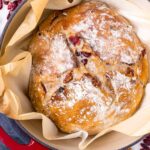
Cranberry Walnut Bread (No-Knead)
This No-Knead Cranberry Walnut Bread is, believe it or not, really easy to make. No kneading or mixer required. The dough rises for 18 hours at room temperature and is baked in a Dutch oven until the crust is beautifully golden brown and crisp. Packed with dried cranberries and walnuts. Makes 1 round loaf.
Servings: 12 slices
Calories: 177kcal
Equipment
- 1 5 to 6 quart dutch oven with lid oven-proof and safe for 450 degrees F
Ingredients
- ½ teaspoon active dry yeast
- 1 ½ cups warm water warmed to 110 to 115 degrees F
- 1 teaspoon granulated sugar
- 2 teaspoons Kosher salt
- 3 cups bread flour, plus 2 tablespoons plus more for surface
- ¾ cup dried cranberries
- ½ cup dried walnuts, roughly chopped
- 1 tablespoon honey
- 1 tablespoon orange zest
Instructions
- Make sure you have an oven-proof 5 to 6 quart Dutch oven with a tight-fitting lid that is safe up to 450 degrees F.
- Dissolve the yeast and sugar with the warm water (110 to 115 degrees F). Let it sit for 10 minutes or until foamed up. If it doesn’t, discard and start over.
- In a large bowl, whisk the bread flour with salt. Add the yeast mixture and honey, and combine until no pockets of flour remain, without over-mixing. Add the cranberries, walnuts, and orange zest. Stir until just combined. The dough will be very sticky and wet, that's normal. Cover bowl tightly with plastic wrap (without touching the dough) and let it rest for 18 hours on your kitchen countertop at room temperature. Yes, 18 hours!
- After 18 hours, the dough will be very wet and sticky. Do NOT punch the dough.
- Transfer dough to a well-floured surface and turn to coat with flour. Sprinkle more flour as needed, and flour your hands also. Gently fold the dough over from the edges to the center to form ball, being careful not to burst the air bubbles trapped inside. Then, turn the dough smooth side up and gently press the sides to re-shape if needed. Carefully transfer to a sheet of lightly floured parchment paper, smooth side up.
- Cover with plastic wrap and let it rest over the counter for 30 minutes (no need to transfer it back to the bowl).
- Meanwhile, place the Dutch oven with the lid inside the oven. Preheat the oven to 450 degrees F for 30 minutes.
- Score an X or any pattern you'd like on the ball of dough.
- Remove the hot pot from the oven, and immediately lift the parchment paper to transfer the dough into the hot pot. Cover with the lid tightly and securely. Bake at 450 degrees F for 30 minutes - during this time, do not open the lid, as you can't let the steam trapped inside escape. Then, remove the lid and continue baking for another 8 to 10 minutes, until the crust is golden brown.
- Remove from oven and lift it up with the parchment paper. Let it cool completely before slicing. Enjoy!
Notes
- Let the dough rise for 18 hours. During this time, the “no-knead” magic (okay, maybe more like science!). During this time, flavors develop too, so the longer the better.
- For reference, anywhere between 16 to 18 hours should be fine. I always go for 18. In theory, the minimum needed is 12 hours, but your bread may not turn out as flavorful and could be a bit dense.
- Dough consistency: The dough will look sticky and wet before and after it rises. That’s normal and preferred. You’re looking for a dough that’s high in humidity so it can create steam as it bakes in the Dutch oven (see below). When you shape it, flour your working surface and hands generously - the dough will be manageable.
- Why you need to use a Dutch oven: The contained vessel for the bread helps to create steam (from the dough, which is high in humidity). This steam is what creates the beautiful, crisp, golden brown crust.
- How to store: I like to store in a semi open paper bag, just like how they do it in the bakeries. The bread needs some air for the crust to stay crusty.
- Freezing: Wrap in aluminum foil and then inside a freezer friendly resealable plastic bag for up to 3 months. Thaw at room temperature.
- More add-on ideas: Pistachios, pecans, pumpkin seeds, raisins, lemon zest.
- Bread flour: This recipe will work with all-purpose flour too, but I’d HIGHLY recommend using bread flour. It has more protein content, which means more gluten and therefore bread with better structure and more height
- Yeast: Use active dry yeast. Do not use instant yeast.
Nutrition
Serving: 1slice | Calories: 177kcal | Carbohydrates: 32g | Protein: 5g | Fat: 4g | Saturated Fat: 0.4g | Polyunsaturated Fat: 3g | Monounsaturated Fat: 1g | Sodium: 391mg | Potassium: 63mg | Fiber: 2g | Sugar: 7g | Vitamin A: 4IU | Vitamin C: 1mg | Calcium: 12mg | Iron: 0.5mg