
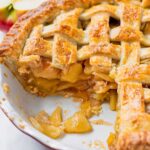
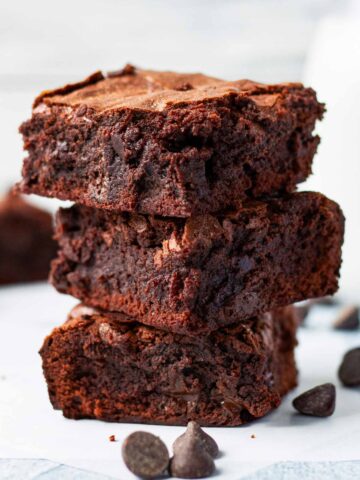
Making apple pie with precooked apple pie filling is my tried-and-true method! I mean, if you know your apple filling tastes good, then you know the entire pie will be amazing!
Precooking the apple pie filling before baking ensures that the filling is never undercooked, soggy, or watery. It’s also a great way to avoid that dreaded gap between the baked top crust and the filling.
Precooking the filling before baking is a sure way to maintain the right consistency, avoid that dreaded watery filling, and test for sweetness. It’s like insurance for the pie!
I still remember…several Thanksgivings ago, I made a truly beautiful apple pie. I let it cool for 3 hours and everything. I then proceeded to cut into it, and the entire thing was swimming in a pool of juice. It was a huge mess and soggy. There was also a huge gap between the top crust and the filling. My heart sank, as you can imagine.
So, I experimented with precooking the filling, and SUCCESS! It works every single time. Perfectly tender apple filling, adjusted to my desired sweetness level, and thickened to perfection. I was thrilled, and I’m so excited to share all the secrets with you!
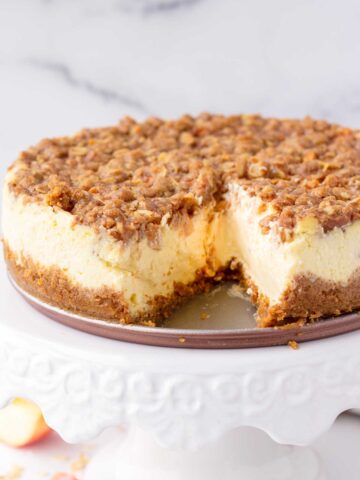
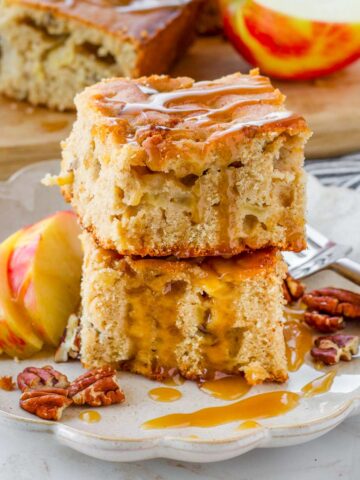
For the holidays, you can also give this beautiful Apple Crisp Cheesecake a try! Or for something simpler, my Fresh Apple Cake is amazing!
Jump to:
Why I Love This Recipe
- Precooking the apple pie filling is the best way to go! It’s like insurance for the pie. I’m sharing all my secrets below!
- My homemade buttermilk pie crust is so incredibly flaky, buttery, and tender.
- This apple pie is make-ahead and freezer friendly. Instructions below!
- The apple pie filling can be frozen and used later.
Why Precook the Apple Pie Filling
- No more undercooked apples: No chance that the middle will be undercooked. In fact, they will be cooked just how you like them.
- Avoid an apple filling that is too watery: Precooking will get rid of extra moisture and ensure that the filling is perfectly thickened before going into the oven.
- Taste and adjust sweetness: Here is where you can make sure the filling is sweet enough. You can even add more cozy spices.
- Avoid the dreaded gap between the top crust and the filling. Sometimes the filling shrinks after the dough has set, leaving a huge gap in between.
Best Apples to Use
Choose your apples wisely. It could make or break your apple pie. There are 2 important things to keep in mind:
Do they hold together in the oven? Some apples hold their shape better than others, providing structure. Good choices: Honeycrisp, Braeburn, Granny Smith. Bad choices: Red delicious.
Are they sweet or tart? This one depends on your preferences. If you like them tart, Granny Smith is the way to go. If you like it on the sweeter side, use Honeycrisp or Braeburn.
Here’s my recommendation: Use both Honeycrisp and Granny Smith. I use about a 3:1 ratio between Honeycrisp (7 to 8 apples) and Granny Smith (2 apples) for a deep 9-inch pie. I like a combination of both sweet and tart, leaning more towards sweet.
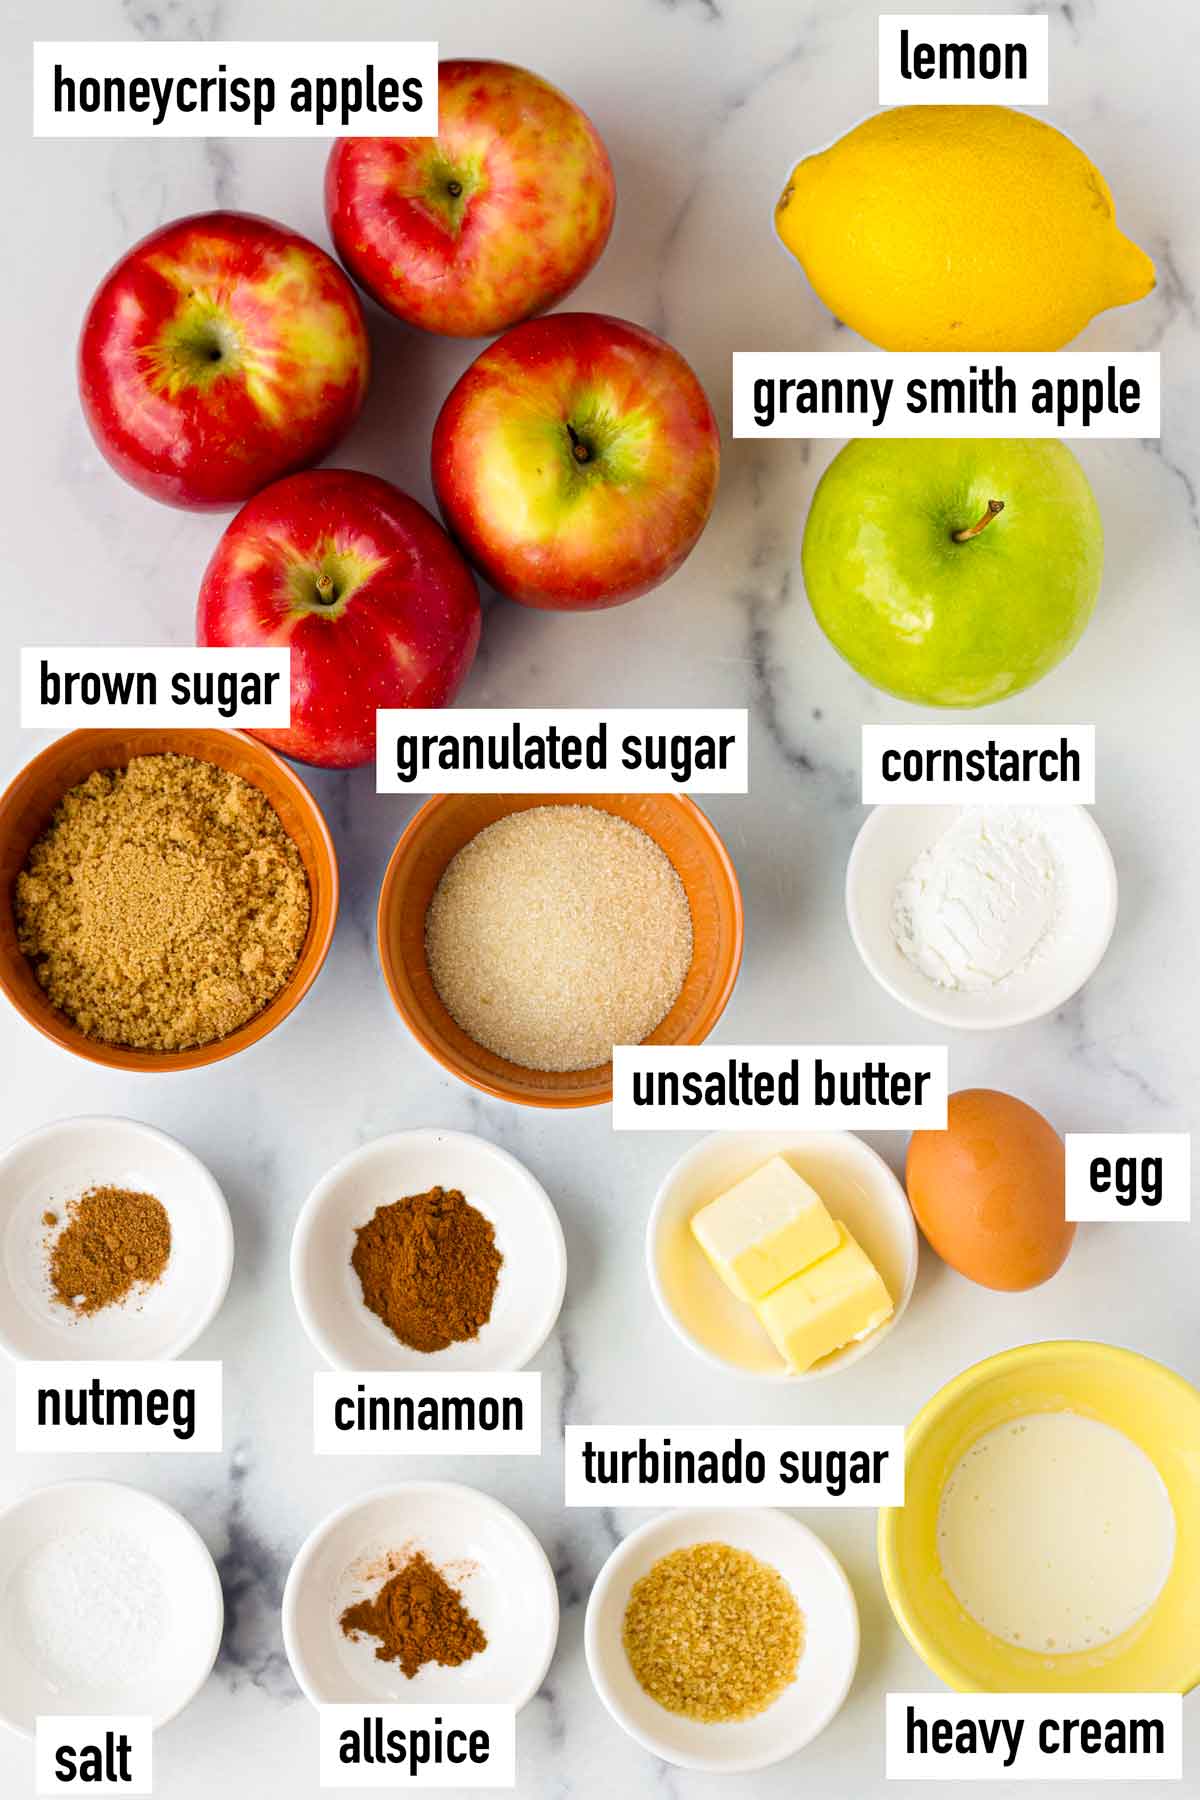
Ingredient Notes
The ingredients needed to make this apple pie with precooked filling are quite simple.
- Pie crust: Try my super flaky buttermilk pie crust. You can also use your favorite store-bought pie crust to save time.
- Apples: You’ll need about 4 to 5 pounds, which is about 8-9 large apples. I use 7 large honeycrisps and 2 granny smiths.
- Brown sugar and granulated sugar: Brown sugar will give it a deep molasses-y flavor and the granulated sugar adds sweetness without overpowering it.
- Nutmeg, cinnamon, allspice: My favorite spice trio for fall bakes!
- Salt: Salt always brings out the flavors in baking.
- Lemon juice and lemon zest: Not only does the lemon juice add flavor and brightness, it also prevents the apples from browning.
- Cornstarch: Thickens the juices from the apples.
- Unsalted butter: For flavor and richness.
- Egg wash: Made of egg and heavy cream or milk. Using cream or milk will get you a beautiful shiny golden brown color.
How To Make The Best Apple Pie
Baking a whole pie is surely a labor of love, but it’s so worth it, especially around the holidays. Here’s how I make it.
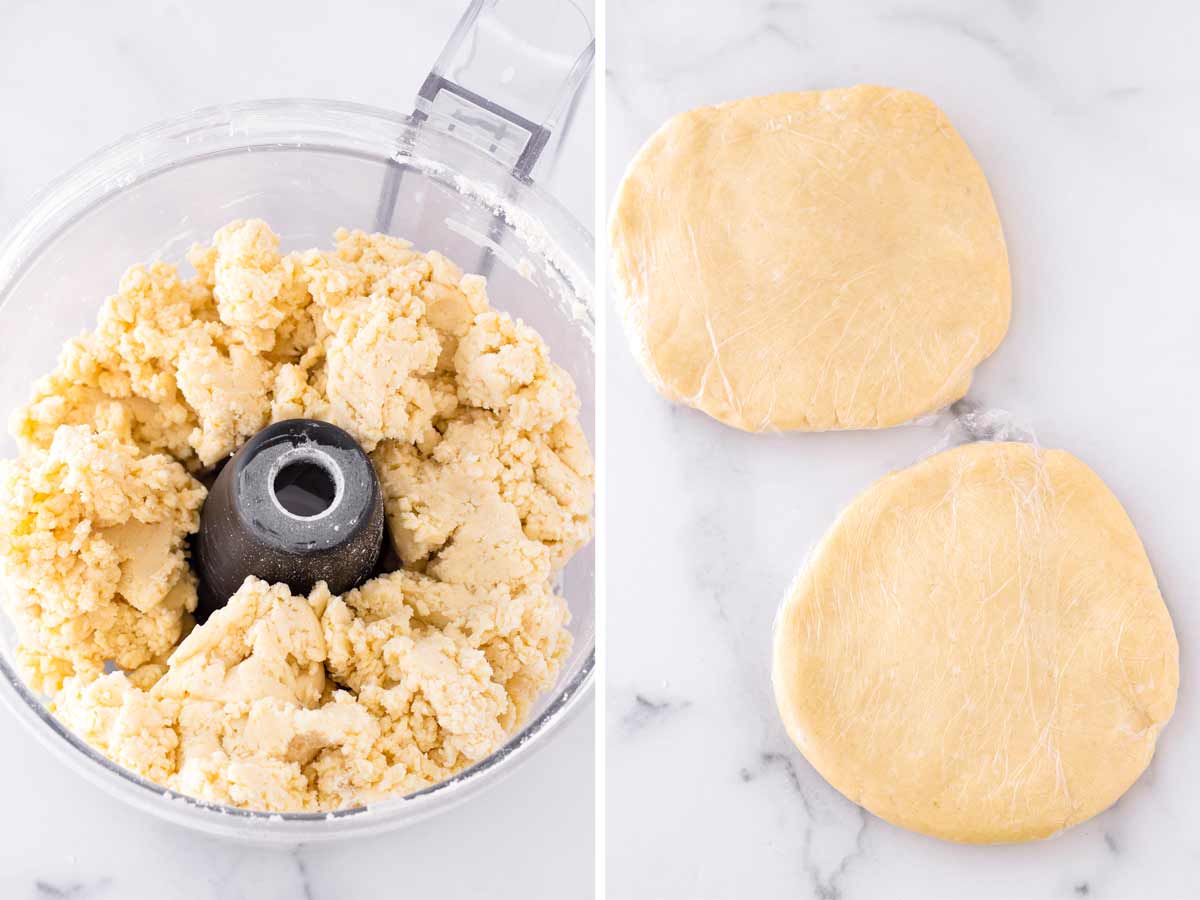
Step 1 | Make the dough and chill
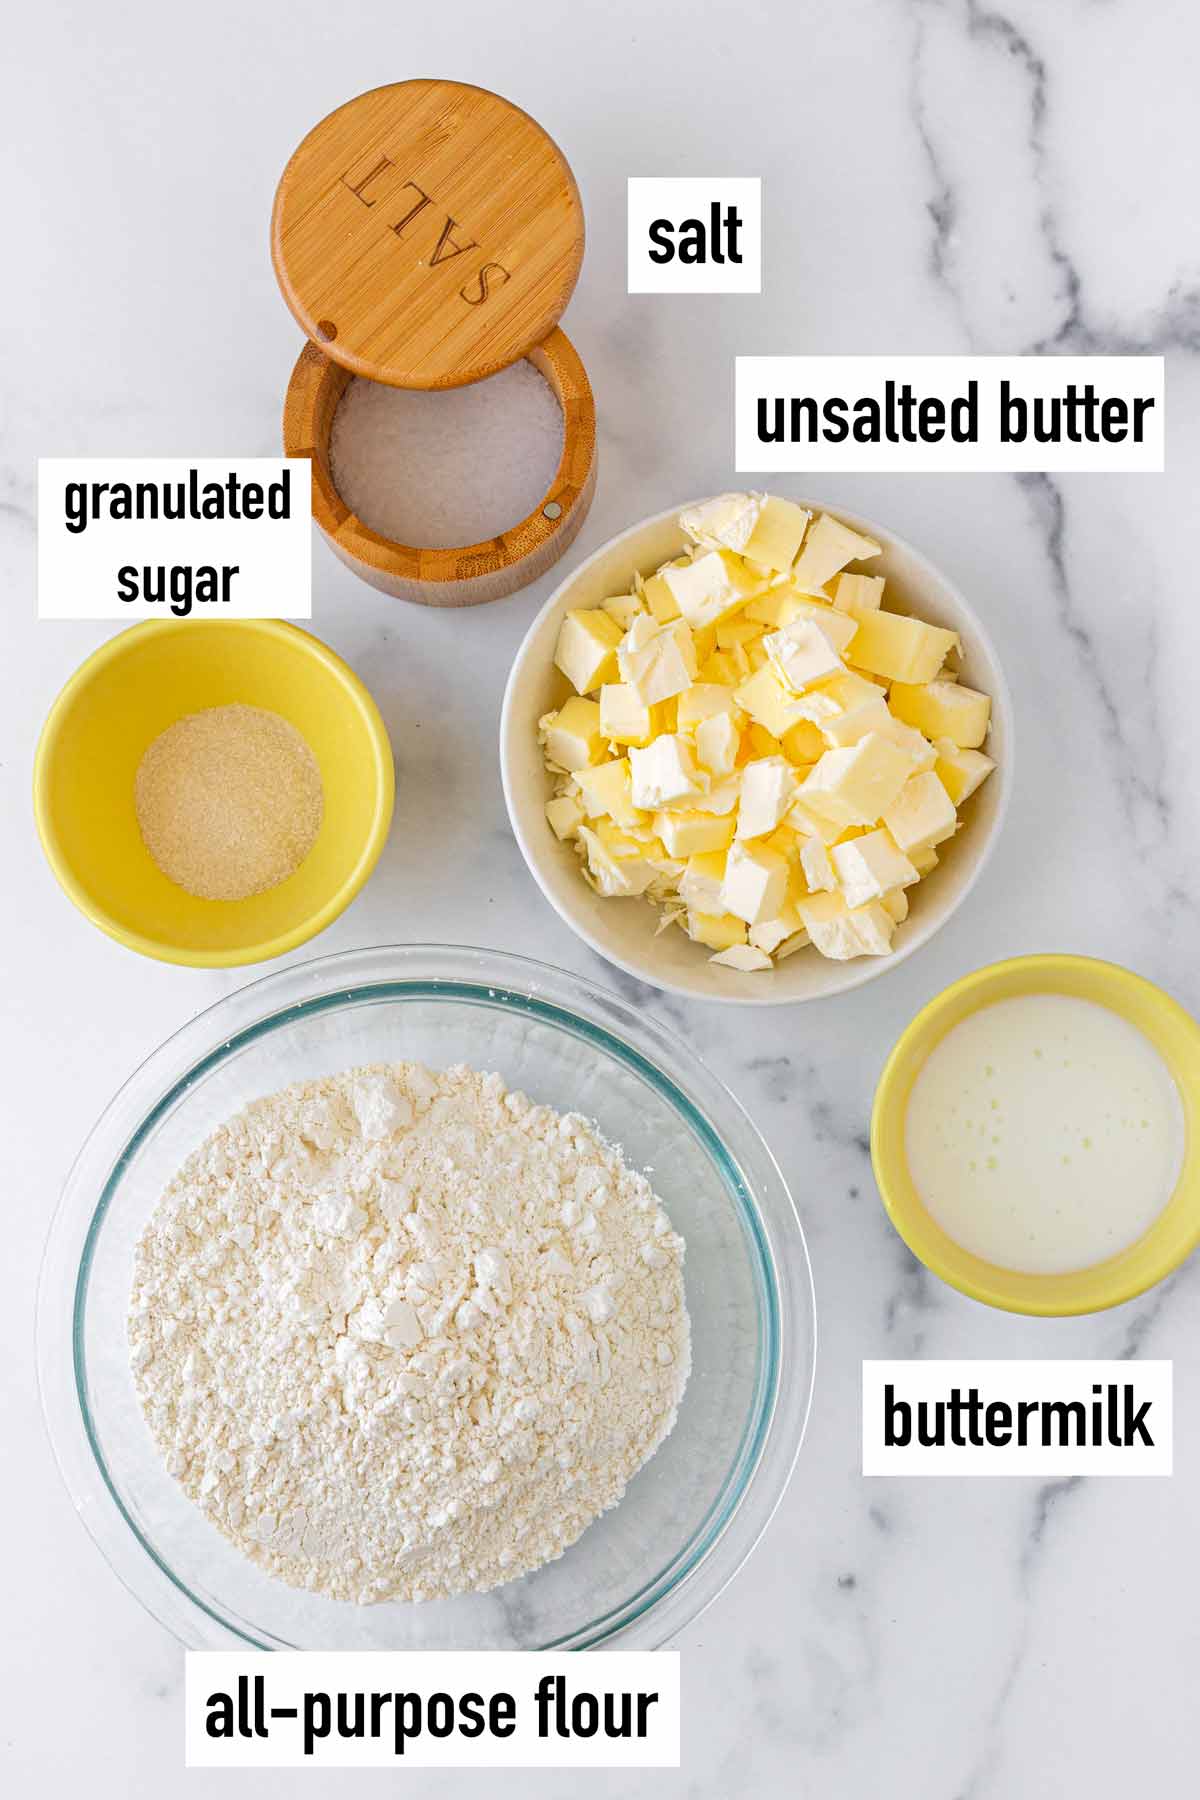
This recipe uses my favorite buttermilk pie crust, which makes a double crust (top and bottom). I really like how flaky and tender this pie crust is. The buttermilk gives it a touch of richness and helps it brown better.
In a food processor, pulse butter with flour until pea-size coarse meal forms. Then, add the buttermilk and run the food processor continuously for a few seconds until a dough forms. Divided it up into two equal-sized discs. Wrap each disk with plastic wrap and chill in the fridge for at least 2 hours or overnight.
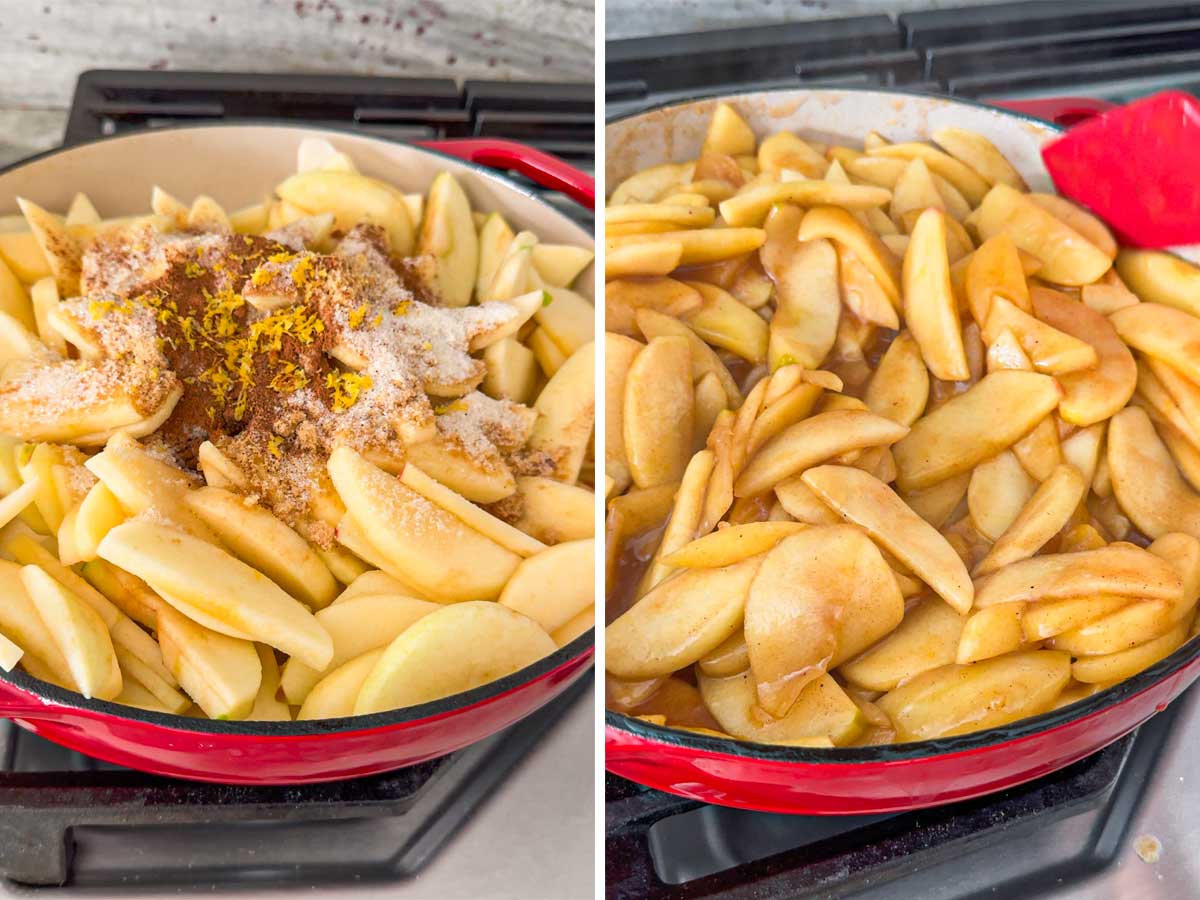
Step 2 | Cook the filling
Make sure to peel and slice the apples the same size for even cooking.
In a large deep pan, melt butter and toss the apples with the brown sugar, granulated sugar, cinnamon, nutmeg, allspice, lemon juice, lemon zest, and cornstarch. Cook, stirring carefully, for about 12 to 15 minutes, or until the apples are tender and softened, and the juices are released. If you want them softer, cook them longer.
Dissolve the cornstarch with about 2 to 3 tablespoons of room temp water, and slowly stir it into the apple mixture, stirring to combine with the juices from the apples. It should thicken. Adjust the amount of cornstarch as needed (some apples release more liquid and need more thickening).
Let it cool completely at room temperature. Do not assemble the pie until it has cooled down.
Step 3 | Roll out dough and assemble
Once the filling has cooled down, we can start assembling the apple pie! Preheat the oven to 400 degrees F.
Grab a 9-inch round pie pan. Roll out one of the dough discs to a 12-inch circle (about ¼ inch thick) using a rolling pin on a floured surface.
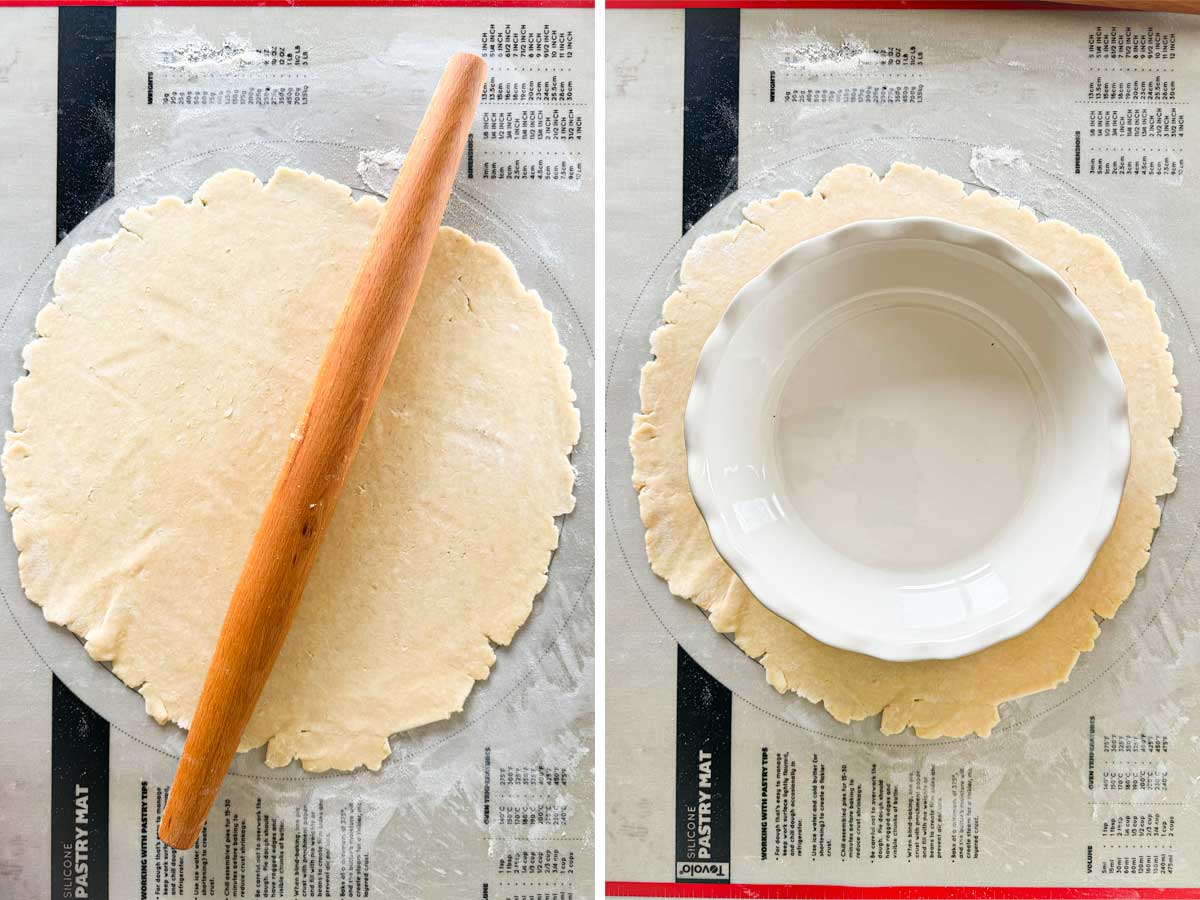
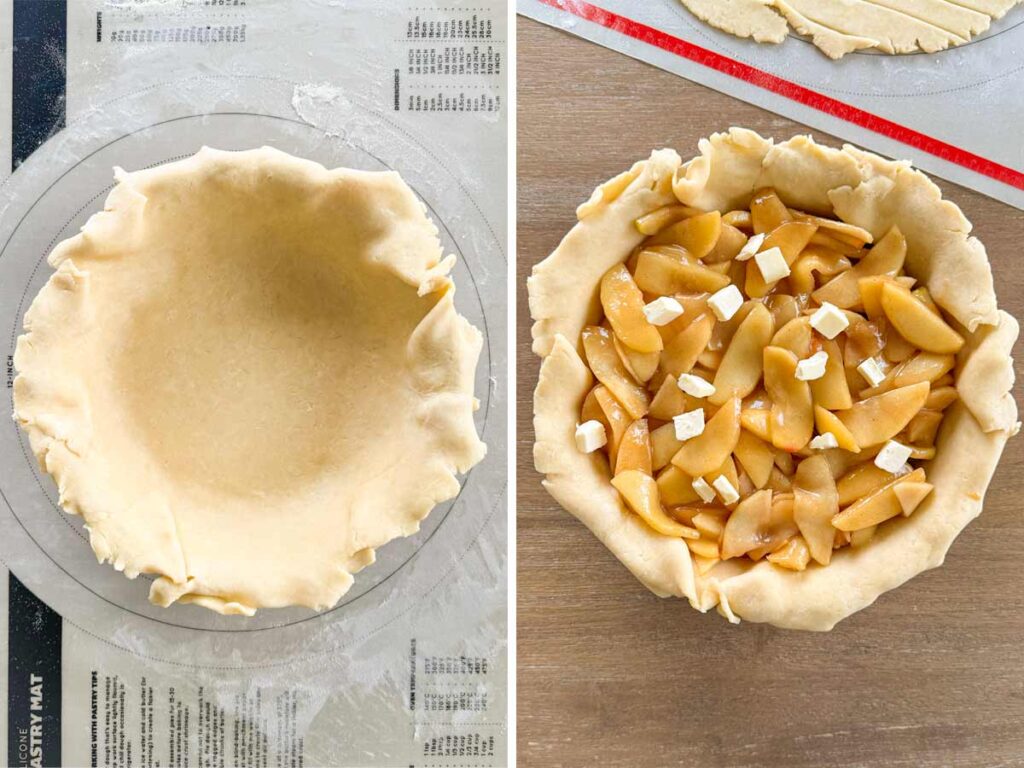
Transfer dough onto the pie pan. Then, spread the cooled down precooked apple filling evenly on top.
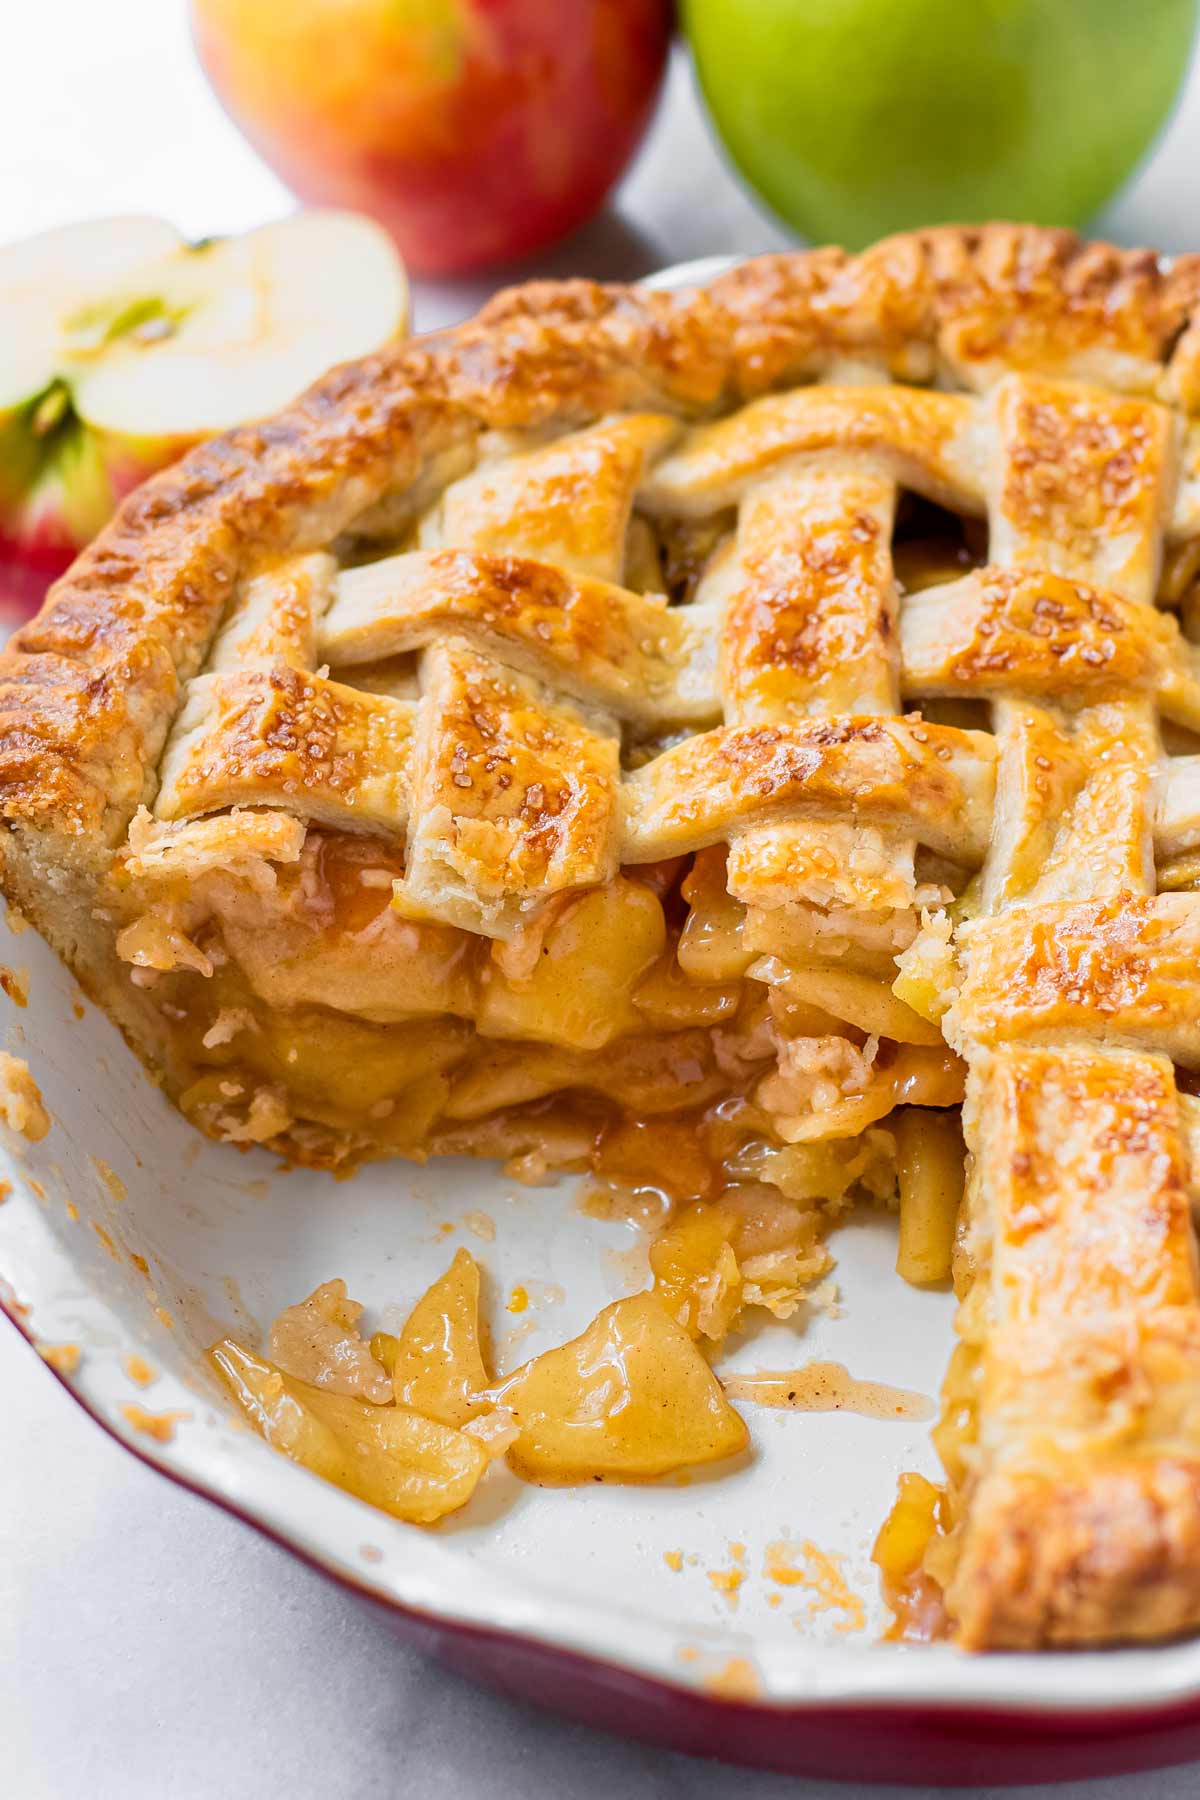
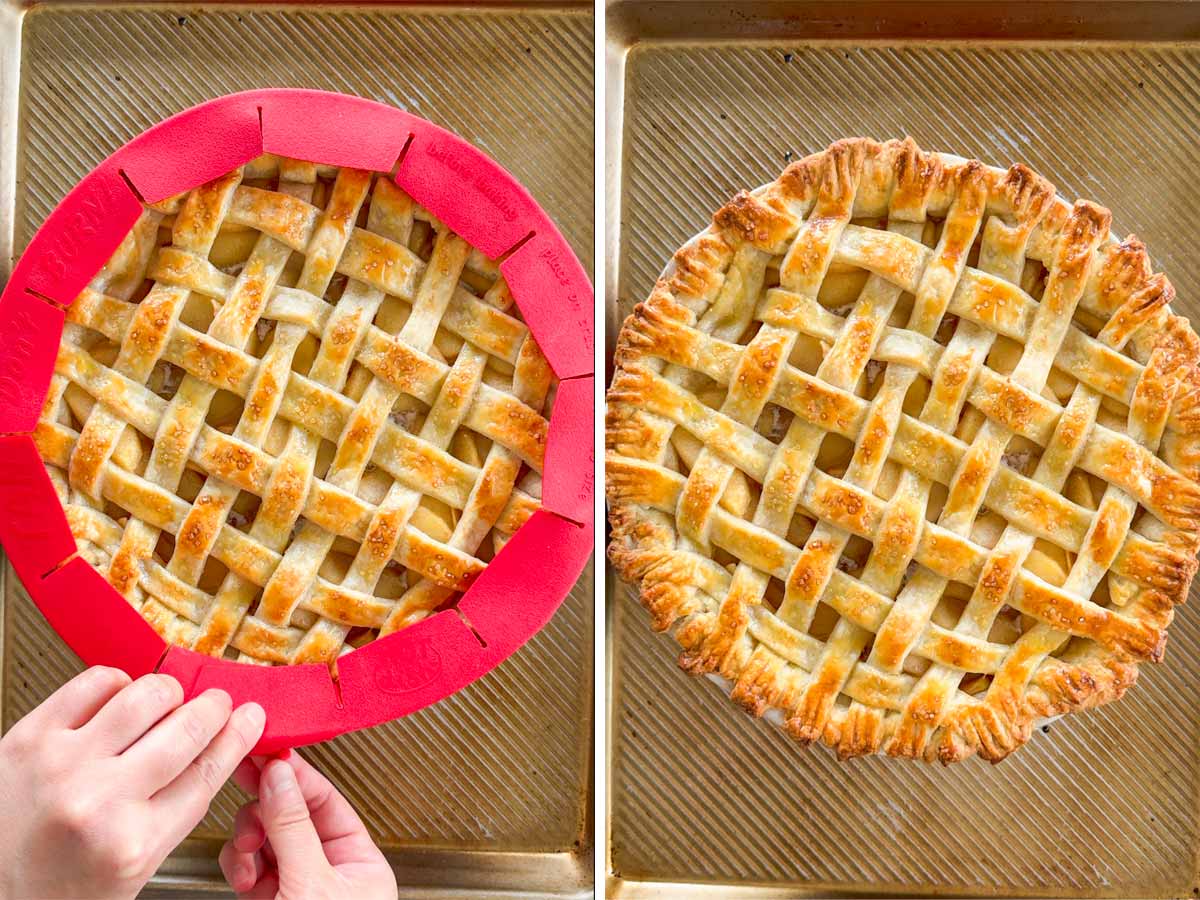
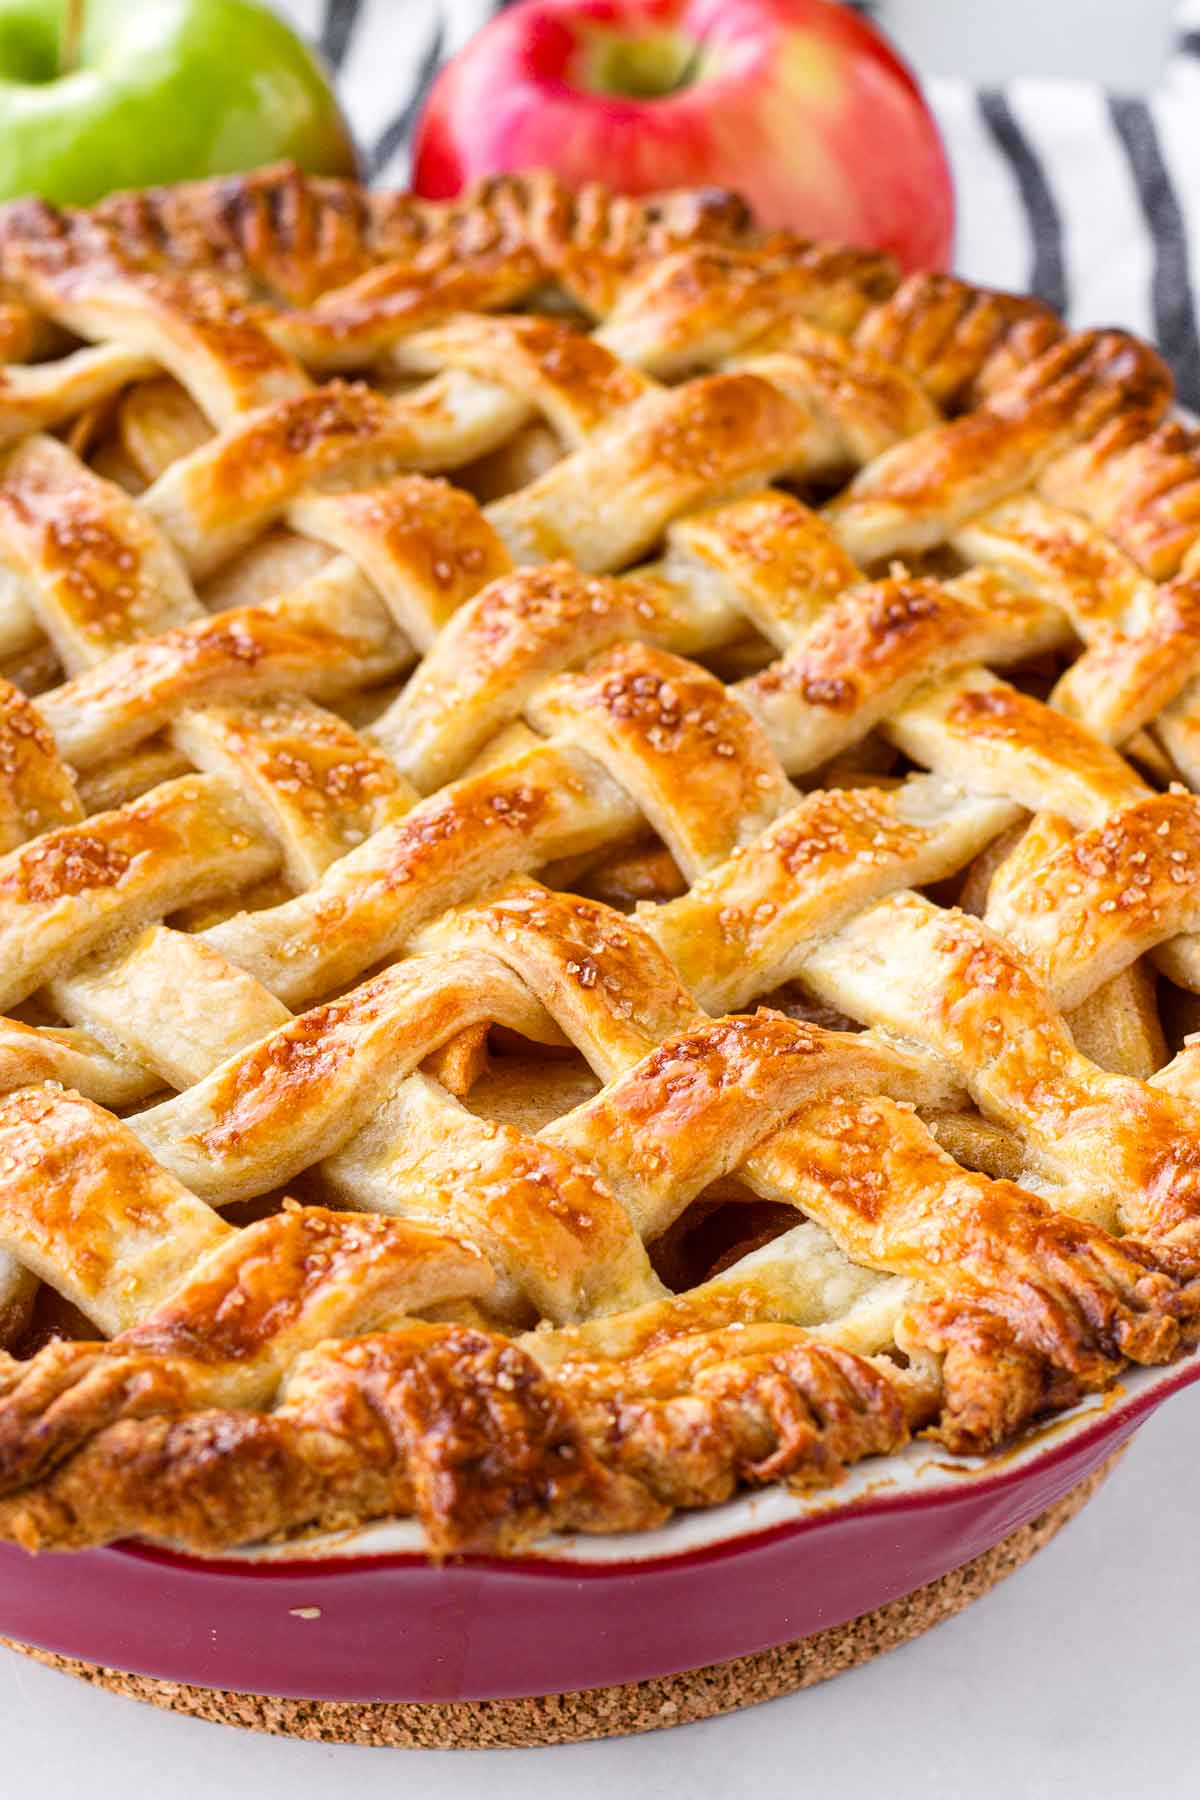
Step 4 | Make the lattice crust
If you want to make a lattice pie crust design, I included instructions and photos below. Alternatively, you can also just place the second dough on top and cut a few slits for ventilation.
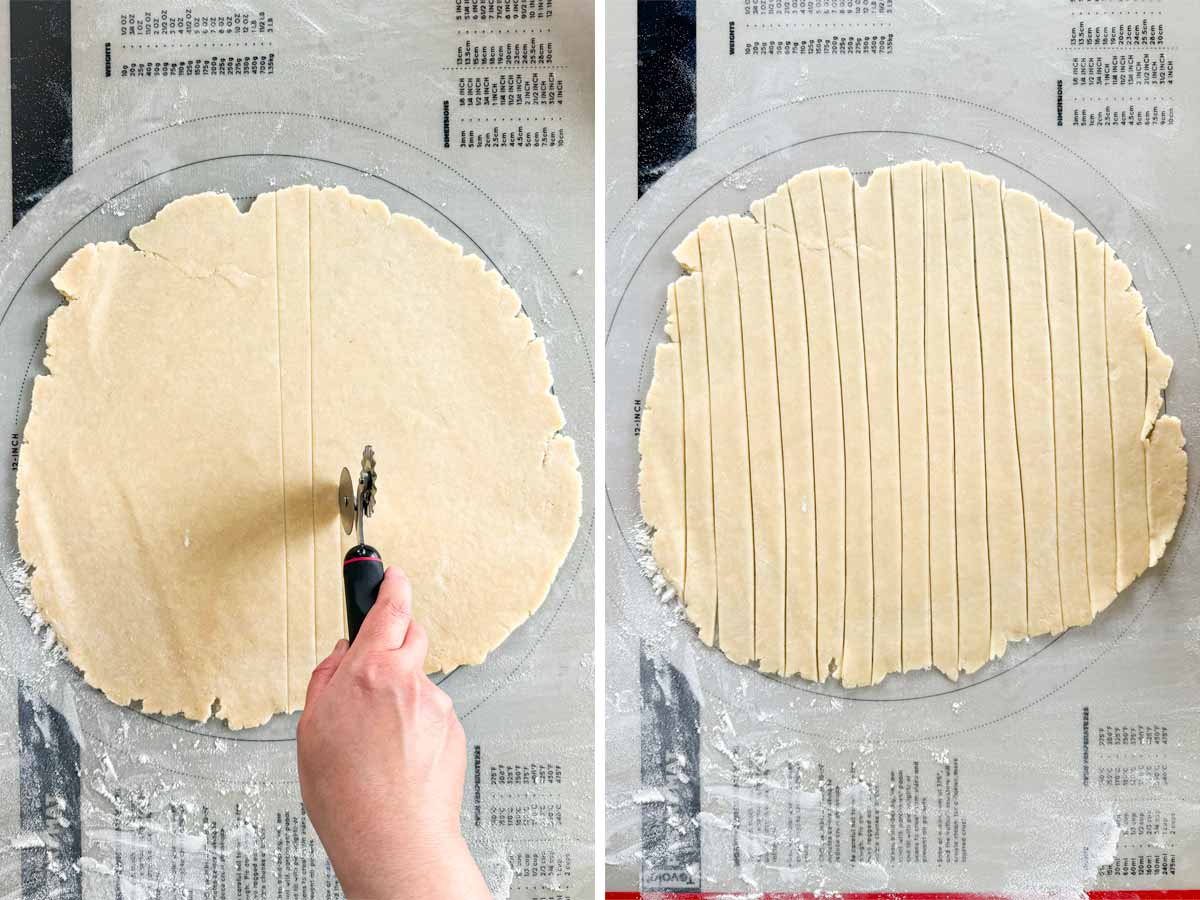
Roll out the second dough disc to a about 10-inch circle. Cut 12 strips of equal width using a pastry wheel or a pizza cutter.
Cut the remaining 1 tablespoon of cold butter into small cubes. Arrange on top of the filling evenly.
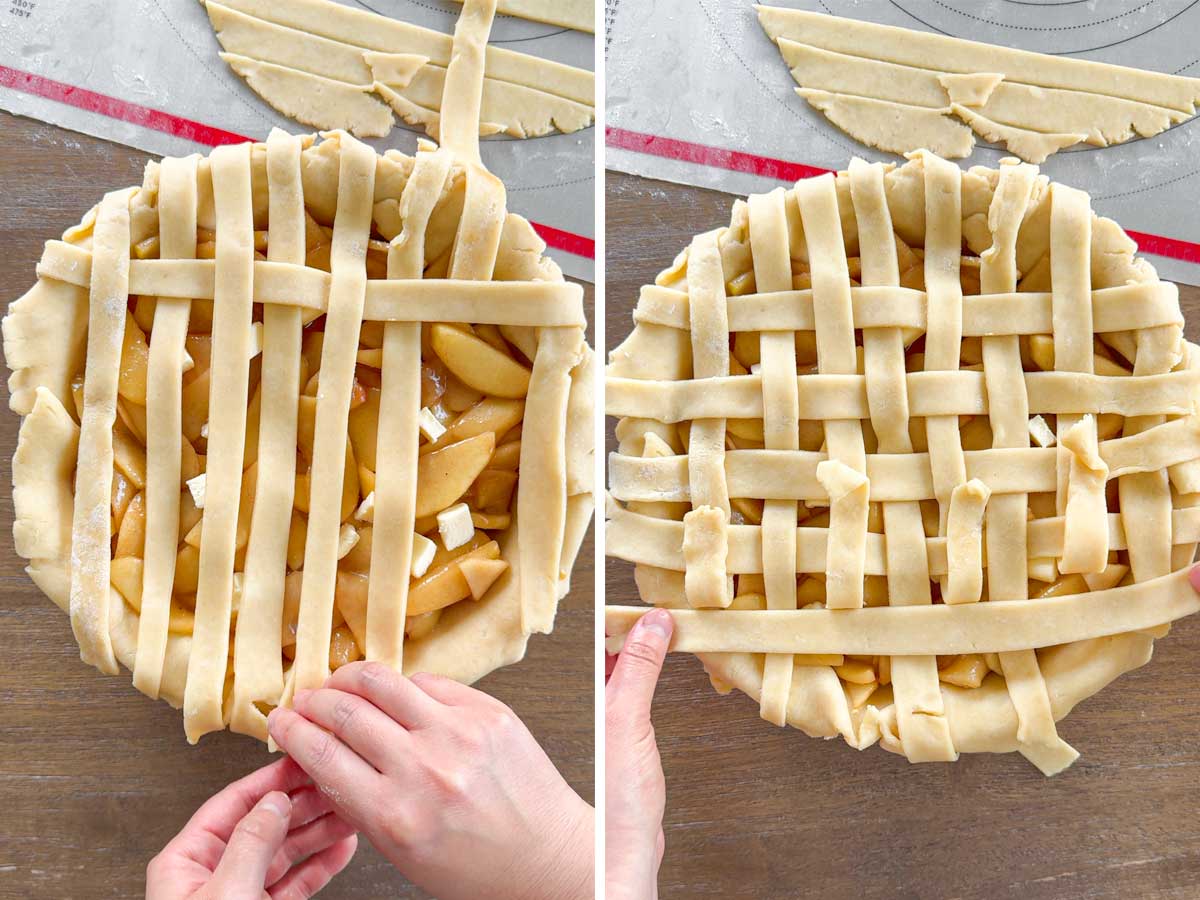
Lay each 8 strips (alternating) on top so that they are evenly spaced. Then fold back only 3 of those strips, alternating. Place another strip perpendicular to the ones you folded back. Then fold those back into place.
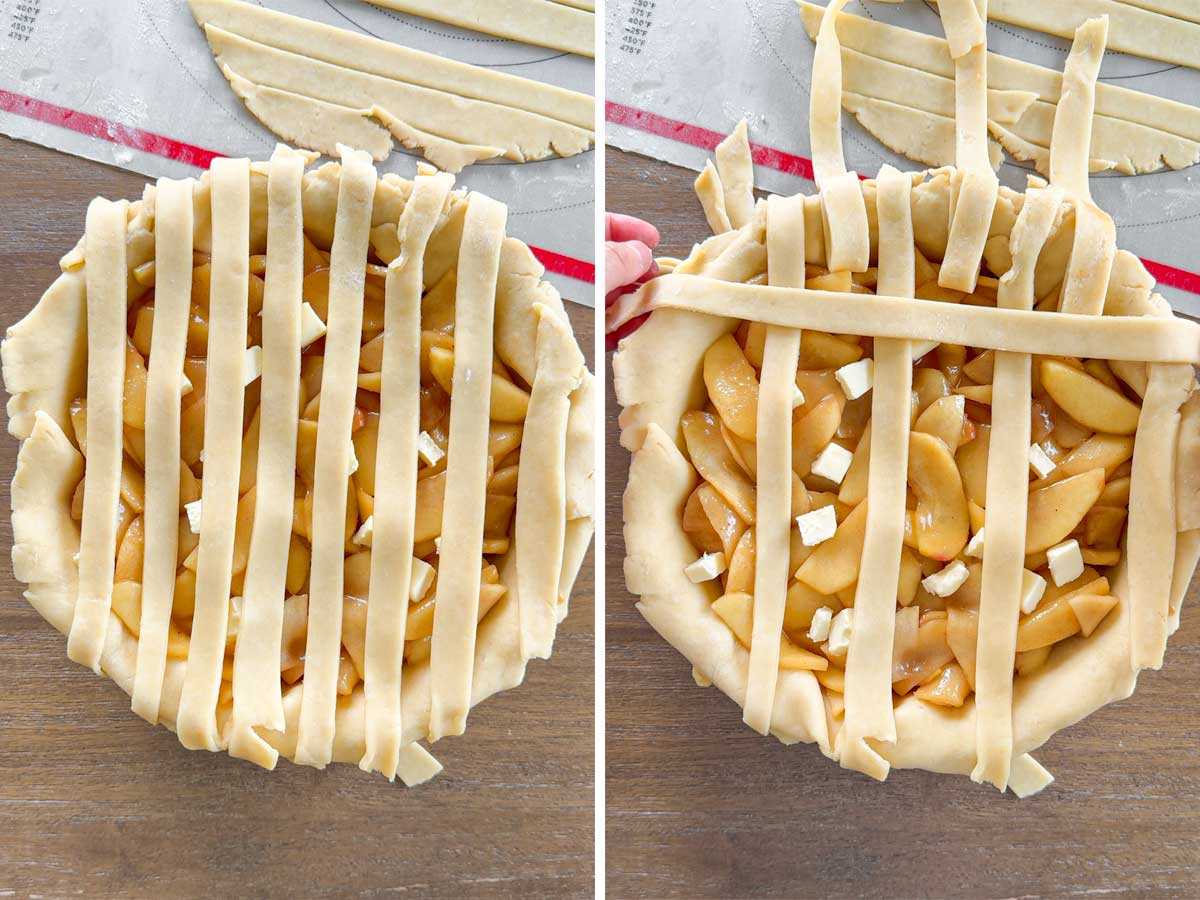
Fold the other 3 strips back, and lay another strip perpendicular on top. Then fold them back into place. Repeat until you finish using all the strips. See pictures for a visual representation. As you can see, it’s not easy to explain in words…
Step 5 | Bake
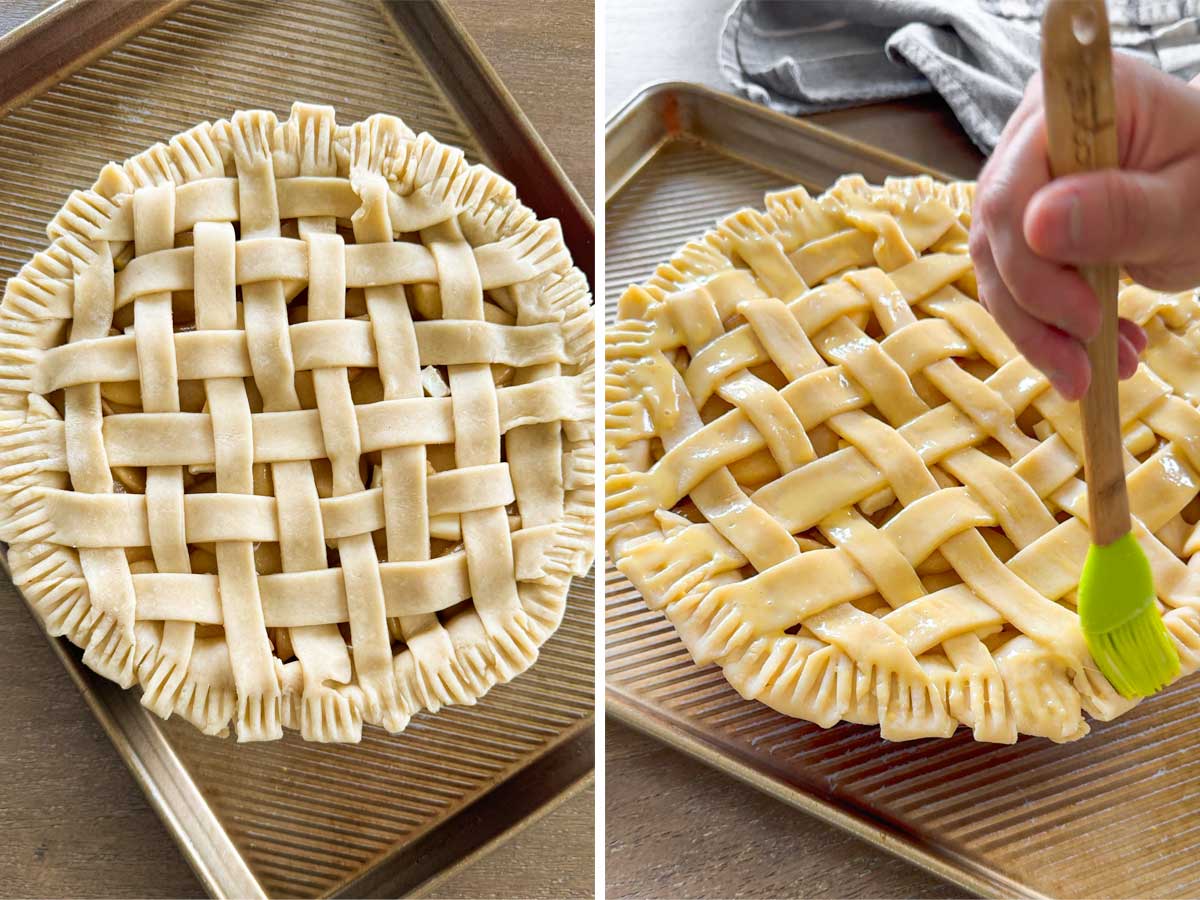
Trim any overhang or excess dough. Seal edges with a fork or with your fingers. Brush the pie with egg wash (whisk heavy cream with egg), and sprinkle coarse sugar on top.
Place the pie on top of a large sheet pan to catch any dripping juices. Bake for 20 minutes at 400 degrees F. Then, remove from the oven and put a pie crust shield around the edges or cover edges with foil. Lower oven temperature to 375 F and bake for an additional 30-35 minutes until golden brown and bubbly.
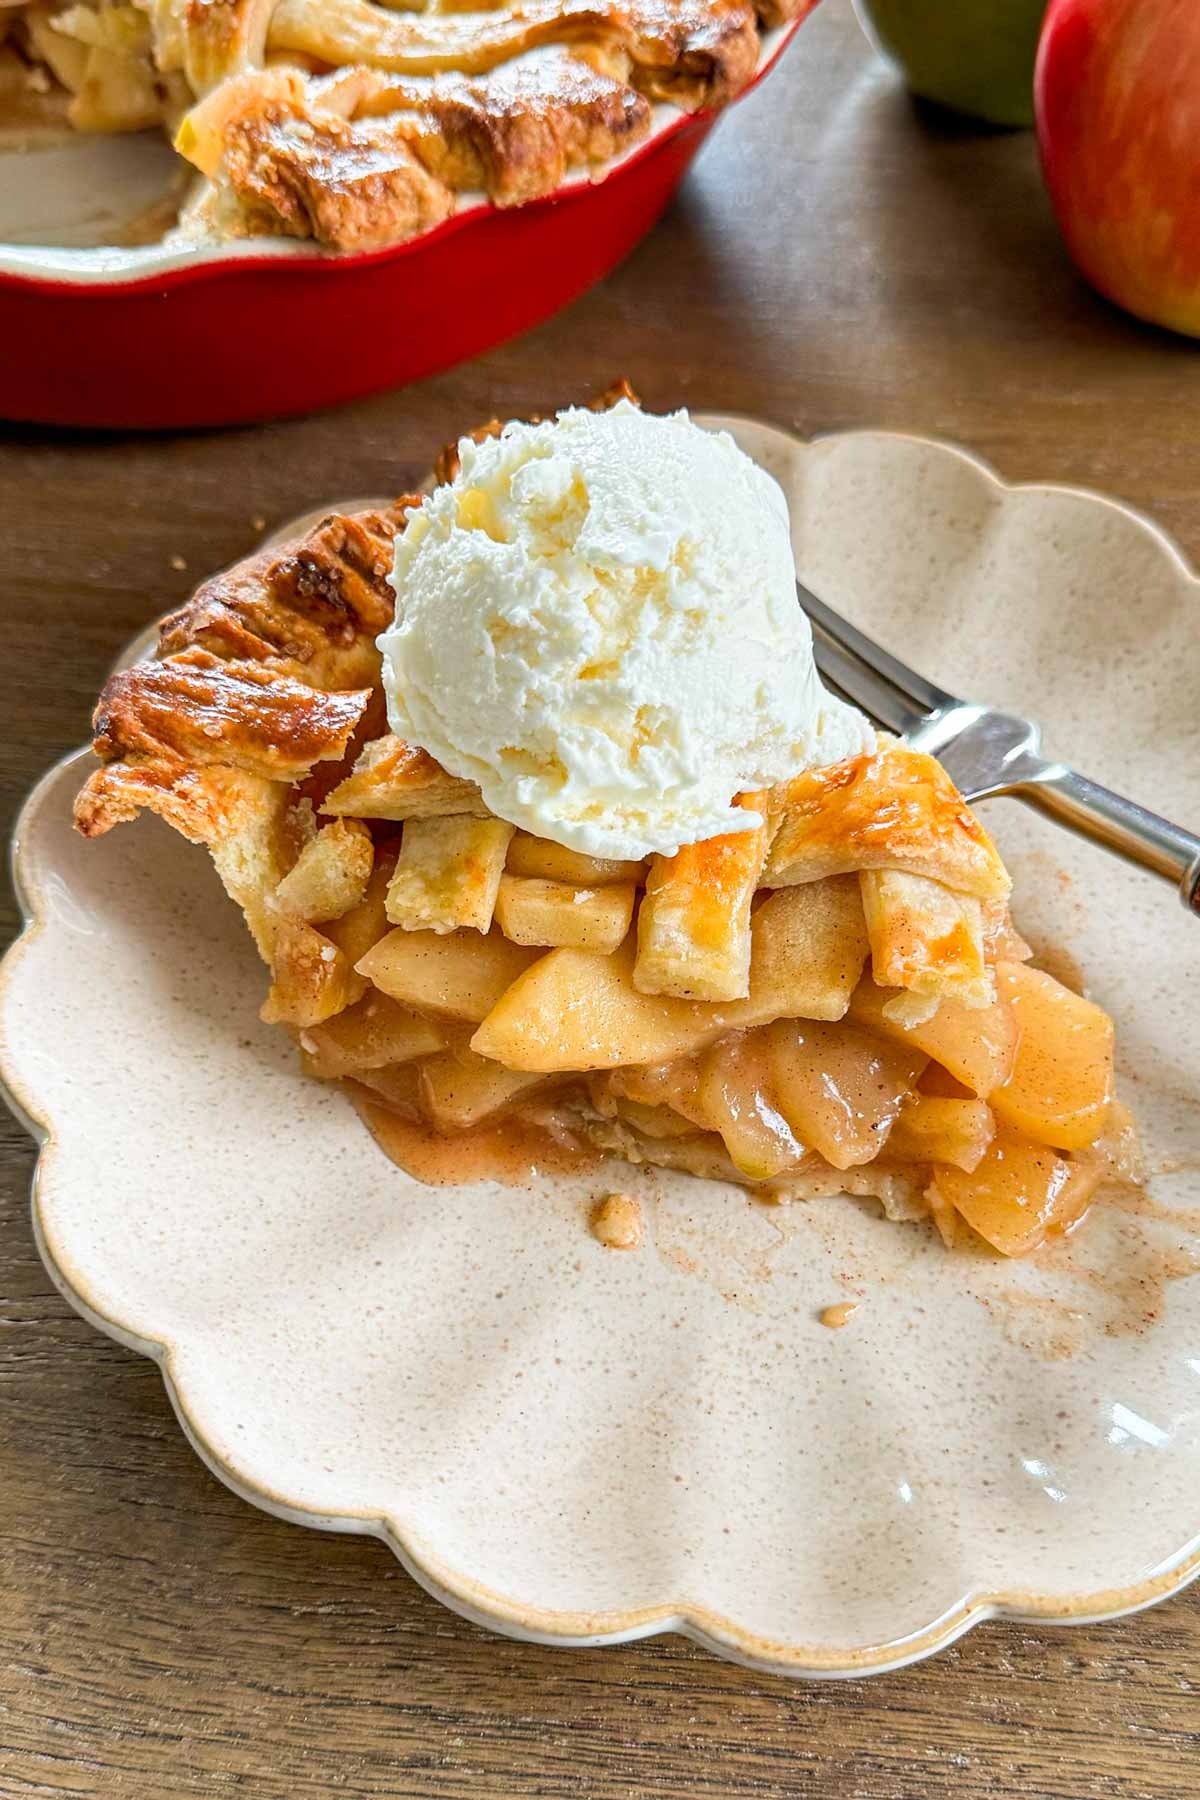
Step 6 | Let it cool down for 3 hours
Now, this is important: Let it cool on a wire rack for 3 hours before serving! If you cut into it before it has cooled down, it will fall apart. Don’t make the same mistake I’ve made haha. Enjoy!
Tips for Success
- The best apples to use are a mix of honeycrisp, which are sweet, and granny smith, which add a touch of tartness. Both hold their shape pretty well when cooked.
- Use 4 to 4.5 pounds of apples. About 8 to 9 large apples.
- Some apples release more juice than others, so you may need to adjust the amount of cornstarch. Most of the time, I only need 2 tablespoons of cornstarch diluted with about 2-3 tablespoons of room temp water.
- If your apples didn’t release enough liquid, you can add some apple cider (not apple cider vinegar).
Make Ahead Tips
Make the filling ahead: Prepare only the apple pie filling up to 3 days ahead. Let it cool down completely, and refrigerate in an airtight container. Then assemble.
Make the crust ahead: Make the pie dough as directed. After you’ve wrapped the disks of dough with plastic wrap, refrigerate for up to 5 days. You can also freeze it for up to 2 months. Thaw in the refrigerator overnight before using.
Completely bake ahead: Since the pie needs to cool down for 3 hours anyway, bake it 1-2 days ahead.
Note: I would not recommend assembling the apple pie and leaving it unbaked overnight because the bottom will get soggy.
Freezing Instructions
The apple pie filling can be frozen for up to 2 months Thaw in the fridge before using.
I’ve also been asked if it’s possible to freeze the assembled unbaked pie. I’ve tested doing this and it doesn’t work as well. However, you can freeze a baked pie for up to 3 months. Thaw at room temperature and serve.
Recipe FAQs
I really like to use my silicone pie crust shield, but if you don’t have one, you can carefully wrap the edges with foil.
I like a combination of honeycrisp apples (about 7 large) and granny smith (2 large). Honeycrisps hold their shape really well and are sweet, and granny smiths add a touch of tartness while also maintaining their shape.
You can bake the entire pie from start to finish the day before or about 2 days ahead because it needs to cool down completely first before cutting. I would not recommend assembling to bake later – the bottom crust might get soggy.
No need. Since the precooked apple filling will already be thickened and cooled down, the bottom crust won’t get soggy. However, feel free to parbake it for about 15 minutes before assembling.

I’d love to hear from you! If you loved my recipe, please consider leaving a 5-star rating and a comment down below. Sign up for my newsletter and follow along on Instagram, Facebook, or Pinterest
Apple Pie with Pre-Cooked Apple Filling
Equipment
Ingredients
Pie Crust
- 2 ½ cups all-purpose flour
- 1 tablespoon granulated sugar
- 1 teaspoon Kosher salt
- 1 cup very cold or frozen unsalted butter, cut into small cubes - (2 sticks)
- ⅓ cup cold buttermilk
Apple Pie Filling
- 4 pounds large apples - about 9 large apples, I use honeycrisp and granny smith, see notes below
- 2 tablespoons cold unsalted butter, divided
- ½ cup brown sugar
- ¼ cup granulated sugar
- 1 teaspoon ground cinnamon, plus more if desired
- ⅛ teaspoon ground nutmeg, plus more if desired
- ⅛ teaspoon ground allspice, plus more if desired
- ¼ teaspoon salt
- Zest of 1 lemon
- 2 tablespoons fresh lemon juice
- 2 tablespoons cornstarch
Other
- 1 large egg
- 1 tablespoon heavy cream or whole milk
- Coarse sugar or turbinado sugar - for sprinkling
Instructions
Make the pie crust
- Combine flour, sugar, and salt in a food processor by pulsing a few times. Add the very cold butter cubes and pulse a few times until a pea-size coarse meal forms. Add the buttermilk and run the food processor continuously for several seconds until a dough forms. At first, it will look like it's not coming together but it will.
- Transfer onto a non-floured clean surface. Press to form a dough. Divide the dough in half. Roll each half into balls and flatten into thick disks. Wrap each disk with plastic wrap and chill in the fridge for at least 2 hours or overnight. Before using, let it sit on the counter for 15 minutes to slightly soften it.
Make the apple pie filling
- Peel apples and cut out the core. Then cut into ¼ inch slices. They should all be cut to the same size for even cooking.
- In a large deep skillet over medium heat, melt 1 tablespoon unsalted butter and add the sliced apples, brown sugar, granulated sugar, cinnamon, nutmeg, allspice, salt, lemon juice and lemon zest. Cook, stirring for about 12-15 minutes until apples have slightly softened but not lost their shape.
- Dissolve cornstarch with about 2-3 tablespoons of room temp water, and slowly stir it into the filling, stirring to dissolve with the juices. It will start to thicken. Bring to a simmer and cook for an additional 3 minutes until juices thicken. If not thick enough, add more cornstarch slurry little by little, stirring. Note: The amount of cornstarch depends on the amount of juices released by the apples, so add gradually.
- Set aside and let cool at room temperature. Tip: to speed up the cooling process, transfer the apple filling to a large shallow bowl or a large pan.
Assemble the pie and bake
- After the filling has cooled down, preheat oven to 400 degrees F.
- Cut remaining 1 tablespoon of cold butter into small cubes. Set aside.
- Get a 9-inch round pie pan ready. Roll out the dough to a 12-inch circle using a rolling pin on a floured surface to about ¼ inch thick. Repeat for the second disk.
- Transfer dough to a 9-inch pie pan. Fill with the cooled apple pie filling and dot with the remaining 1 tablespoon butter cut into small cubes. Cover the pie with the second rolled out dough. Trim any overhang or excess dough. Seal edges with a fork or with your fingers. Make a few slits at the top to let the steam escape.
- Alternatively, you can make a lattice pattern. For instructions and visuals, see the “Make a Lattice Pie Crust” section above.
- Make the egg wash by whisking the egg with heavy cream or milk. Brush the pie dough with egg wash and sprinkle with coarse sugar if desired.
- Place pie on a large baking sheet and bake for 20 minutes at 400 degrees F. Remove pie from oven and put a pie crust shield or cover edges with foil. Lower oven temperature to 375 F and bake for an additional 30-35 minutes until golden brown and bubbly.
- Let it cool on a wire rack for 3 hours before serving. Trust me, if you cut into it before it has cooled down, it will fall apart (been there, done that). Enjoy!
Notes
- Choice of apples: I like a combination of honeycrisp apples (about 7-8 large) and granny smith (2 large). Honeycrisps hold their shape really well and are sweet, and granny smiths add a touch of tartness while also maintaining their shape. Do not use Red Delicious apples – they will disintegrate.
- Lattice pie crust design: This design pattern is optional. If you want to keep it simple, just place the second crust on top, press the borders, and cut a few slits to allow for venting.
- Make ahead: Since the pie needs to cool down to 3+ hours anyway, I always bake it 1-2 days in advance. Store on your kitchen counter, covered, at room temperature.
- Prep ahead: The pie crust can be made up to 5 days in advance and stored in the refrigerator. The apple pie filling can be made up to 3 days in advance; let it cool completely and store in an airtight container in the refrigerator.
- Freezing: I would not recommend freezing an unbaked pie, but you can freeze a baked pie for up to 3 months. Thaw at room temperature.
- Other apples you can use: Braeburn. If you want more tartness, use more granny smiths.
- Additional spices: Feel free to add extra spices you like.


Denise says
Hi, Can I prepare the filling 1-2 weeks ahead and freeze? Would I thaw it for a day or two before using? Will freezing change the texture of the apples? Thanks!
Tania says
It’s fine to make ahead and freeze the filling. Thaw it in the fridge overnight. Texture may change a just a tiny bit, but nothing too major. Let me know how it goes! 🙂
Marianne Lewis says
Hi Tania, this is my new favorite apple pie recipe, just delicious. My question is, can I freeze this pie if I blind bake the bottom crust first? assemble with the pre-cooked filling and an unbaked top crust, or should I forgo baking the bottom crust first?
Tania says
Hi! You don’t have to blind bake the bottom crust first. Make sure the filling is completely cooled down before filling the pie. Once the unabaked pie is prepared, wrap with aluminum foil and then in a large ziploc bag for up to 3 months. To bake at a later day, remember not to thaw it or else it will become soggy. Bake time may need to be a bit longer because the apple pie is frozen. And finally, remember to cover the edges with pie crust shield or foil! 🙂
Amber says
I only used the filling recipe but it was delicious and cooked to perfection! My family loved it. I somehow ended up with enough filling for two pies (using 9 apples), so now I have one in the freezer to bake later!
Tania says
Thank you so much! Glad to hear everyone loved it!
Henricus Henkes says
The pie looks wonderful…..although the bottom crust looks raw. It has not browned and looks the same as before baking. Going to cut into it later today. I baked it in a Pyrex pie plated. Any thoughts?
Tania says
Hmm I’m not sure why that could have been. I’ve baked it on pyrex pans before and it’s fine. Did you bake it in the middle rack of the oven? I always make sure it’s in the middle rack.
Deborah L Thurston says
I always use a metal pie pan which I put on top of a pre heated sheet pan. I preheat the sheet pan while the oven is coming up to temp. The heat from the bottom lets the bottom crust get a fast start on baking. BTW, this is the best apple pie I have ever made!
Steven says
Used the filling portion for apple empanadas ( or little hand held apple pies). Turned out wonderfully, thank you for do this!
Tania says
That’s awesome to hear!
Ashley says
Hello, do you have to precook the pie crust before adding the filling?
Thanks
Tania says
Hi Ashley! No, you don’t have to precook the pie crust.
tommy gibbons says
It’s in the oven now, ready for the 375 deg. I’ll let you know what tomorrowday. After all these plus comments, I’m psyched.
tommy gibbons says
Hey, hear I am with the good news. Pie was best I’ve had in so long. Making another today, apples are cooked and cooling down, dough is in ice box. I’ts raining out here in E. Ky. today, dogs [3] are staying close, thunder. Bye and God bless ya’ll.
Tania says
Thank you so much, Tommy! I am so happy you liked the apple pie. Take care!
Olga says
Hello Tania!!!!!
I love apple pie, the ones in the red box, they sell in supermarkets and some grocery stores is the one I got addicted to, I have tried some “home baked” they did not tickle my enamel.
For over 4 decades dreamed of baking an apple pie ? because of the virus I accumulated over 20 apples?? they were spoiling. Yesterday decided to do it read your recepie, problem, aside from overly ripe these are not apples for pies, no matter lets go.
Your recepie is cooling down as I type, but I already taste it. I do not have a drooling emoji. TANIA!!! It is fantastic inspite of the apples. All I did was cut the cooking time, I cut them too thin for my taste beside that ??????? my very first apple pie a blow out succes.
Tank you Tania
You the woman
The pie woman
????
Olga
Tania says
Hi Olga, I am SO happy to hear!! And thank you for your kind comment. Waiting for the pie to cool down is always the hardest part, isn’t it?
Katie says
Is it possible to make the filling and crust, assemble the pie, freeze it uncooked, and cook it at a later date?
Tania says
Hi Katie! Yes, I think so! Make sure the filling is completely cooled down before filling the pie. Once the unabaked pie is prepared, wrap with aluminum foil and then in a large ziploc bag for up to 3 months. To bake at a later day, remember not to thaw it or else it will become soggy. Bake time may need to be a bit longer because the apple pie is frozen.
Your Majestry says
I have made the pre cooked before. And I make it ahead and freeze the assemble pie and it comes out wonderful. I am trying your recipe for this Thanksgiving!
Angela Brunette says
Delicious! Thanks!
Shakira says
Hi I didn’t see baking instructions… maybe I missed it
Tania says
Hi! Baking instructions are in step 7 🙂
Tiffany R. says
I have never made a pie before EVER! I tried 2 completely separate recipes. This recipe came out so PERFECT. My mom made an apple pie but didn’t precook the apples and when we cut into her pie there was a lot of juices in the dish – which made it look runny – and made the crust soggy overnight. This recipe – the pie looked stuffed with apples, there was NO runny fluids at all, my grandmother said that this recipe is worthy of winning pie contests :-), and 2 days after making the pie the crust is still good – the apples are firm and delicious. This is a winner!
Tania says
Hi Tiffany – I am SO happy to hear!! Thank you so much for your kind words and for trying my apple pie recipe 🙂 Happy holidays!
Patty says
This apple pie was incredible . My husband and I love homemade pies and this one was so delicious. The crust was so flaky too. So much better than anything store bought.
Tania says
So happy to hear! Thank you for sharing 🙂
Sandy Hamm says
As opposed to a Tiffany R (comment Dec 27), I’ve made hundreds of pies before and plenty of apple pies. I sought out this recipe because I wanted to try pre-cooking the apples.
I went a bit heavy on the apple mixture and used a deep dish pie plate. EXCELLENT. I wish I could upload an image. It’s more work than not pre-cooking, but well worth it.
Thank you Tania,
Sandy
Jef S says
I cheated by using a premade Pillsbury pie crust but other than that, I pretty much followed the recipe. I served it at Thanksgiving and everyone loved it. I’ve had several friends and 1 son request apple pie for Christmas Dinner. Honeycrisp apples are more expensive than some of the others but they’re very well worth it. Great tasting, easy to follow recipe. This one goes into the “make again” box.
Tania says
Thank you, Jef! Glad you liked it! 🙂
LorraineD says
I’ve always wondered how some double crusted apple pies were filled to the top of the towering crust, while others were disappointingly hollow.
Thank you for this detailed, easy to follow recipe. I will make it for New Years Day dinner.
Happy New Year
Rosie Miller says
Did you have a problem with the lattice not cooking completely on the thicker parts of the lattice?( with the Pillsbury crust )
Kathy says
I lay 1/2 of the lattice sprinkled w/ sugar in 1 direction only for the first part of baking, then add it in the opposite direction, sprinkled with sugar and continue baking at the lower temp. That solved the undercooked lattice problem for me.
Marlene says
How long do you bake it after you turn it down to 375°?
Tania says
After you turn it down to 375 degrees F, bake for an additional 30-35 minutes.