
Making apple pie with precooked apple pie filling is my tried-and-true method! I mean, if you know your apple filling tastes good, then you know the entire pie will be amazing!
Precooking the apple pie filling before baking ensures that the filling is never undercooked, soggy, or watery. It’s also a great way to avoid that dreaded gap between the baked top crust and the filling.
Precooking the filling before baking is a sure way to maintain the right consistency, avoid that dreaded watery filling, and test for sweetness. It’s like insurance for the pie!
I still remember…several Thanksgivings ago, I made a truly beautiful apple pie. I let it cool for 3 hours and everything. I then proceeded to cut into it, and the entire thing was swimming in a pool of juice. It was a huge mess and soggy. There was also a huge gap between the top crust and the filling. My heart sank, as you can imagine.
So, I experimented with precooking the filling, and SUCCESS! It works every single time. Perfectly tender apple filling, adjusted to my desired sweetness level, and thickened to perfection. I was thrilled, and I’m so excited to share all the secrets with you!
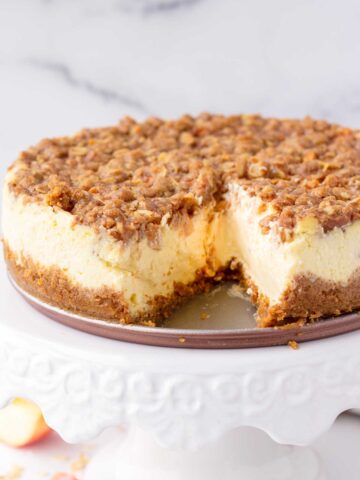
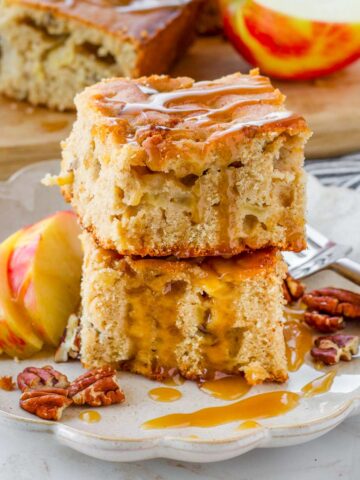
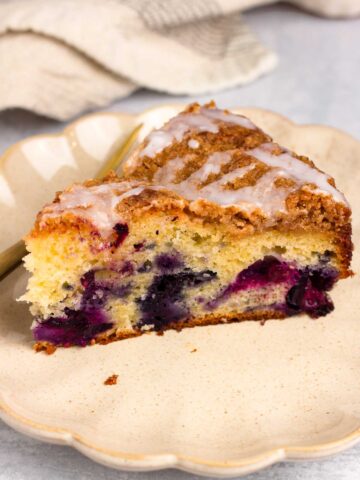
For the holidays, you can also give this beautiful Apple Crisp Cheesecake a try! Or for something simpler, my Fresh Apple Cake is amazing!
Jump to:
Why I Love This Recipe
- Precooking the apple pie filling is the best way to go! It’s like insurance for the pie. I’m sharing all my secrets below!
- My homemade buttermilk pie crust is so incredibly flaky, buttery, and tender.
- This apple pie is make-ahead and freezer friendly. Instructions below!
- The apple pie filling can be frozen and used later.
Why Precook the Apple Pie Filling
- No more undercooked apples: No chance that the middle will be undercooked. In fact, they will be cooked just how you like them.
- Avoid an apple filling that is too watery: Precooking will get rid of extra moisture and ensure that the filling is perfectly thickened before going into the oven.
- Taste and adjust sweetness: Here is where you can make sure the filling is sweet enough. You can even add more cozy spices.
- Avoid the dreaded gap between the top crust and the filling. Sometimes the filling shrinks after the dough has set, leaving a huge gap in between.
Best Apples to Use
Choose your apples wisely. It could make or break your apple pie. There are 2 important things to keep in mind:
Do they hold together in the oven? Some apples hold their shape better than others, providing structure. Good choices: Honeycrisp, Braeburn, Granny Smith. Bad choices: Red delicious.
Are they sweet or tart? This one depends on your preferences. If you like them tart, Granny Smith is the way to go. If you like it on the sweeter side, use Honeycrisp or Braeburn.
Here’s my recommendation: Use both Honeycrisp and Granny Smith. I use about a 3:1 ratio between Honeycrisp (7 to 8 apples) and Granny Smith (2 apples) for a deep 9-inch pie. I like a combination of both sweet and tart, leaning more towards sweet.
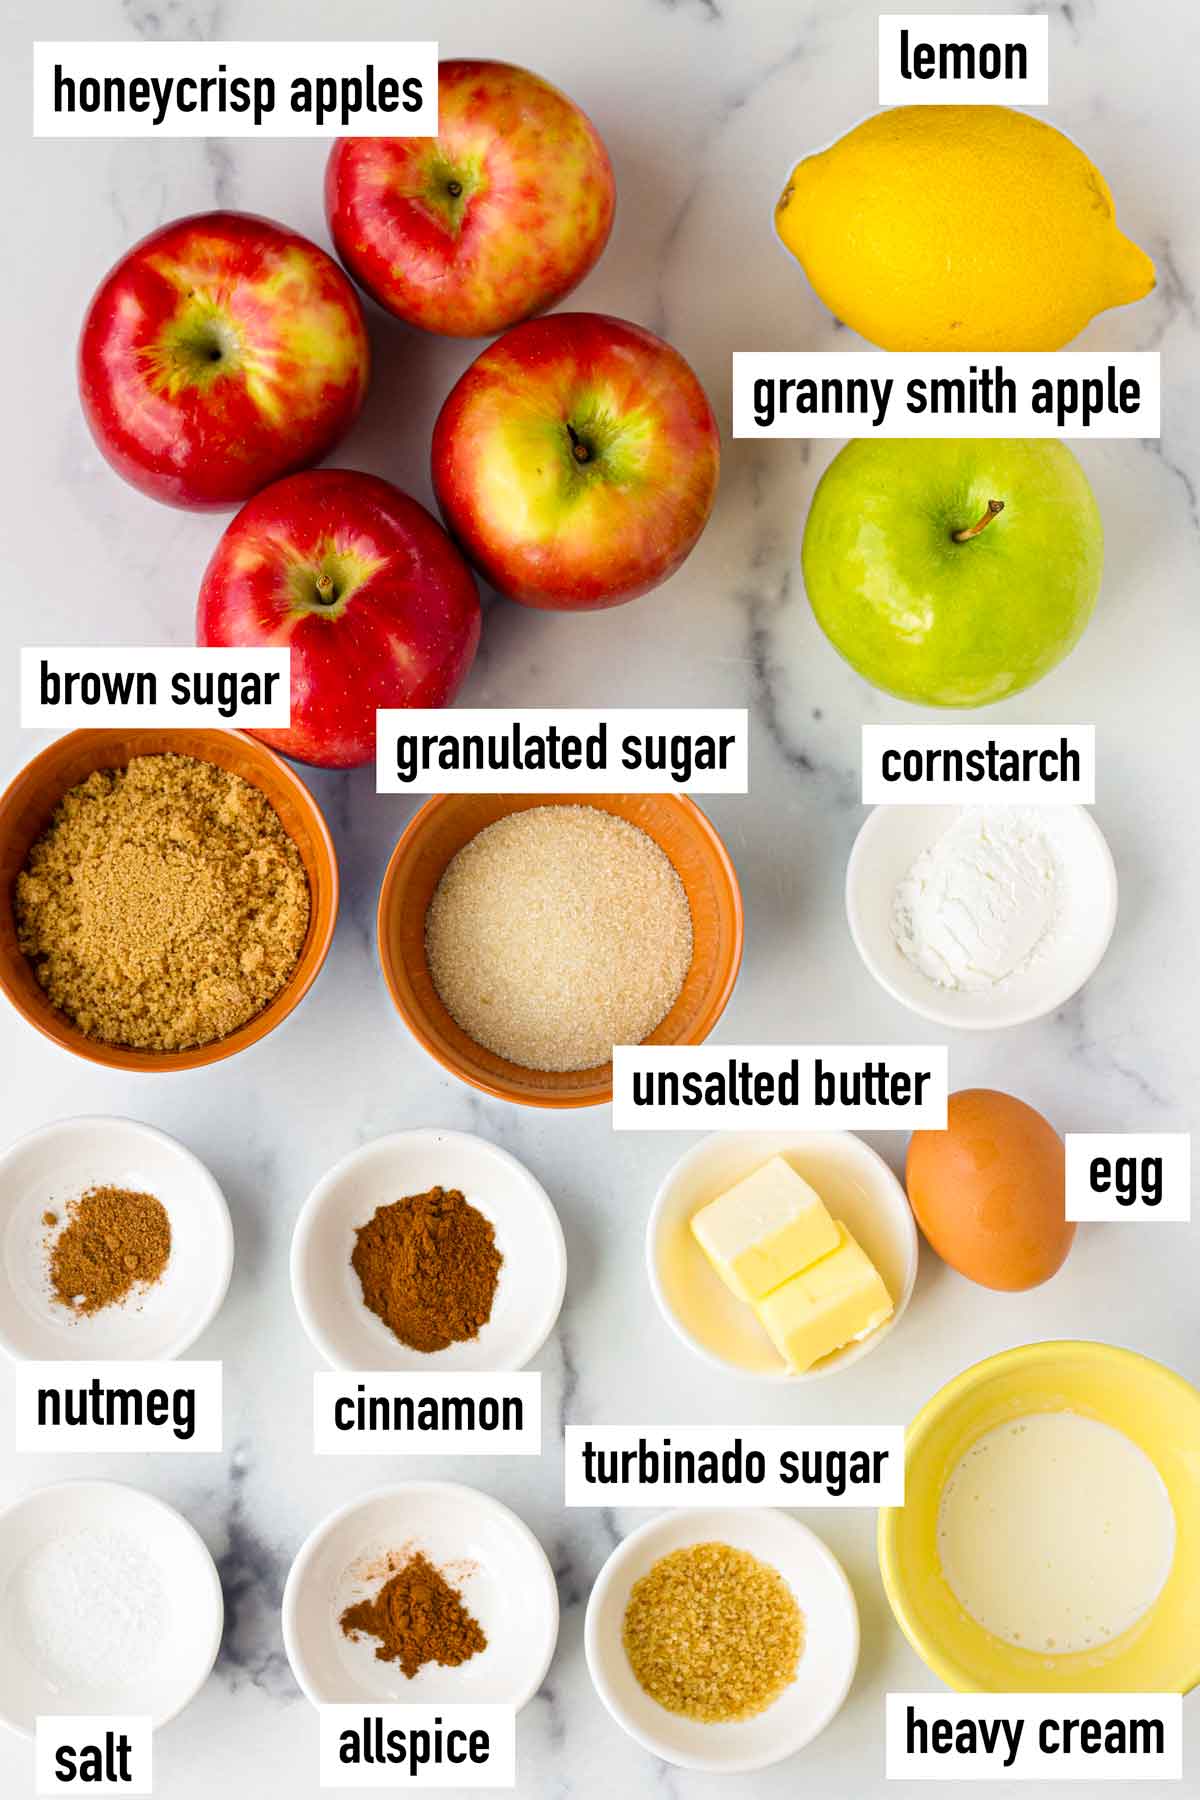
Ingredient Notes
The ingredients needed to make this apple pie with precooked filling are quite simple.
- Pie crust: Try my super flaky buttermilk pie crust. You can also use your favorite store-bought pie crust to save time.
- Apples: You’ll need about 4 to 5 pounds, which is about 8-9 large apples. I use 7 large honeycrisps and 2 granny smiths.
- Brown sugar and granulated sugar: Brown sugar will give it a deep molasses-y flavor and the granulated sugar adds sweetness without overpowering it.
- Nutmeg, cinnamon, allspice: My favorite spice trio for fall bakes!
- Salt: Salt always brings out the flavors in baking.
- Lemon juice and lemon zest: Not only does the lemon juice add flavor and brightness, it also prevents the apples from browning.
- Cornstarch: Thickens the juices from the apples.
- Unsalted butter: For flavor and richness.
- Egg wash: Made of egg and heavy cream or milk. Using cream or milk will get you a beautiful shiny golden brown color.
How To Make The Best Apple Pie
Baking a whole pie is surely a labor of love, but it’s so worth it, especially around the holidays. Here’s how I make it.
Step 1 | Make the dough and chill
This recipe uses my favorite buttermilk pie crust, which makes a double crust (top and bottom). I really like how flaky and tender this pie crust is. The buttermilk gives it a touch of richness and helps it brown better.
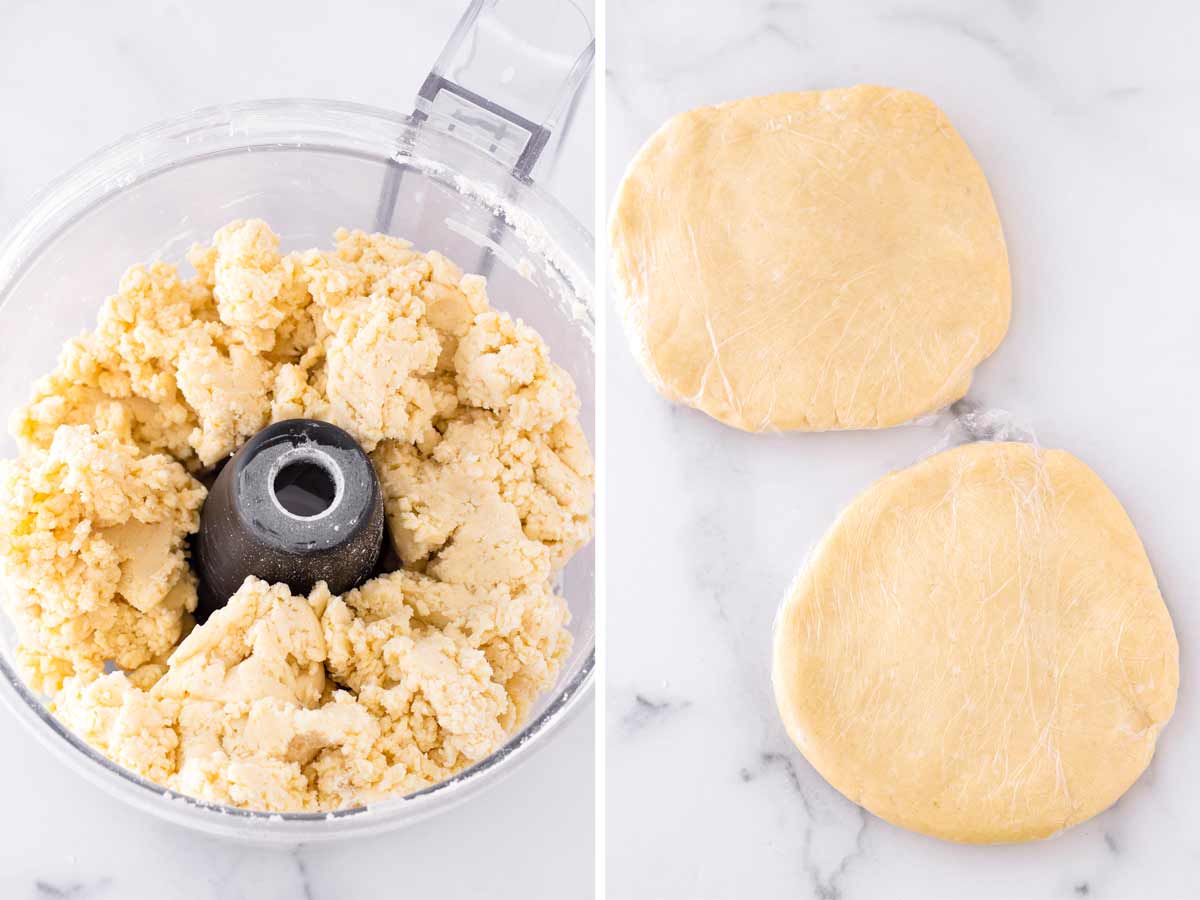
In a food processor, pulse butter with flour until pea-size coarse meal forms. Then, add the buttermilk and run the food processor continuously for a few seconds until a dough forms. Divided it up into two equal-sized discs. Wrap each disk with plastic wrap and chill in the fridge for at least 2 hours or overnight.
Step 2 | Cook the filling
Make sure to peel and slice the apples the same size for even cooking.
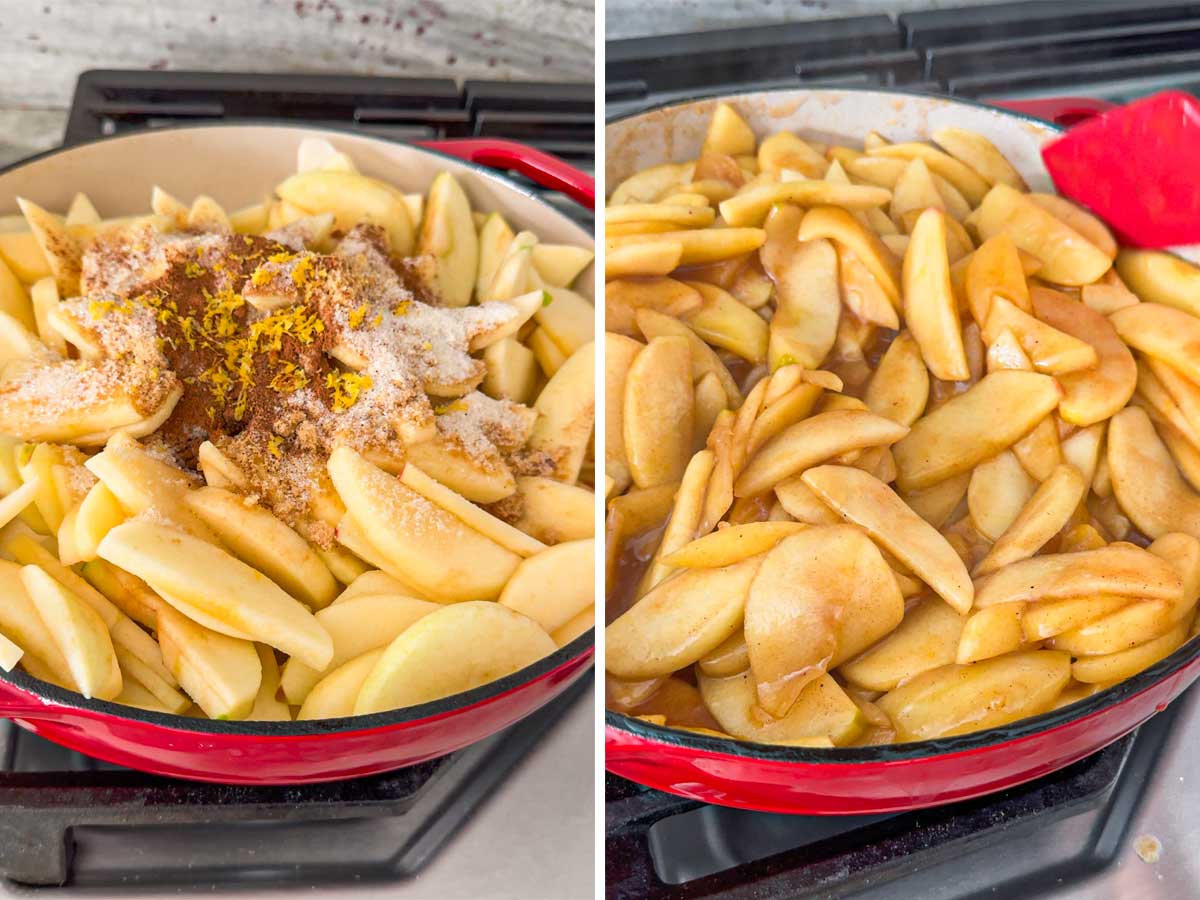
In a large deep pan, melt butter and toss the apples with the brown sugar, granulated sugar, cinnamon, nutmeg, allspice, lemon juice, lemon zest, and cornstarch. Cook, stirring carefully, for about 12 to 15 minutes, or until the apples are tender and softened, and the juices are released. If you want them softer, cook them longer.
Dissolve the cornstarch with about 2 to 3 tablespoons of room temp water, and slowly stir it into the apple mixture, stirring to combine with the juices from the apples. It should thicken. Adjust the amount of cornstarch as needed (some apples release more liquid and need more thickening).
Let it cool completely at room temperature. Do not assemble the pie until it has cooled down.
Step 3 | Roll out dough and assemble
Once the filling has cooled down, we can start assembling the apple pie! Preheat the oven to 400 degrees F.
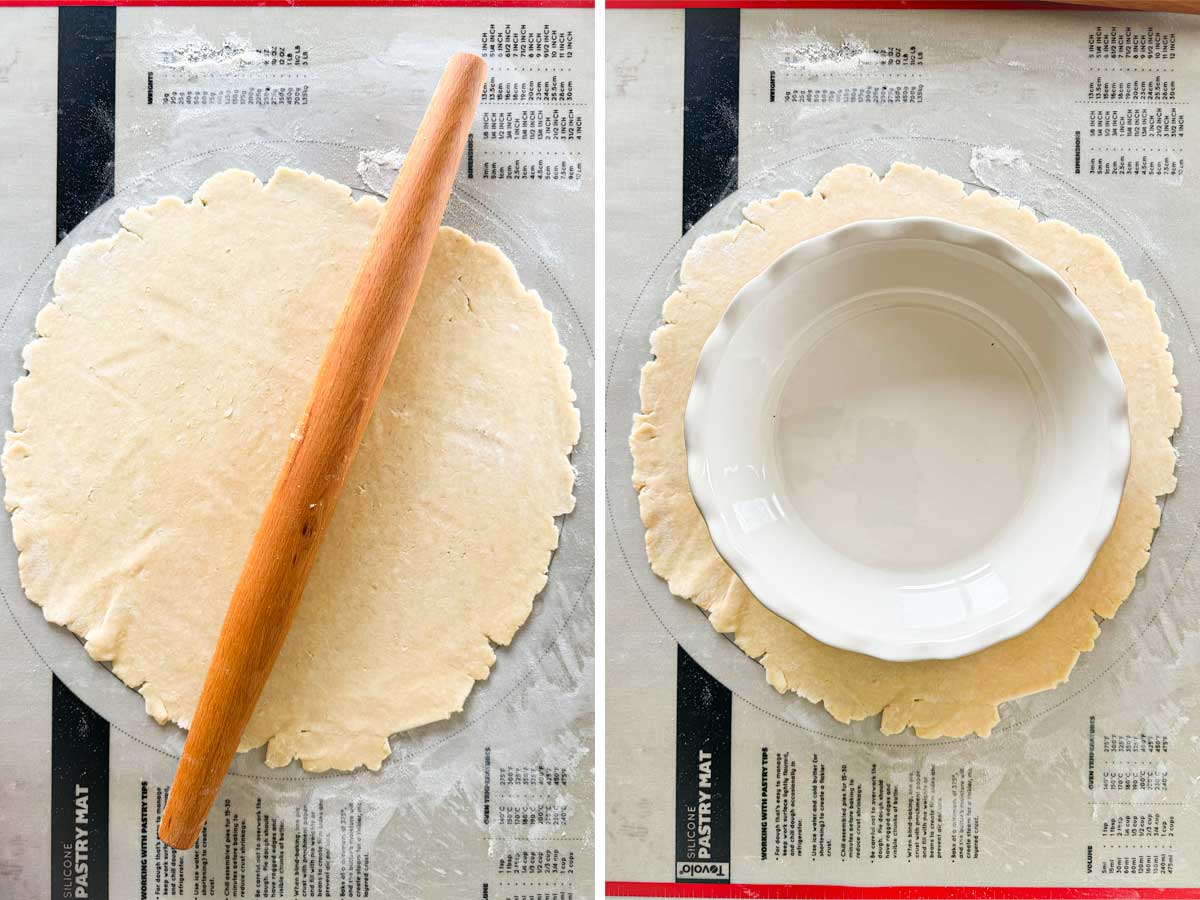
Grab a 9-inch round pie pan. Roll out one of the dough discs to a 12-inch circle (about ¼ inch thick) using a rolling pin on a floured surface.
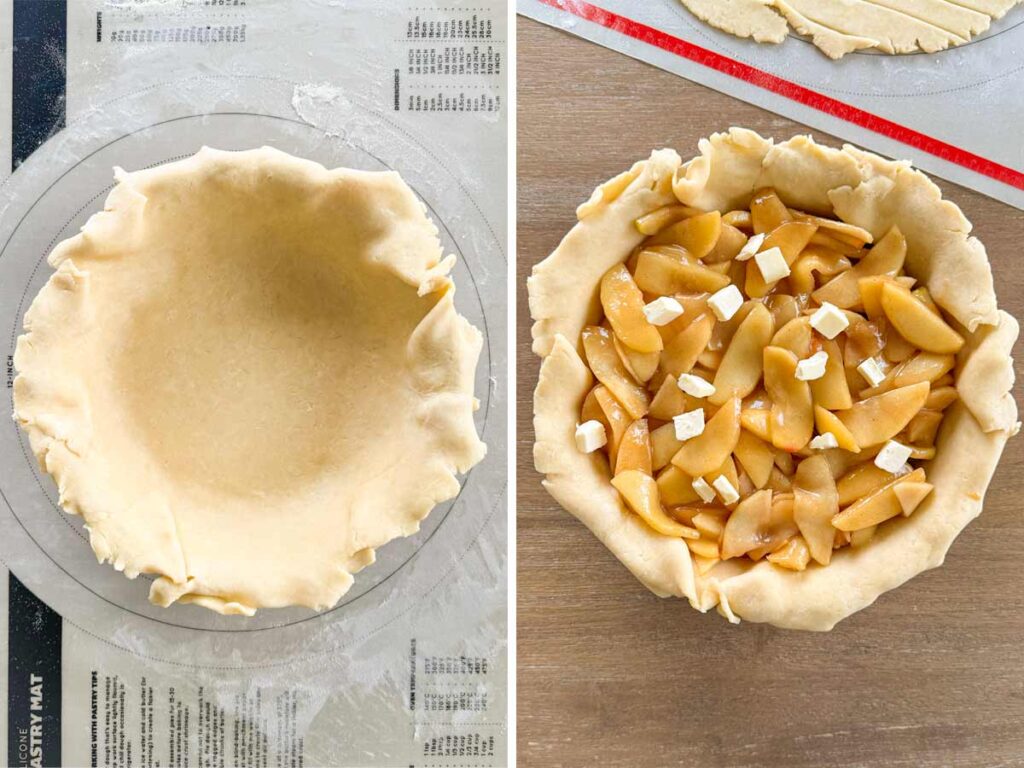
Transfer dough onto the pie pan. Then, spread the cooled down precooked apple filling evenly on top.
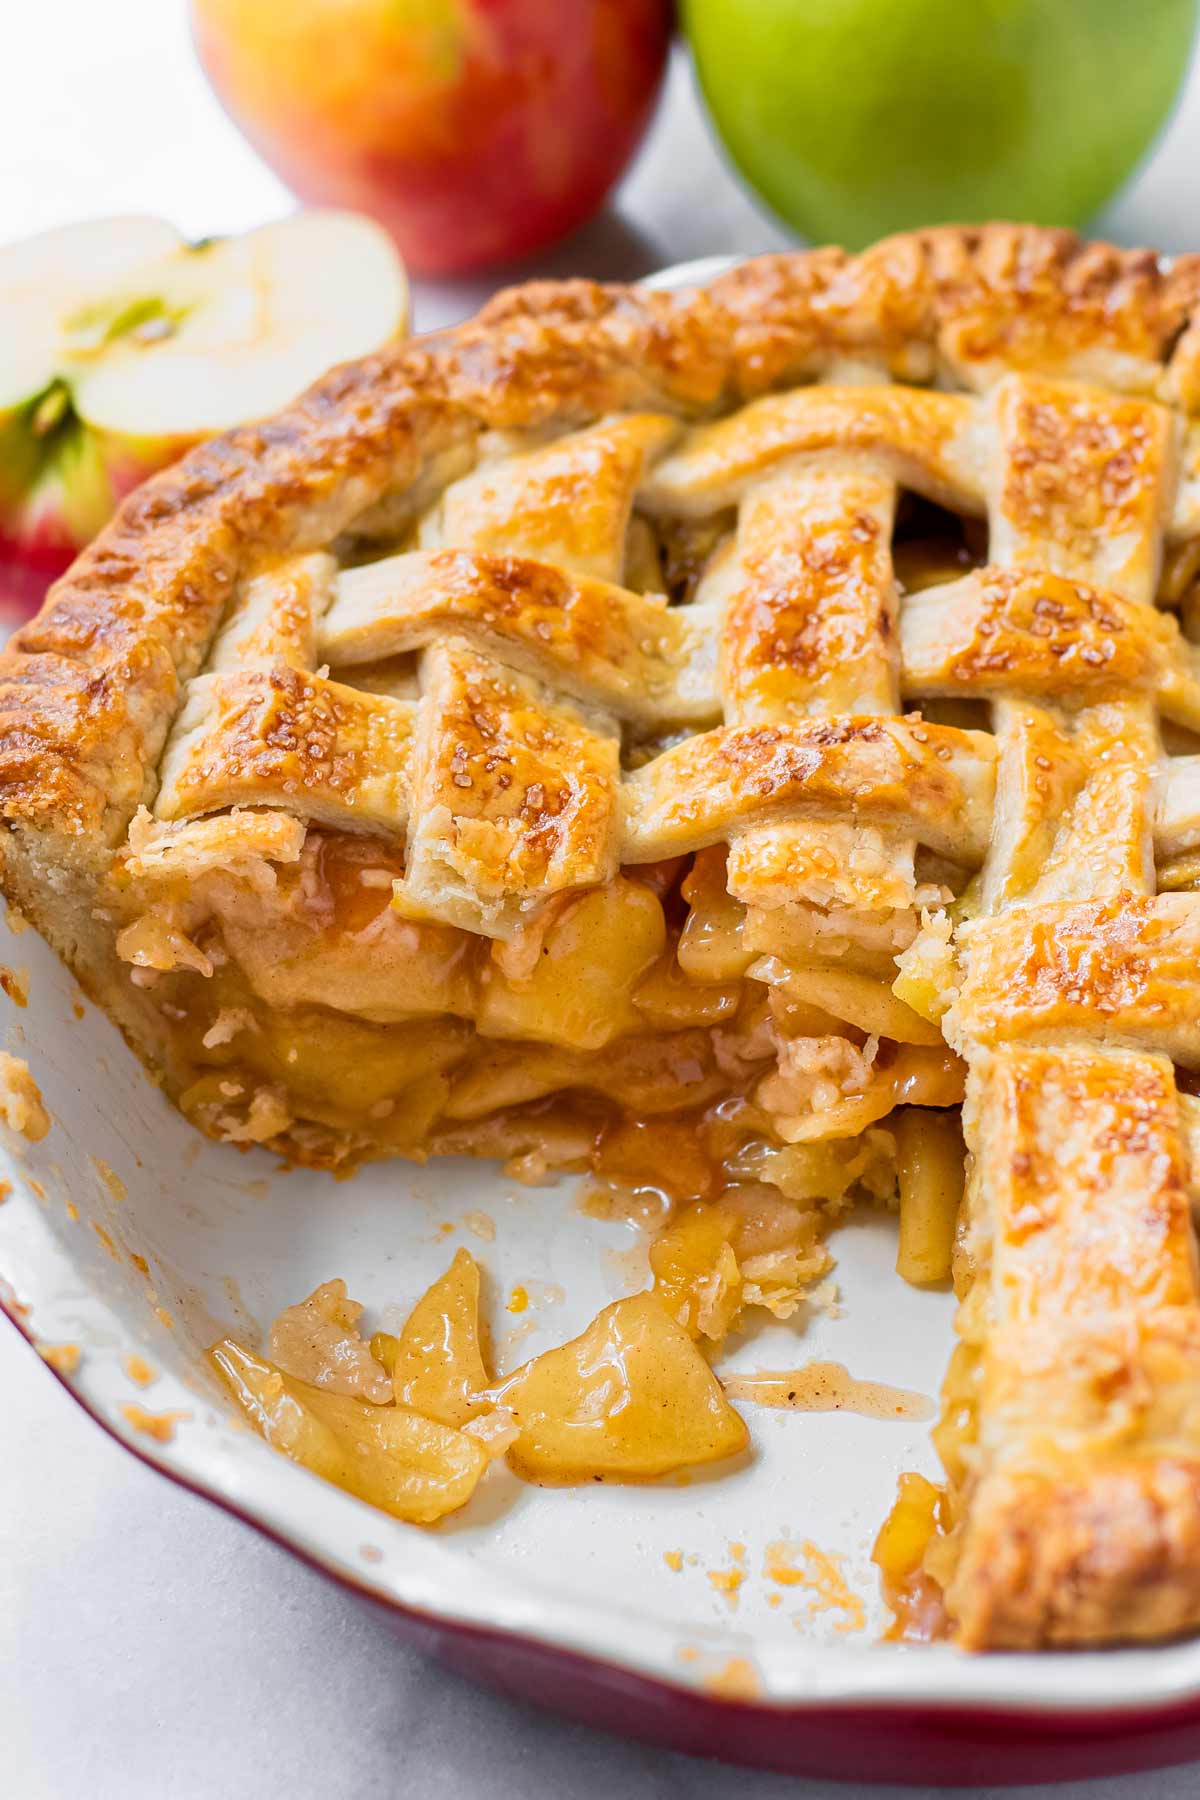
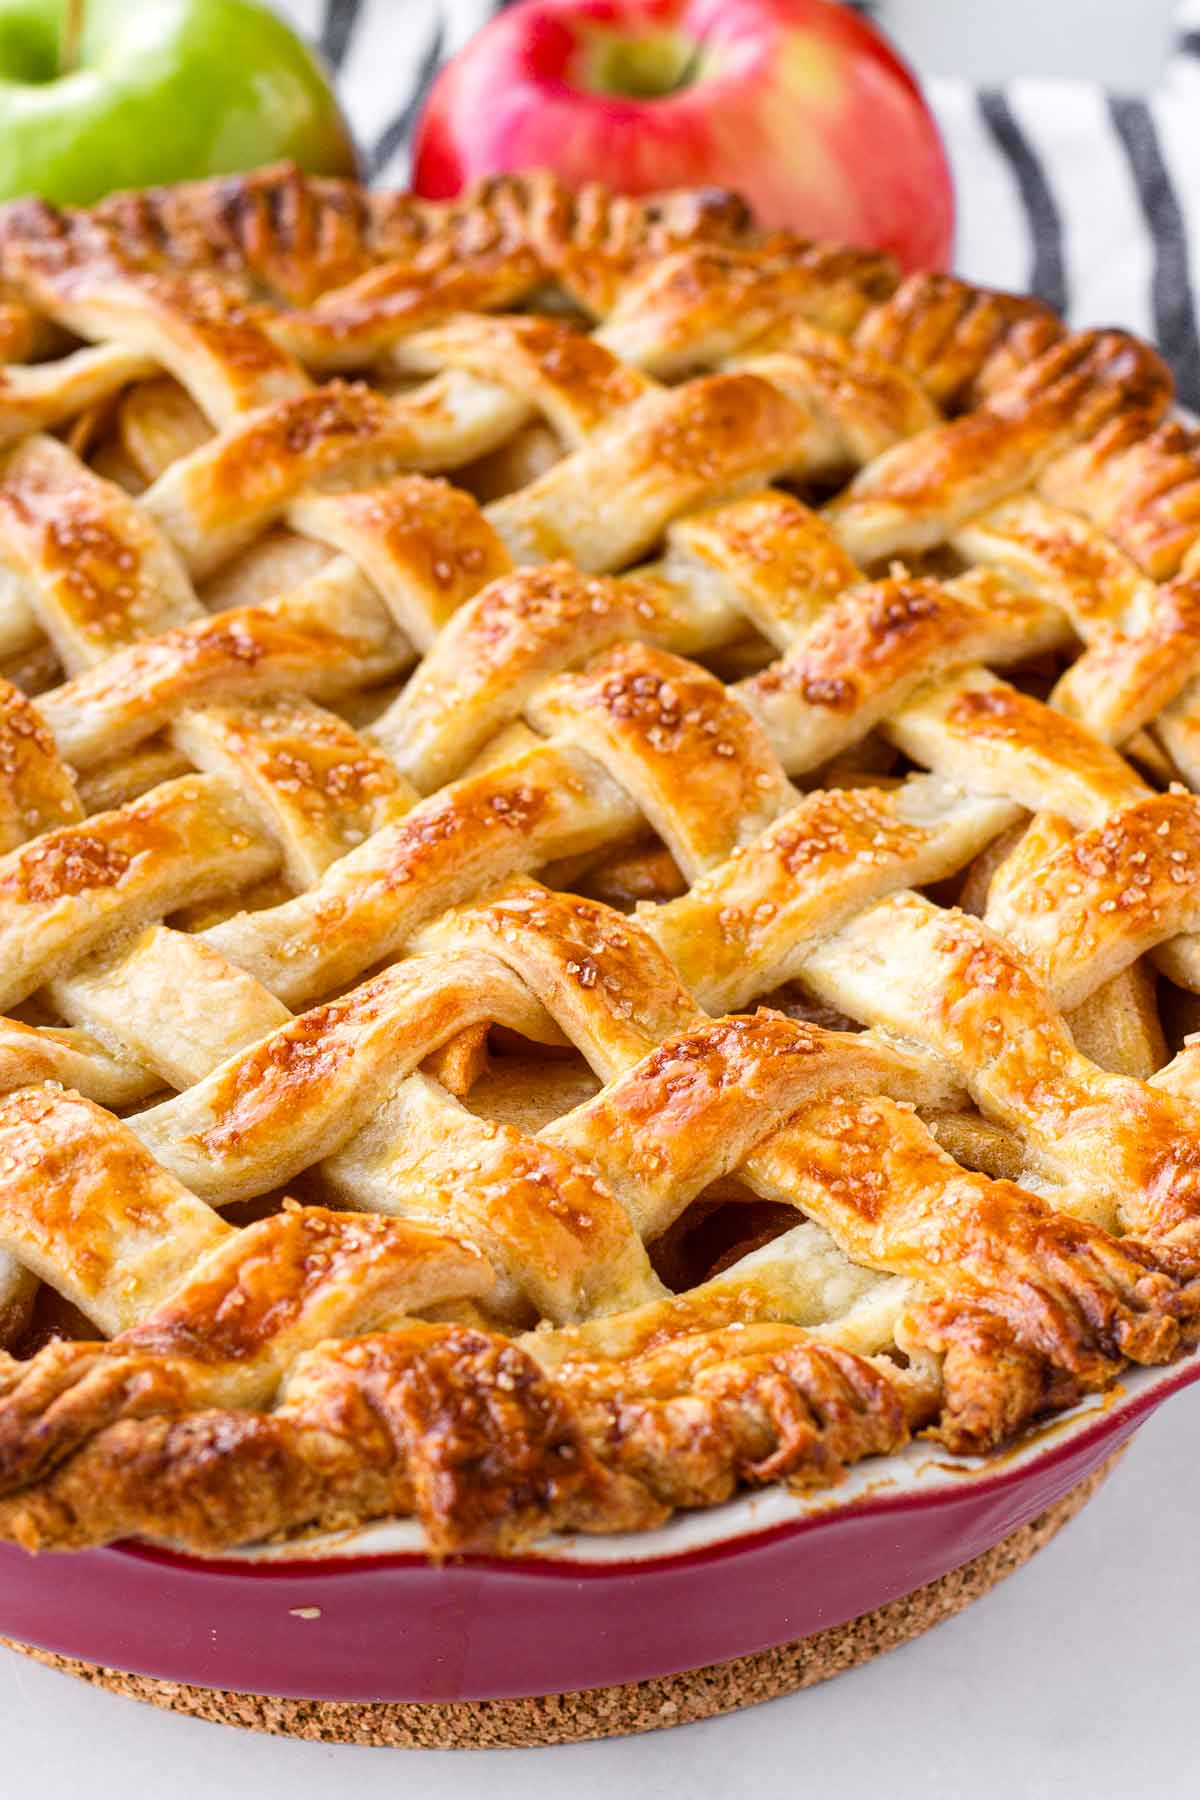
Step 4 | Make the lattice crust
If you want to make a lattice pie crust design, I included instructions and photos below. Alternatively, you can also just place the second dough on top and cut a few slits for ventilation.
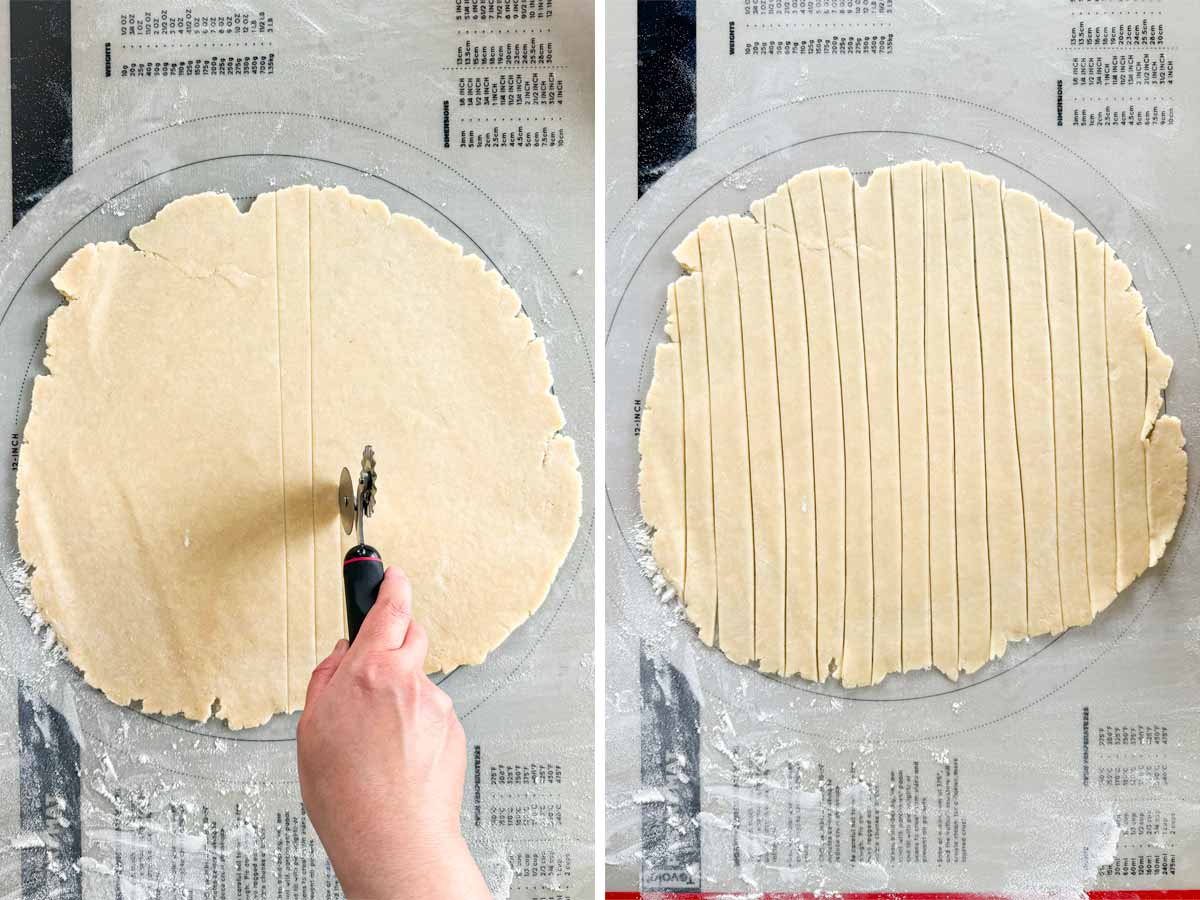
Roll out the second dough disc to a about 10-inch circle. Cut 12 strips of equal width using a pastry wheel or a pizza cutter.
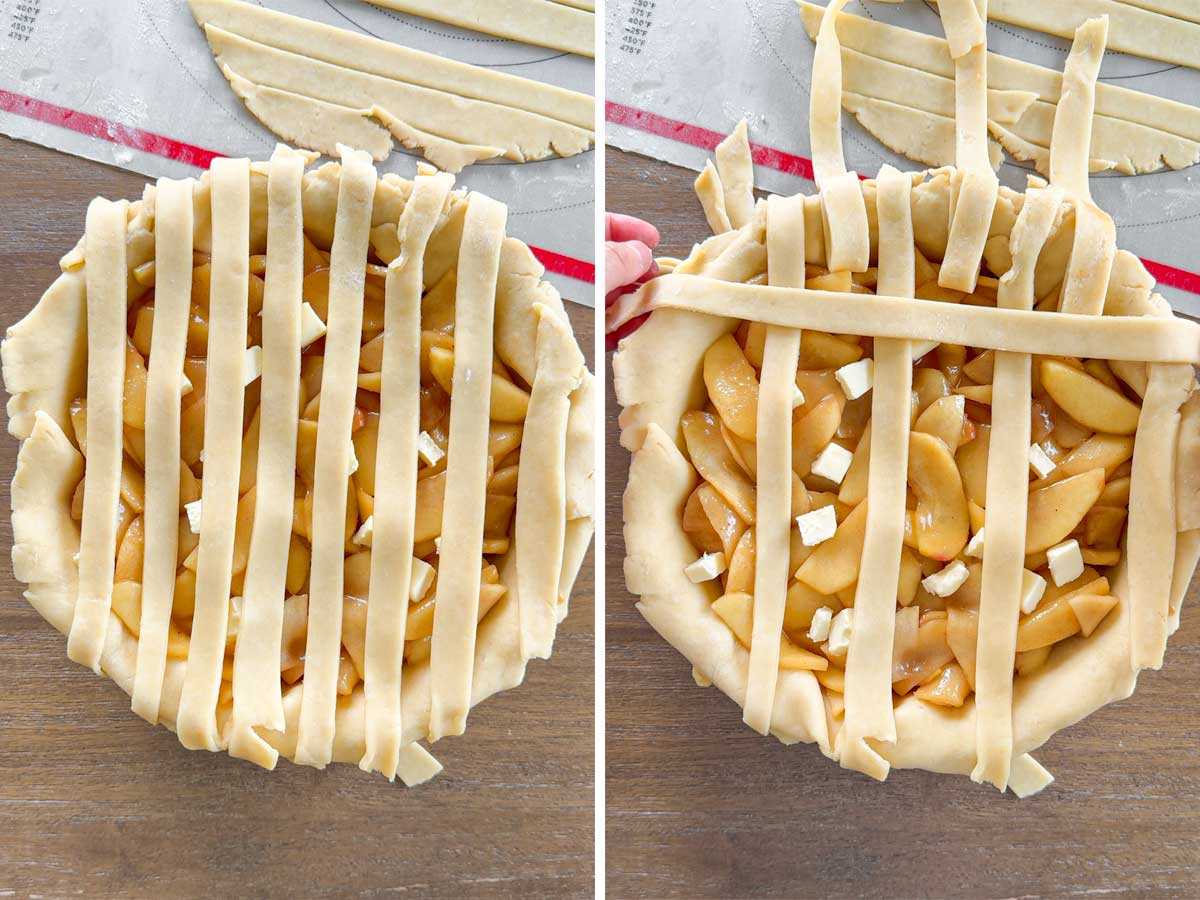
Cut the remaining 1 tablespoon of cold butter into small cubes. Arrange on top of the filling evenly.
Lay each 8 strips (alternating) on top so that they are evenly spaced. Then fold back only 3 of those strips, alternating. Place another strip perpendicular to the ones you folded back. Then fold those back into place.
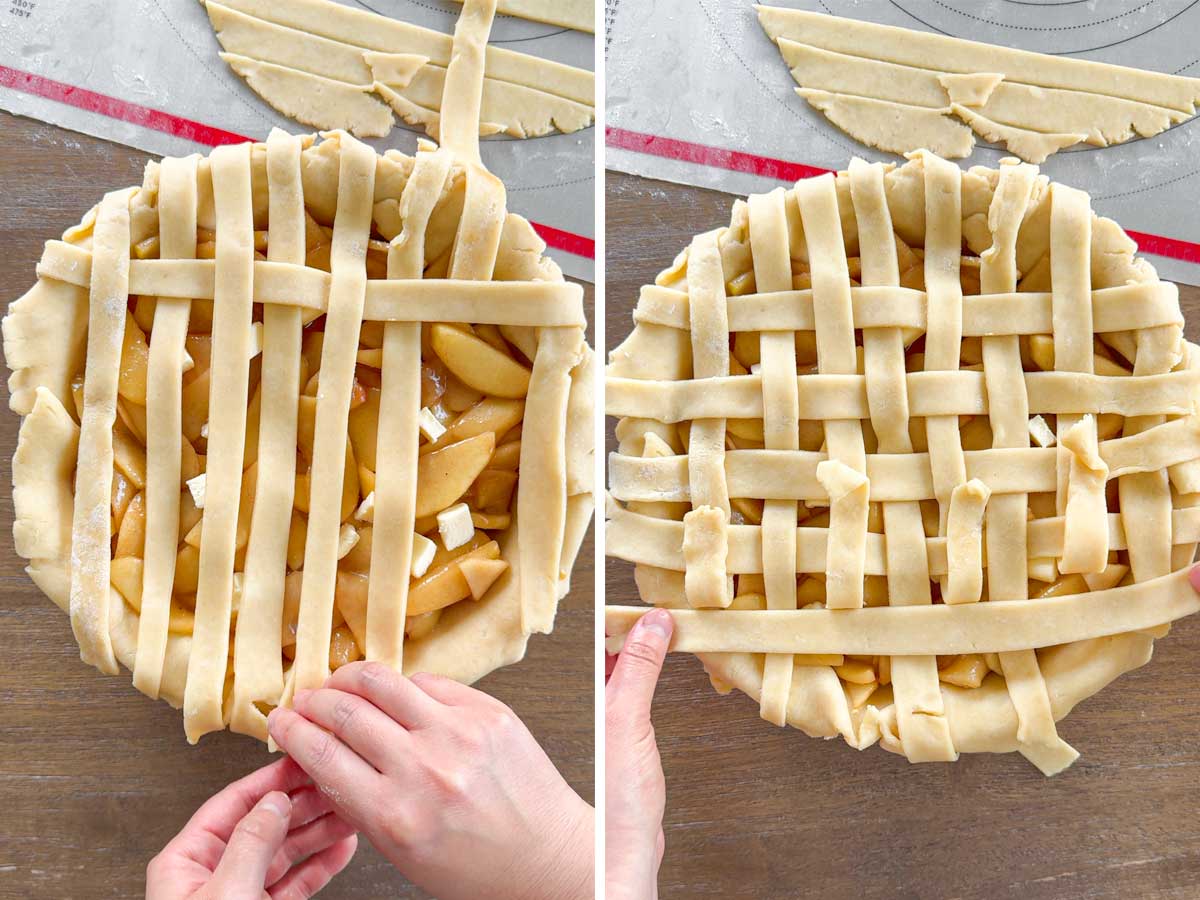
Fold the other 3 strips back, and lay another strip perpendicular on top. Then fold them back into place. Repeat until you finish using all the strips. See pictures for a visual representation. As you can see, it’s not easy to explain in words…
Step 5 | Bake
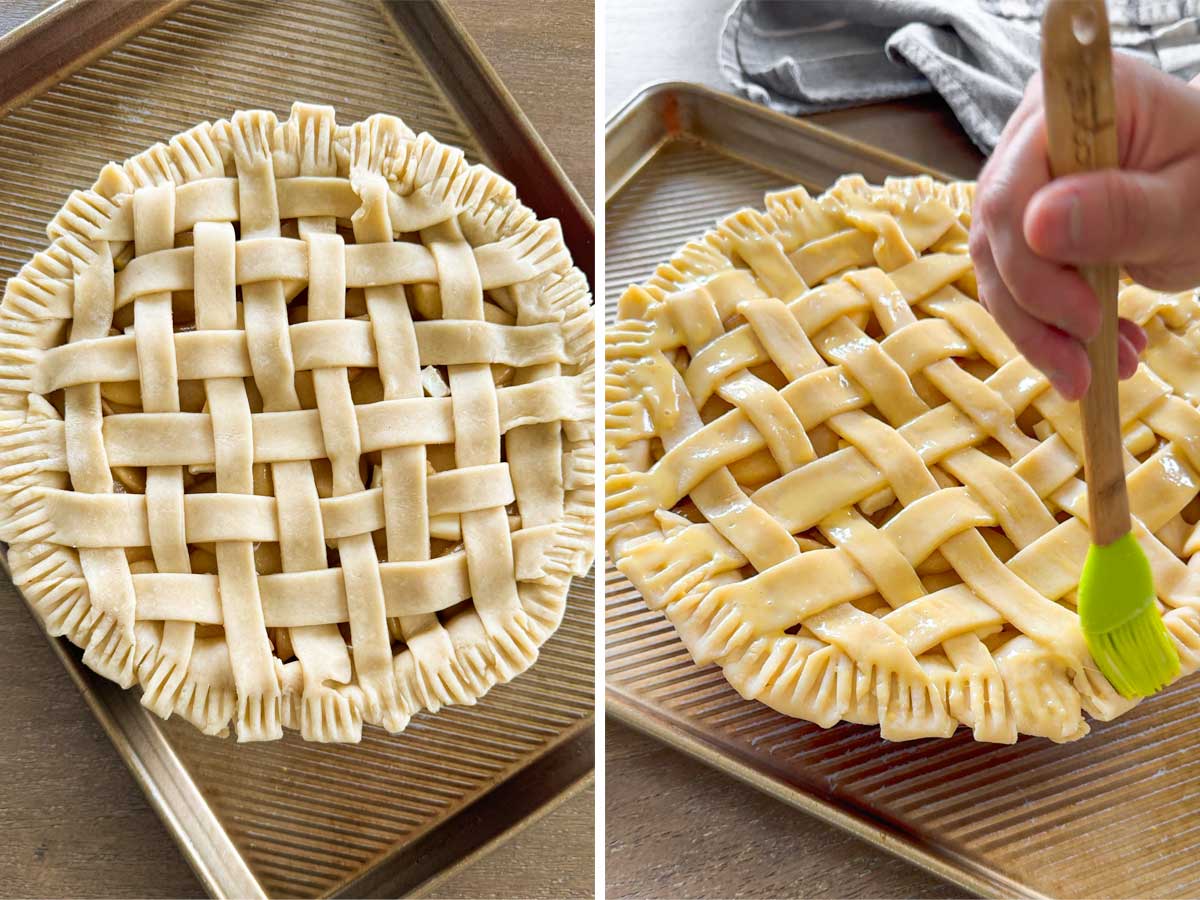
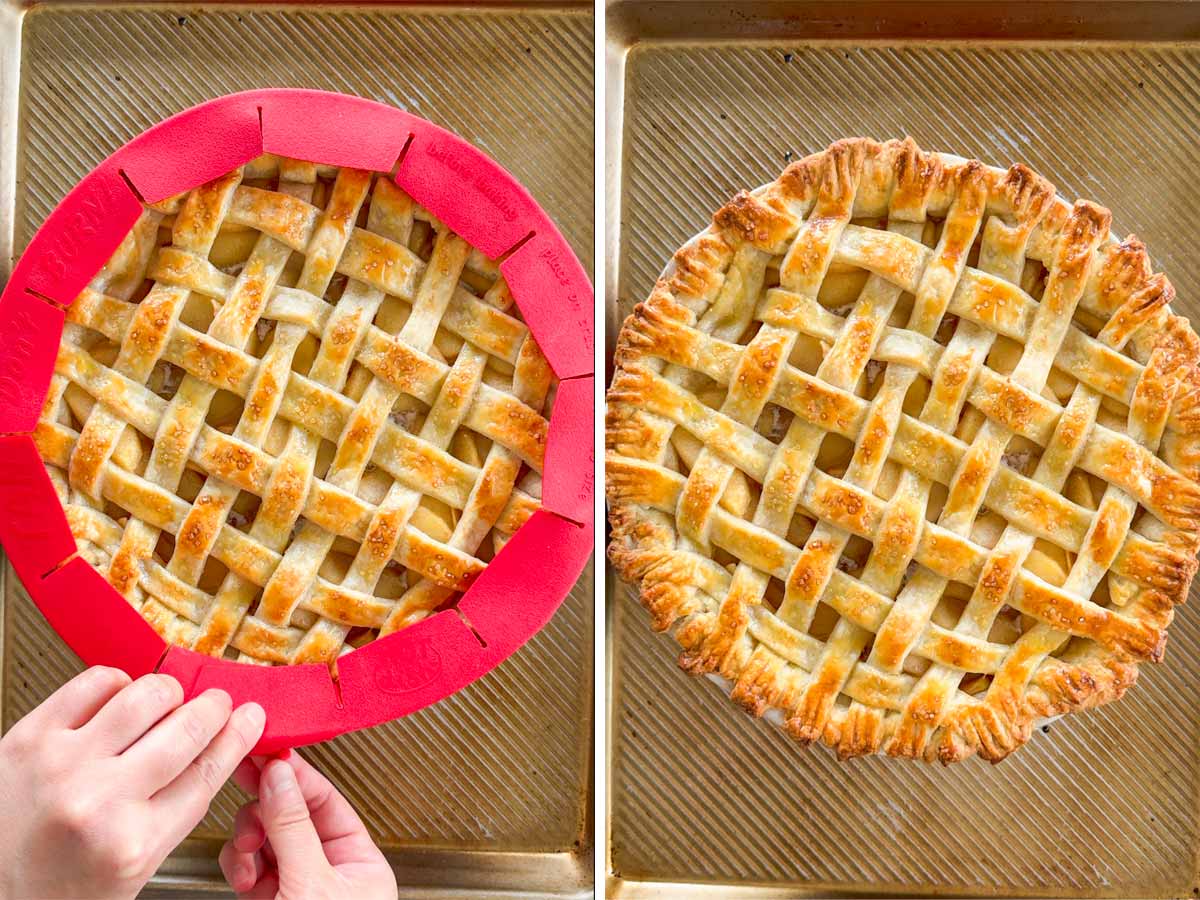
Trim any overhang or excess dough. Seal edges with a fork or with your fingers. Brush the pie with egg wash (whisk heavy cream with egg), and sprinkle coarse sugar on top.
Place the pie on top of a large sheet pan to catch any dripping juices. Bake for 20 minutes at 400 degrees F. Then, remove from the oven and put a pie crust shield around the edges or cover edges with foil. Lower oven temperature to 375 F and bake for an additional 30-35 minutes until golden brown and bubbly.
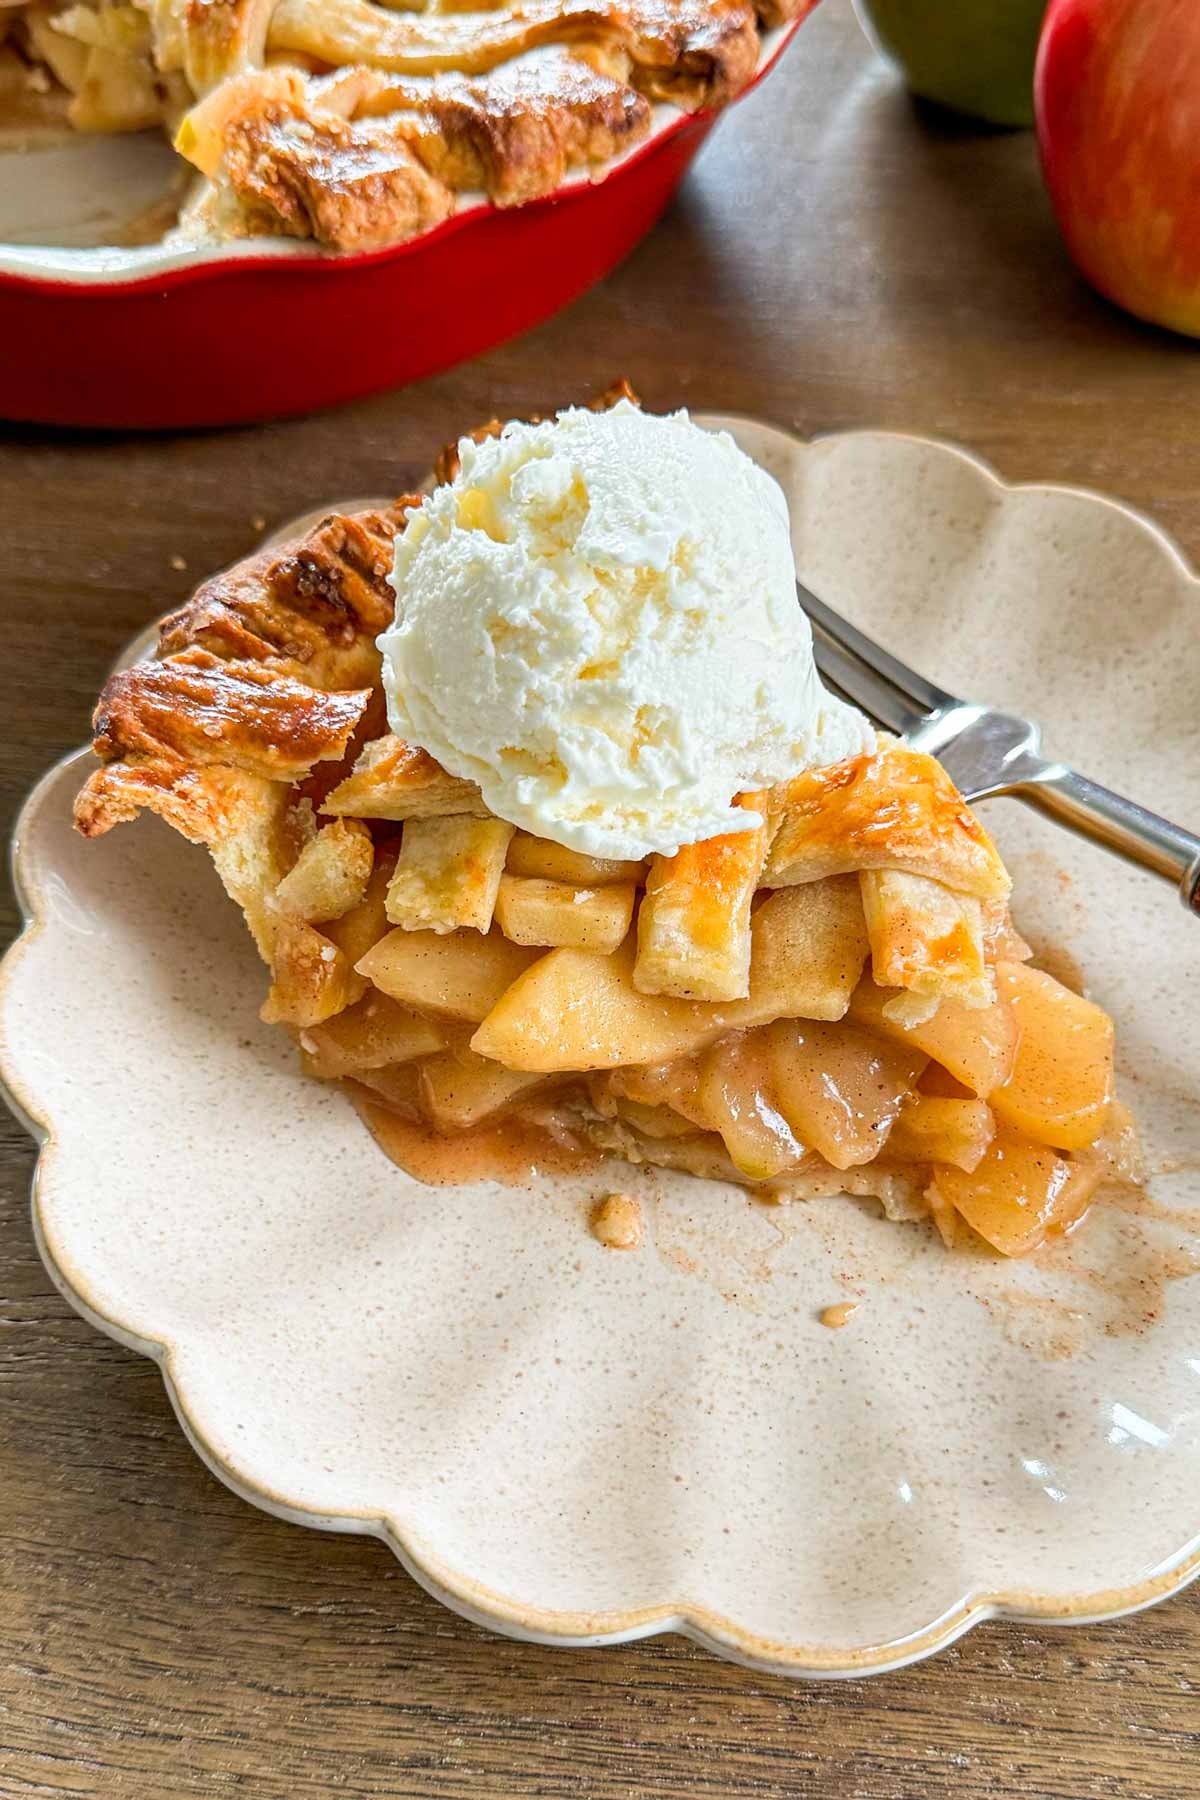
Step 6 | Let it cool down for 3 hours
Now, this is important: Let it cool on a wire rack for 3 hours before serving! If you cut into it before it has cooled down, it will fall apart. Don’t make the same mistake I’ve made haha. Enjoy!
Tips for Success
- The best apples to use are a mix of honeycrisp, which are sweet, and granny smith, which add a touch of tartness. Both hold their shape pretty well when cooked.
- Use 4 to 4.5 pounds of apples. About 8 to 9 large apples.
- Some apples release more juice than others, so you may need to adjust the amount of cornstarch. Most of the time, I only need 2 tablespoons of cornstarch diluted with about 2-3 tablespoons of room temp water.
- If your apples didn’t release enough liquid, you can add some apple cider (not apple cider vinegar).
Make Ahead Tips
Make the filling ahead: Prepare only the apple pie filling up to 3 days ahead. Let it cool down completely, and refrigerate in an airtight container. Then assemble.
Make the crust ahead: Make the pie dough as directed. After you’ve wrapped the disks of dough with plastic wrap, refrigerate for up to 5 days. You can also freeze it for up to 2 months. Thaw in the refrigerator overnight before using.
Completely bake ahead: Since the pie needs to cool down for 3 hours anyway, bake it 1-2 days ahead.
Note: I would not recommend assembling the apple pie and leaving it unbaked overnight because the bottom will get soggy.
Freezing Instructions
The apple pie filling can be frozen for up to 2 months Thaw in the fridge before using.
I’ve also been asked if it’s possible to freeze the assembled unbaked pie. I’ve tested doing this and it doesn’t work as well. However, you can freeze a baked pie for up to 3 months. Thaw at room temperature and serve.
Recipe FAQs
I really like to use my silicone pie crust shield, but if you don’t have one, you can carefully wrap the edges with foil.
I like a combination of honeycrisp apples (about 7 large) and granny smith (2 large). Honeycrisps hold their shape really well and are sweet, and granny smiths add a touch of tartness while also maintaining their shape.
You can bake the entire pie from start to finish the day before or about 2 days ahead because it needs to cool down completely first before cutting. I would not recommend assembling to bake later – the bottom crust might get soggy.
No need. Since the precooked apple filling will already be thickened and cooled down, the bottom crust won’t get soggy. However, feel free to parbake it for about 15 minutes before assembling.

I’d love to hear from you! If you loved my recipe, please consider leaving a 5-star rating and a comment down below. Sign up for my newsletter and follow along on Instagram, Facebook, or Pinterest
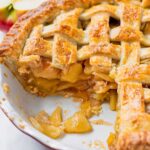
Apple Pie with Pre-Cooked Apple Filling
Equipment
Ingredients
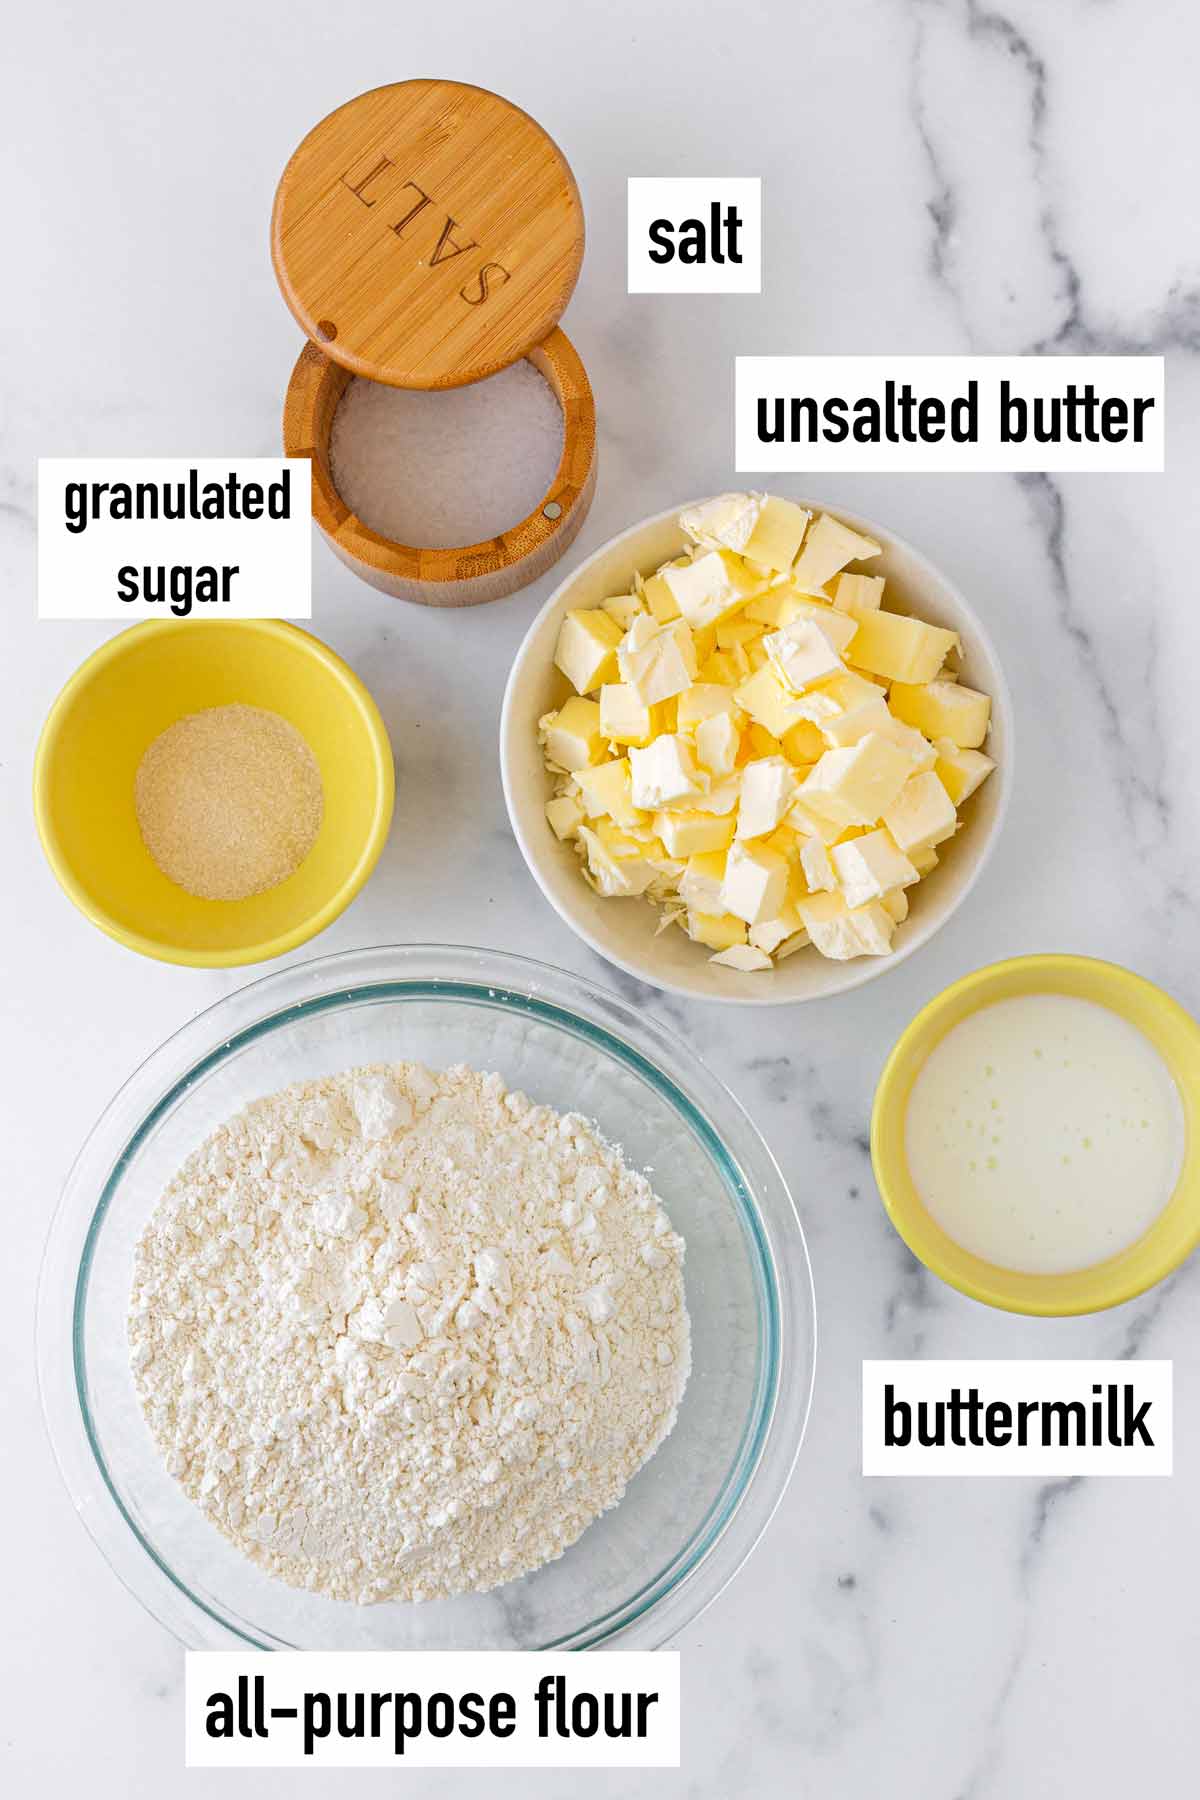
Pie Crust
- 2 ½ cups all-purpose flour
- 1 tablespoon granulated sugar
- 1 teaspoon Kosher salt
- 1 cup very cold or frozen unsalted butter, cut into small cubes - (2 sticks)
- ⅓ cup cold buttermilk
Apple Pie Filling
- 4 pounds large apples - about 9 large apples, I use honeycrisp and granny smith, see notes below
- 2 tablespoons cold unsalted butter, divided
- ½ cup brown sugar
- ¼ cup granulated sugar
- 1 teaspoon ground cinnamon, plus more if desired
- ⅛ teaspoon ground nutmeg, plus more if desired
- ⅛ teaspoon ground allspice, plus more if desired
- ¼ teaspoon salt
- Zest of 1 lemon
- 2 tablespoons fresh lemon juice
- 2 tablespoons cornstarch
Other
- 1 large egg
- 1 tablespoon heavy cream or whole milk
- Coarse sugar or turbinado sugar - for sprinkling
Instructions
Make the pie crust
- Combine flour, sugar, and salt in a food processor by pulsing a few times. Add the very cold butter cubes and pulse a few times until a pea-size coarse meal forms. Add the buttermilk and run the food processor continuously for several seconds until a dough forms. At first, it will look like it's not coming together but it will.
- Transfer onto a non-floured clean surface. Press to form a dough. Divide the dough in half. Roll each half into balls and flatten into thick disks. Wrap each disk with plastic wrap and chill in the fridge for at least 2 hours or overnight. Before using, let it sit on the counter for 15 minutes to slightly soften it.
Make the apple pie filling
- Peel apples and cut out the core. Then cut into ¼ inch slices. They should all be cut to the same size for even cooking.
- In a large deep skillet over medium heat, melt 1 tablespoon unsalted butter and add the sliced apples, brown sugar, granulated sugar, cinnamon, nutmeg, allspice, salt, lemon juice and lemon zest. Cook, stirring for about 12-15 minutes until apples have slightly softened but not lost their shape.
- Dissolve cornstarch with about 2-3 tablespoons of room temp water, and slowly stir it into the filling, stirring to dissolve with the juices. It will start to thicken. Bring to a simmer and cook for an additional 3 minutes until juices thicken. If not thick enough, add more cornstarch slurry little by little, stirring. Note: The amount of cornstarch depends on the amount of juices released by the apples, so add gradually.
- Set aside and let cool at room temperature. Tip: to speed up the cooling process, transfer the apple filling to a large shallow bowl or a large pan.
Assemble the pie and bake
- After the filling has cooled down, preheat oven to 400 degrees F.
- Cut remaining 1 tablespoon of cold butter into small cubes. Set aside.
- Get a 9-inch round pie pan ready. Roll out the dough to a 12-inch circle using a rolling pin on a floured surface to about ¼ inch thick. Repeat for the second disk.
- Transfer dough to a 9-inch pie pan. Fill with the cooled apple pie filling and dot with the remaining 1 tablespoon butter cut into small cubes. Cover the pie with the second rolled out dough. Trim any overhang or excess dough. Seal edges with a fork or with your fingers. Make a few slits at the top to let the steam escape.
- Alternatively, you can make a lattice pattern. For instructions and visuals, see the “Make a Lattice Pie Crust” section above.
- Make the egg wash by whisking the egg with heavy cream or milk. Brush the pie dough with egg wash and sprinkle with coarse sugar if desired.
- Place pie on a large baking sheet and bake for 20 minutes at 400 degrees F. Remove pie from oven and put a pie crust shield or cover edges with foil. Lower oven temperature to 375 F and bake for an additional 30-35 minutes until golden brown and bubbly.
- Let it cool on a wire rack for 3 hours before serving. Trust me, if you cut into it before it has cooled down, it will fall apart (been there, done that). Enjoy!
Notes
- Choice of apples: I like a combination of honeycrisp apples (about 7-8 large) and granny smith (2 large). Honeycrisps hold their shape really well and are sweet, and granny smiths add a touch of tartness while also maintaining their shape. Do not use Red Delicious apples – they will disintegrate.
- Lattice pie crust design: This design pattern is optional. If you want to keep it simple, just place the second crust on top, press the borders, and cut a few slits to allow for venting.
- Make ahead: Since the pie needs to cool down to 3+ hours anyway, I always bake it 1-2 days in advance. Store on your kitchen counter, covered, at room temperature.
- Prep ahead: The pie crust can be made up to 5 days in advance and stored in the refrigerator. The apple pie filling can be made up to 3 days in advance; let it cool completely and store in an airtight container in the refrigerator.
- Freezing: I would not recommend freezing an unbaked pie, but you can freeze a baked pie for up to 3 months. Thaw at room temperature.
- Other apples you can use: Braeburn. If you want more tartness, use more granny smiths.
- Additional spices: Feel free to add extra spices you like.


Jennifer S. says
I made an apple pie with a different recipe and it ended in disaster. Determined, I scooped the apples out (they weren’t entirely cooked all the way, which caused the problems) and found your recipe. I used those mostly cooked apples, added more stuff to them per your recipe, and my pie came out great! Thanks for saving the day.
Carmela DiBenedetto says
First time attempting to make apple pie! Great tips! Pie was amazing!
Eleanor Joseph says
Great recipe…awesome instructions, especially for a novice like me. Thanks 😊
Abena says
Very good recipe although I found it way too sweet for our tastes. Will tamper down the sugar next time but overall, excellent recipe. Precooking the apples makes a huge difference!
Donna young says
I tried this apple pie recipe and it turned out perfect I can wait to try it for the family thanksgiving day!
LauraLee says
Am I missing where it says how long to continue baking ‘after’ temp is reduced to 375 degrees?
Tania says
Hey there! After lowering the oven temperature to 375 degrees F, bake for 30-35 minutes until golden brown and bubbly.
Mike says
The recipe says 375 at 30 min, Laura Lee.
This is a good recipe. I’ve made it several times after combing through others. Cornstarch works better than flour in case anyone is wondering.
Also, different apples give different flavors. Granny, Fuji, Nz rose are all tasty.
Jodi G says
Hi, I am baking 4inch individual French apple pies. How should I adjust the baking time to ensure the crust is fully cooked, but the French apple topping does not burn?
Tania says
Hi Jodi, try baking the individual pies for about 25-30 minutes or so. The French crumb topping should be fine, but if it looks like it’s burning during the baking time, try covering it with foil.
Alf Purkiss says
Hi Tania,
are you able to freeze the pie filling?
regards
Alf Purkiss
Tania says
Yes, definitely!
Donna says
My husband said that this is the best apple pie ever. Thanks
Stephen Allen says
it seems that the bake times for pre-cooked filling is the same as the uncooked recipes.
Tania says
Hi Stephen! You still need the full bake time for the pie crust to bake completely and brown beautifully. If you’re concerned about overcooking the apples, don’t worry – as long as you use firm apples and the pre-cooked filling holds its shape (so not mushy or overcooked), you should be good!
Maddy says
I got a new food processor ( my first one) and I used the wrong blade to slice my apples so they are quite thin, is my pie going to be mushy?
Tania says
Hi Maddy! They might, but not necessarily – it depends on how thin they are and what types of apples you used. You can try reducing the stovetop pre-cooking time by half, or until they have the desired texture, and see if that works.
Darrel says
Hi! I’ve been reading your website for a long time now and finally
got the courage to go ahead and give you a shout out from Atascocita Tx!
Just wanted to tell you keep up the fantastic job!
Roberta Leslie says
You, my dear, are a genius! I’m 69, and I quit baking apple pies long ago because they never turned out right. My grandson was asking- and asking!- for apple pie. I couldn’t let him down, so the search began for the perfect recipe. Thank goodness I found yours! It is hands down the best apple pie I’ve ever made. Precooking the apples is the answer! Making another pie right now. Thank you!
LuAnne says
I made this on Thanksgiving day and everyone loved the taste of the pie. However, I felt that the apples were overcooked and a bit mushy. Next time I will remove the apples from the juice before I add the corn starch to thicken it, then mix the apples back in. I think the extra cooking while the sauce was thickening made the apples too soft.
Tiffany M says
I’m an absolute pie novice and I wowed my family with this recipe! So delicious but more importantly, so well explained and such great detail! Thanks Tania!
Vicki says
Hello. I am looking to make a baked apple crumble, no crust. As my son likes the apples soft and gooey, do you think your recipe would work well for this? Hoping so! Thanks.
Tania says
You can use a crumb topping on top instead, yes. You may also need to reduce the baking time until the top of golden brown.