
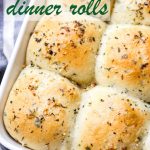
Learn to make the softest and fluffiest savory garlic dinner rolls using simple ingredients! I included a step-by-step tutorial to make it even easier, including tips on working with yeast.
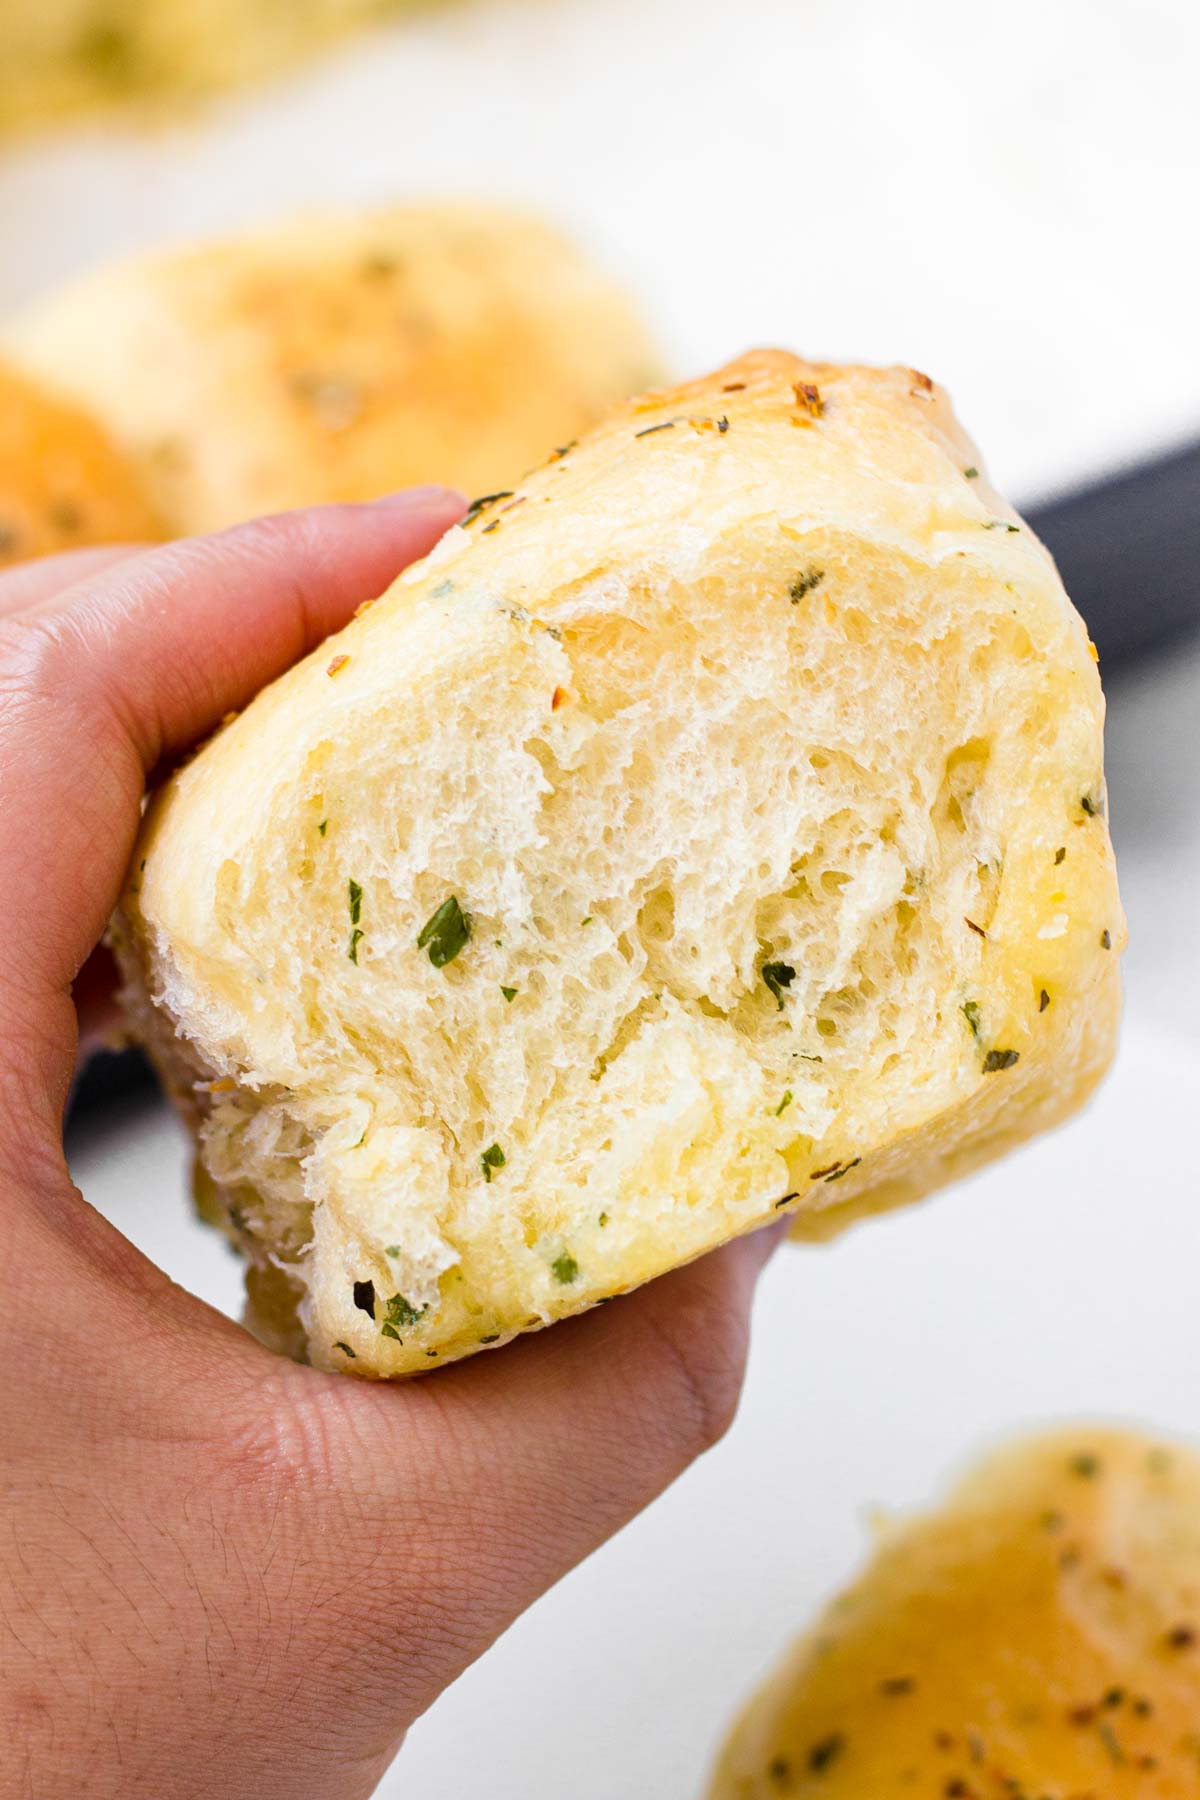
They are so soft and fluffy, and packed with garlic and herb flavors. Serve with whipped butter to make them even better. They’re so incredibly good!
This garlic dinner rolls recipe is great even for first time bread-makers, and if the buttery garlic aromas coming from your kitchen weren’t enough, the results are always worth it!
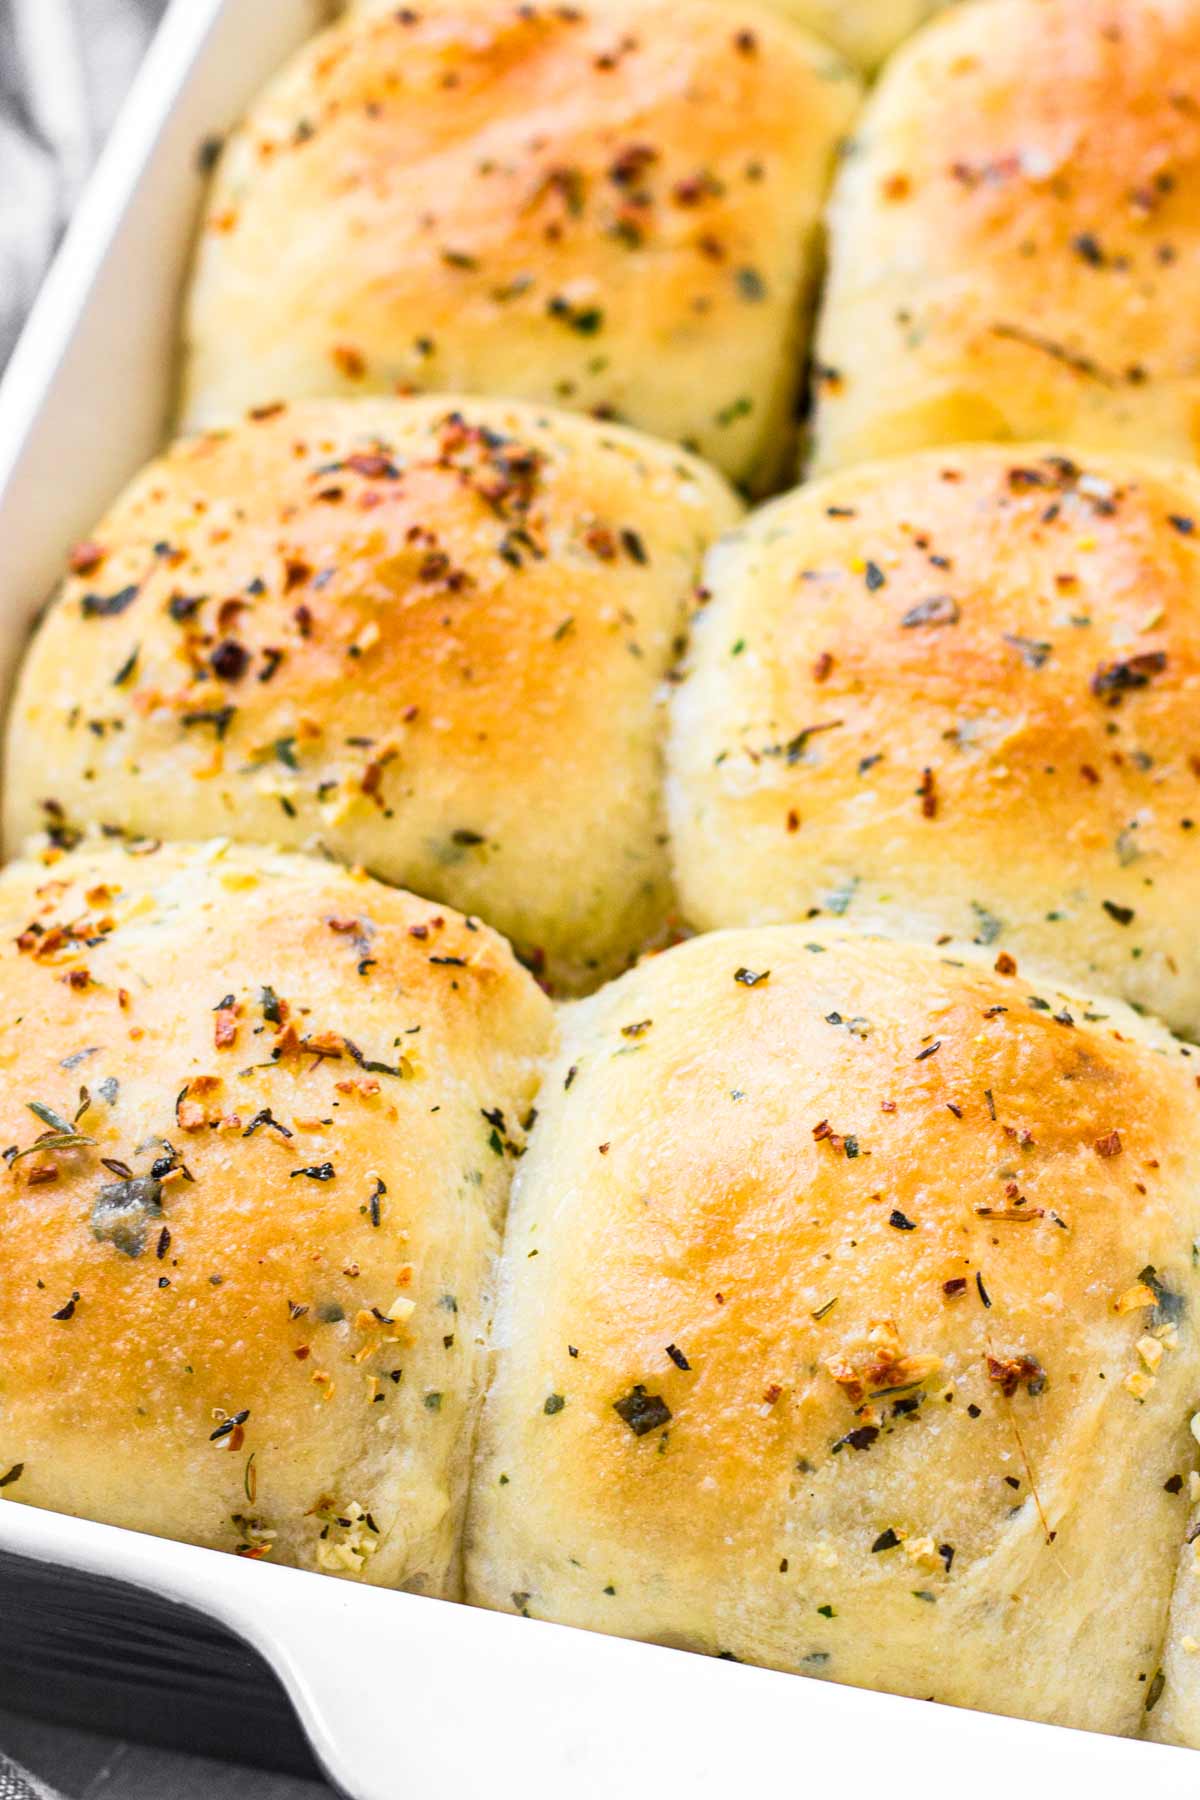
Nothing completes a meal like a basket of homemade, fresh from the oven, garlic herb dinner rolls on the table!
They’re super soft, buttery, garlicky, with plenty of herbs, and then brushed with even more garlic and herb butter. They are incredible.
I am a big fan of all kinds of bread, buns, or rolls! When I’m short on time, I’ll whip up pepperoni pizza rolls or cheesy garlic bread because they don’t require a dough made from scratch.
However, when I do have the extra time, for special occasion dinners, like Thanksgiving, I like to make these Garlic Dinner Rolls or my Soft Honey Butter Rolls, which my family requests every single year. They are always a hit!
There is nothing quite the aroma of fresh baked bread and opening up a pillowy soft bun. Whether you’re baking up a fresh batch for a holiday dinner or just because, I know you’re going to love them as much as I do!
Also, try my Sundried Tomato Rolls and Rosemary Focaccia! Both are great savory options.
Why I love making this garlic dinner rolls:
- So incredibly soft! Golden on top and super pillowy soft inside, these garlic dinner rolls will be gone in seconds!
- Tall and mighty! Using bread flour is the trick here.
- Garlicky, buttery, with aromatic herb flavors. Nothing like a good savory dinner roll.
- Simple ingredients. With active dry yeast and pantry staples, these dinner rolls couldn’t be easier to make. Below, I’m sharing all my best tips and tricks to make the best ever!
Jump to:
Ingredient Notes
You only need a few pantry ingredients to make this recipe for garlic herb dinner rolls. Below, I included a few ingredient notes that I hope you find helpful. As always, quantities are listed in the recipe card down below.
- Whole milk: Using milk instead of water ensures a richer consistency in the dough thanks to the extra fat. Needs to be warmed between 110-115 degrees F to activate the yeast. Too hot, it’ll kill the yeast, and too cold it won’t activate it.
- Bread flour: This has a higher protein content than all-purpose flour which helps to give it even more rise, structure, and extra softness. You can also use all-purpose flour, but they may turn out as tall and fluffy.
- Active dry yeast: Make sure it’s not expired. If in doubt, get fresh yeast.
- Granulated sugar: Helps to activate the yeast. It also helps to add flavor to the rolls, without making them too sweet.
- Large eggs: Gives structure to the bread.
- Unsalted butter: For a soft and fluffy texture, with a buttery flavor. You’ll also need some for brushing at the end.
- Garlic powder and salt: To give the rolls that garlicky and savory flavor.
- Rosemary, parsley, dried oregano: I use fresh chopped parsley, fresh chopped rosemary, and dried (or fresh) oregano to complement the garlicky and savory flavor profile. Make sure they are fully pat fry.
- Italian seasoning, minced garlic, and melted butter: All these will be combined to brush the tops for even more deliciousness.
Step-by-Step Tutorial
Here, I’ll show you the detailed step-by-step process for how to make these garlic dinner rolls, along with my best tips and tricks to ensure success. Remember that the dough needs a few hours to rise, so be sure to account for that. Let me show you how I make them!
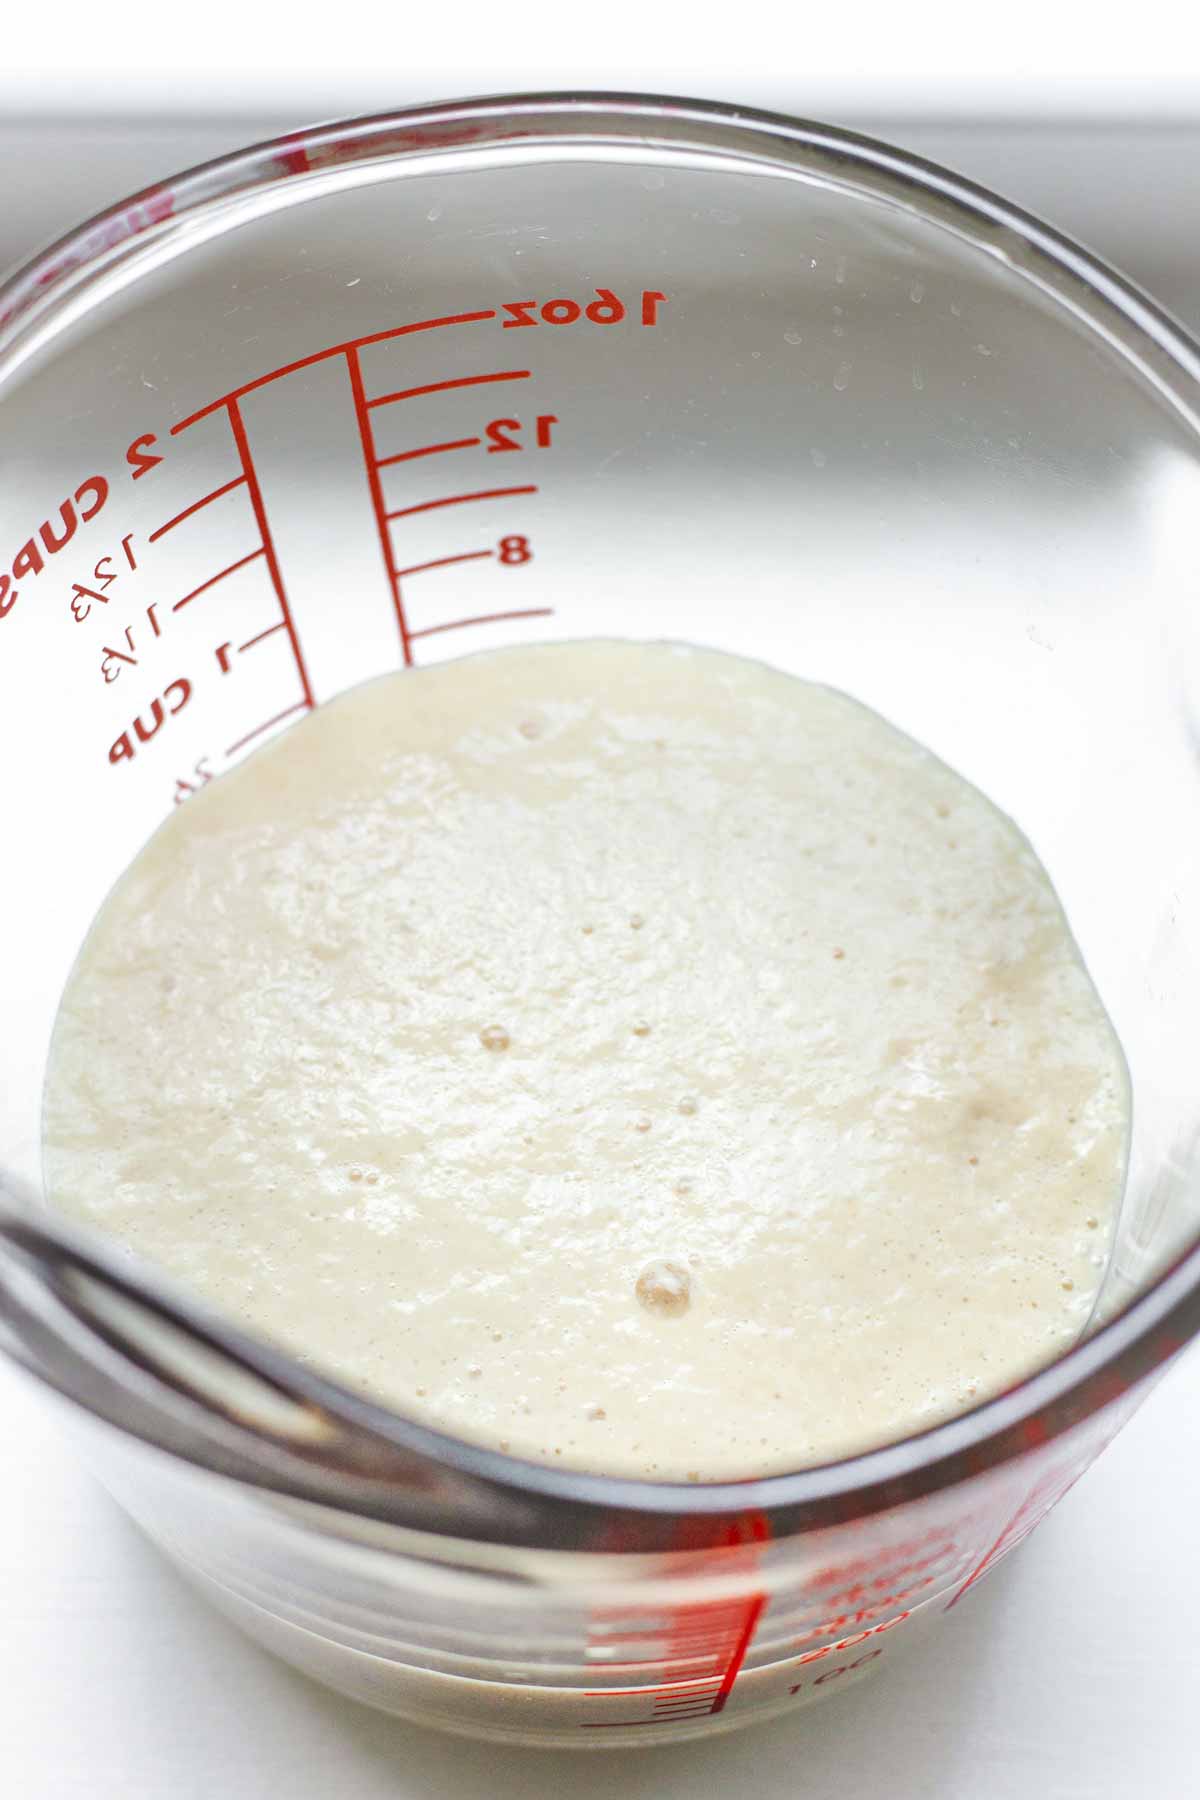
Step 1 | Proof the yeast
To the bowl of a stand mixer, add the warm milk (needs to be between 110 to 115 degrees F), 1 teaspoon granulated sugar, and the active dry yeast. Let it stand for about 10 to 15 minutes until it starts to foam. If it’s not foaming at this point, discard it and start over. Make sure the yeast is not expired or old.
Step 2 | Make the dough
In a stand mixer, using the dough hook attachment over medium to medium-high speed, mix the yeast mixture along with the remaining sugar, eggs, melted butter, garlic powder, and salt. Mix until well combined.
Now, reduce the speed to medium-low and add the bread flour, one cup at a time, scraping down the sides of the bowl as needed. Increase the speed back up to high and continue kneading (using the mixer with the dough hook attachment) until a dough forms and starts pulling away from the sides of the bowl. This should take about 3 to 4 minutes. You can also knead by hand, about 8-10 minutes.
At this point, the dough should be smooth, just slightly sticky and moist. If needed, add more flour until the dough is just right. I ended up using 3 ½ cups. Then, mix in the rosemary, parsley, and oregano until just combined.
Step 3 | Knead and let rise
Turn the dough out onto a lightly floured clean work surface. Knead by hand for about 3 to 4 minutes until it’s smooth and stretchy, and springs back slowly when poked with a finger. If it feels too sticky, knead with a bit more extra flour as necessary, without overworking.
Place the ball of dough in a lightly oiled bowl. Rub the dough around in the bowl to ensure it’s evenly greased. Cover the bowl tightly with plastic wrap and let it sit in a warm, draft-free area for an hour, or until it has doubled in bulk.
Step 4 | Shape into buns and rise again
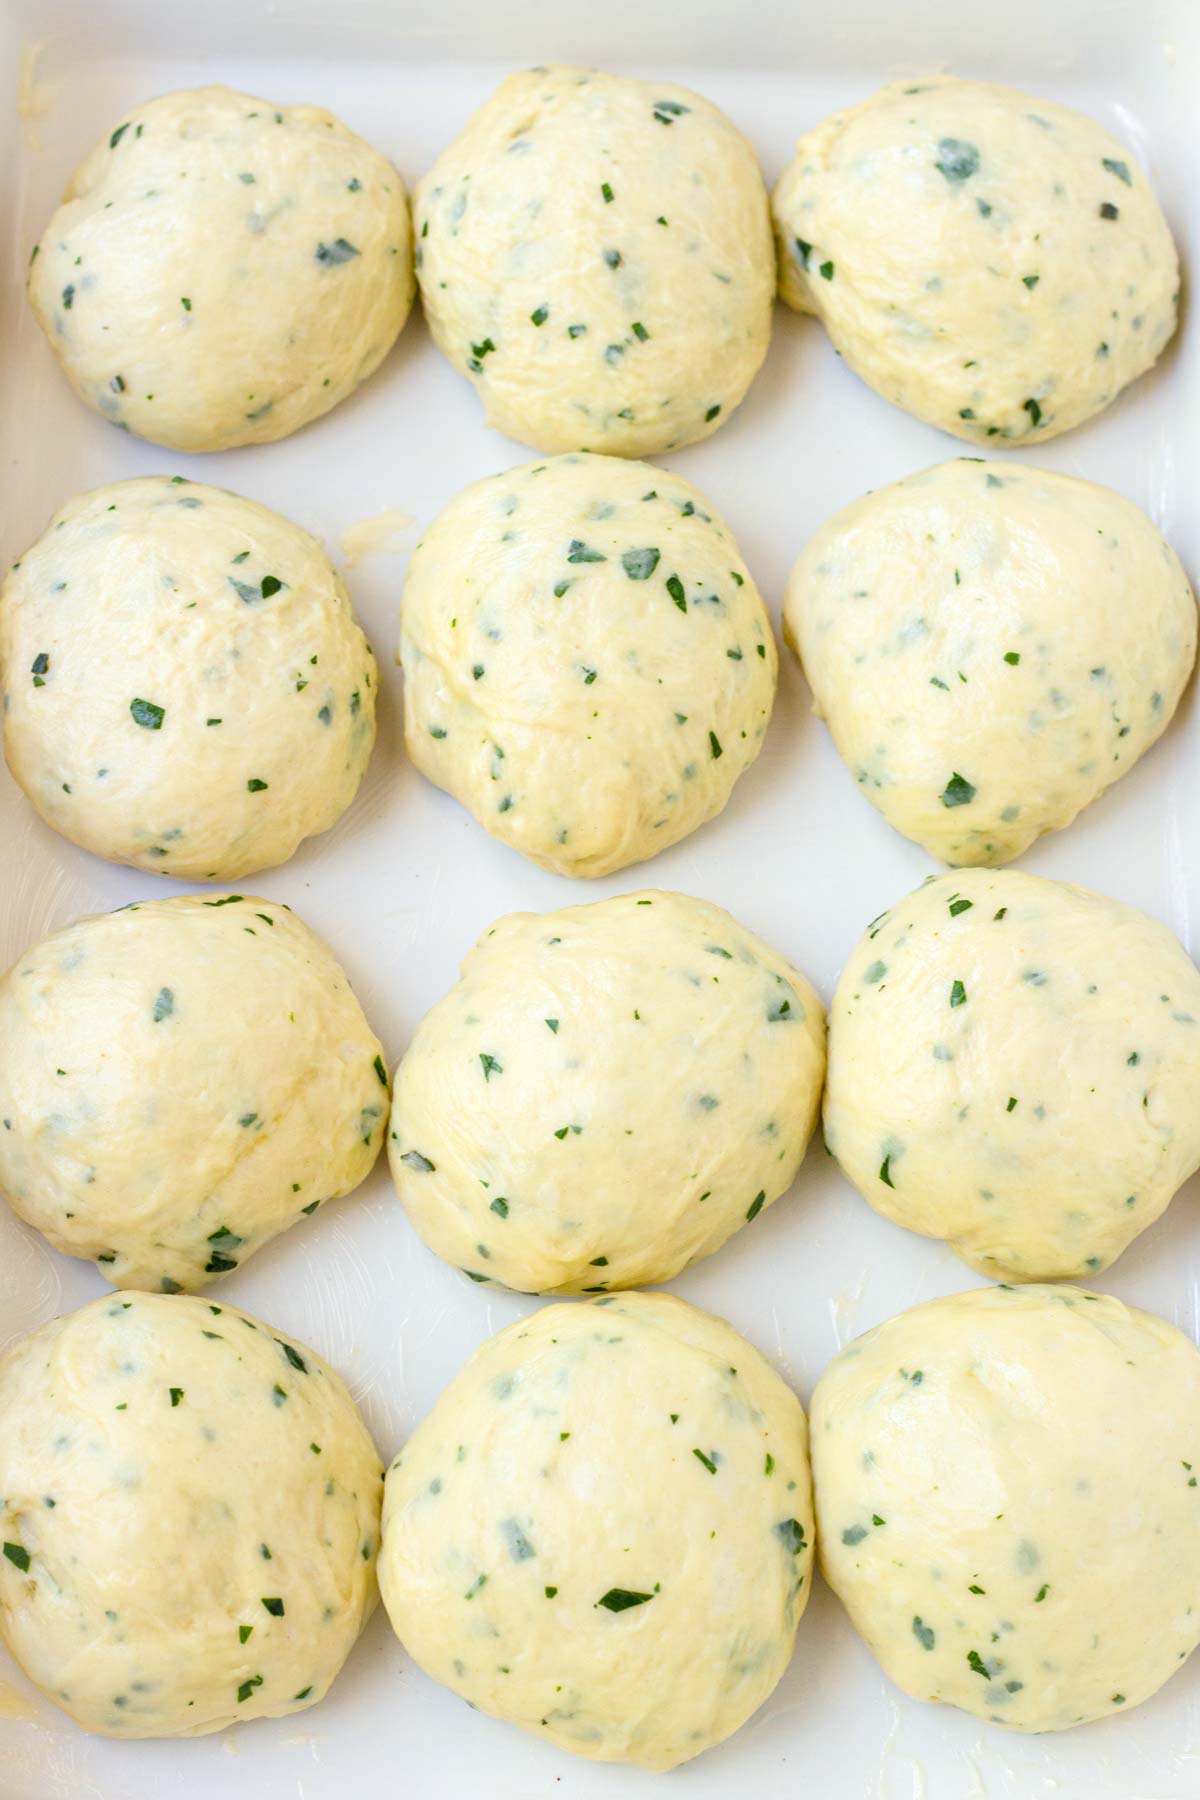
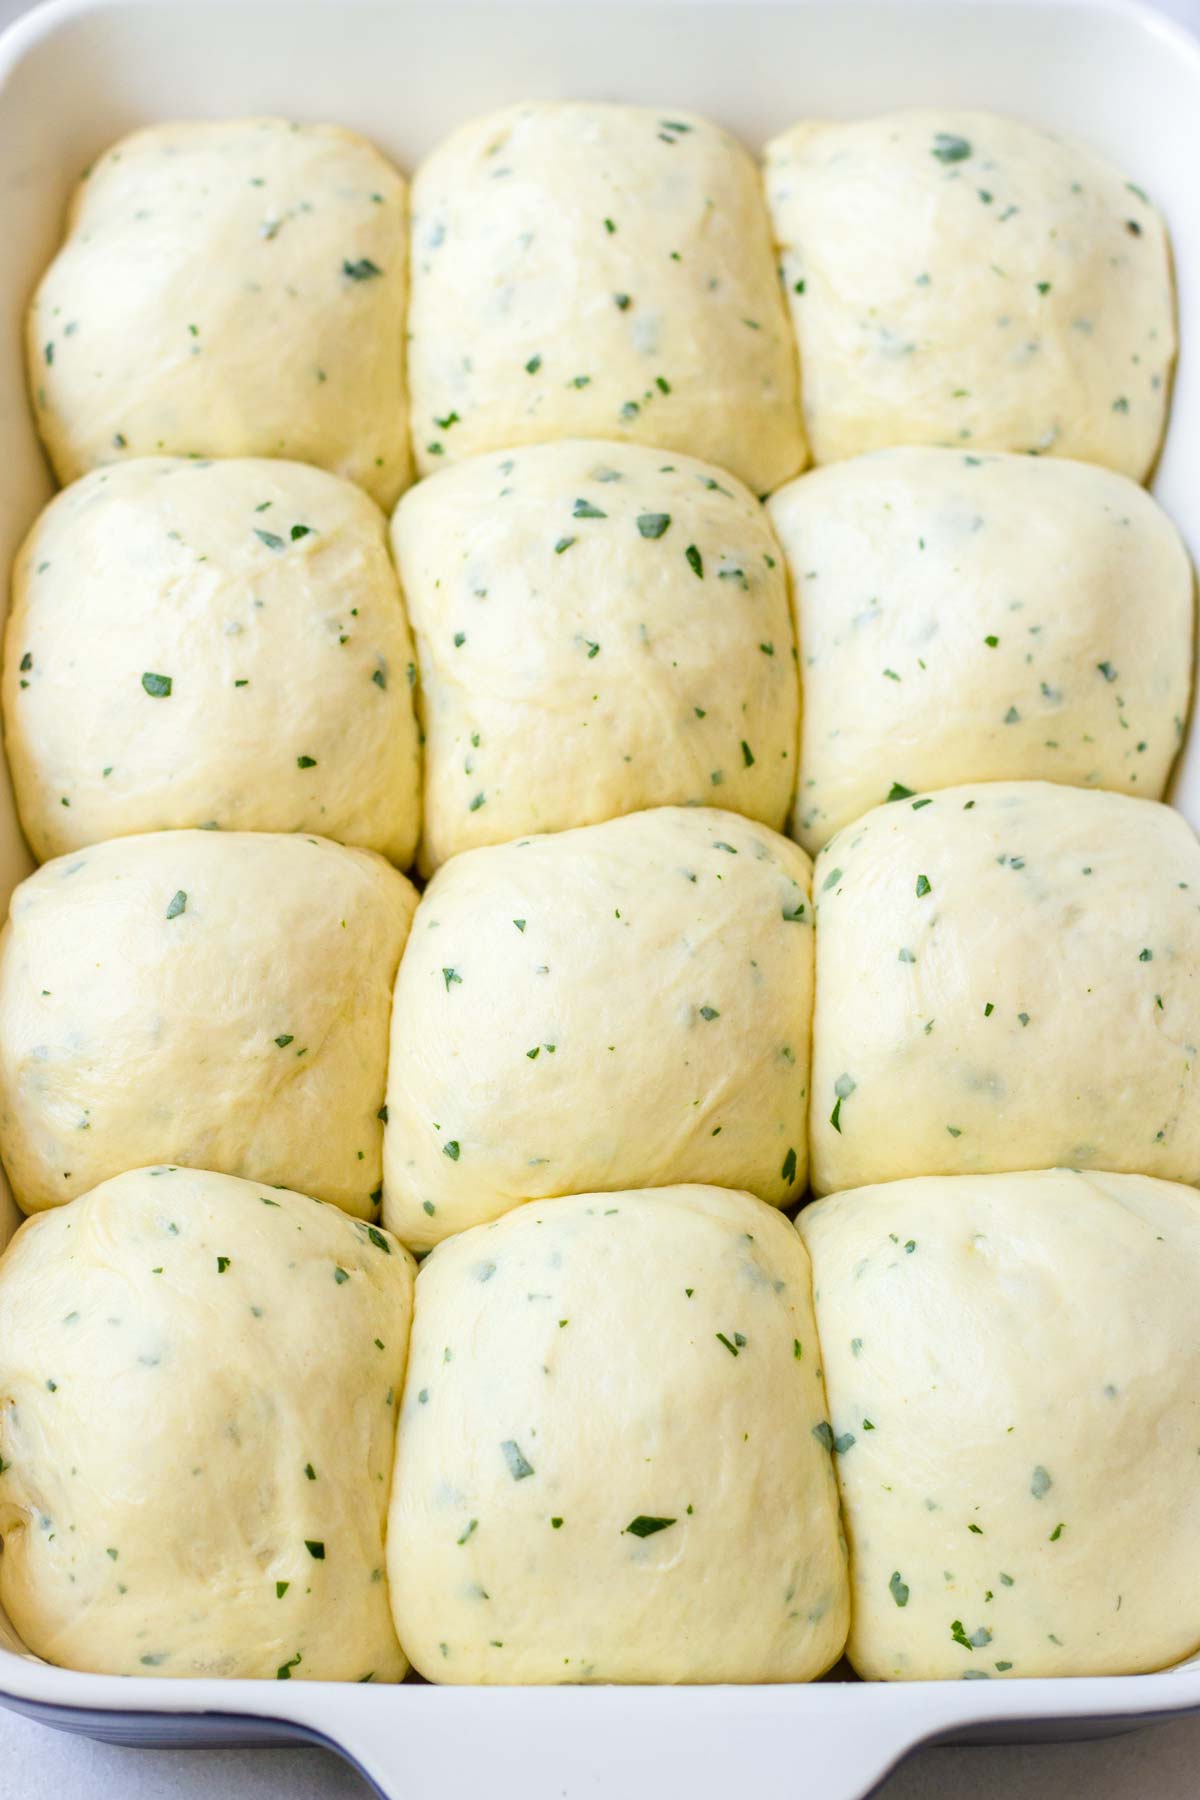
Once the dough has doubled in size, punch it down to remove the excess air. Transfer it onto a clean, non-floured, surface. Using a bench scraper or knife, to cut the dough in half. Then, cut each half into 6 equal portions. Shape all 12 pieces into equal-sized balls, pinching down the bottoms with your fingers.
Arrange them on a 9×13 baking dish. Cover the pan with plastic wrap and let the dough balls rise for another hour. They will once again double in size.
Step 5 | Brush and bake
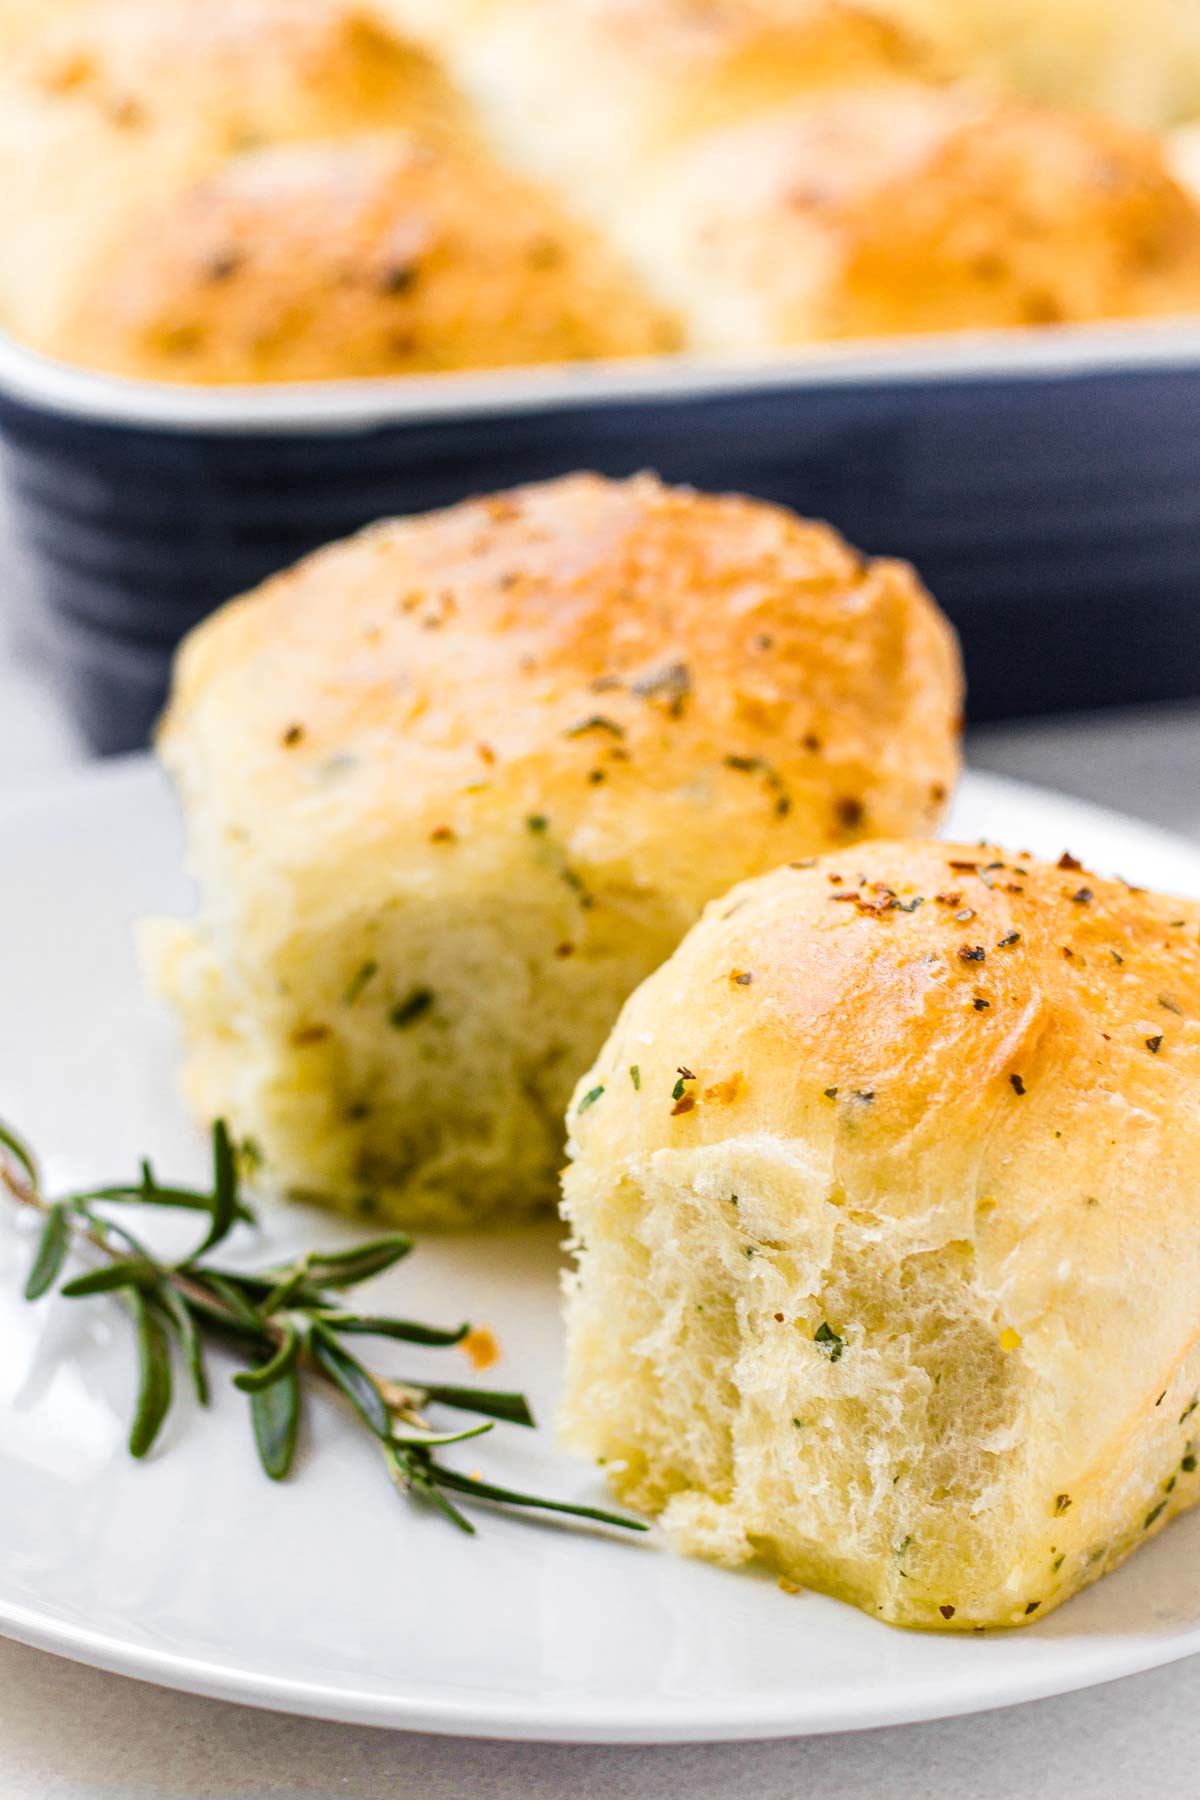
During the end of the rise time, preheat the oven to 350 degrees F. Meanwhile, make the garlic herb butter by mixing the melted butter, Italian seasoning, and minced garlic. Brush all over the risen buns.
Bake for 18 to 20 minutes until risen and golden brown on top. Once they are out of the oven, brush with more melted butter for that shiny finish. Let them cool slightly and enjoy your garlic dinner rolls while still warm!

Making Dough Rise Better and Faster
Creating the optimal environment for your dough to rise is key to helping the yeast do its job. It needs to be warm, somewhat humid, and draft-free.
My favorite trick is to microwave water in a mug for 2 or 3 minutes to warm up the microwave and create humidity. Push the mug (don’t throw out the water) into the corner, and then place the dough inside and quickly close the door. Avoid opening it until ready.
This is especially helpful if you live in a colder climate or your kitchen just happens to be colder than average.
Make Ahead and Freezing
If you want to get a head start, you can let them have their second rise in the fridge overnight.
Prep ahead (overnight): Shape the dough into balls and place them in the baking pan. Cover with plastic wrap and let them slowly rise in the fridge overnight. Bring them to room temperature for about 2 hours before baking them. This will allow them to bulk up. Then, bake as directed.
Freeze: You can freeze baked rolls for up to 1 month. Place them in a freezer bag or freezer safe container. To keep them separate so they don’t freeze in a clump, use sheets of parchment paper between the layers of rolls.
Thaw and reheat: Place them in the fridge or on the counter to thaw. Pop them in the microwave to reheat until nice and soft.
Pairing and Serving Ideas
Dinner rolls are a staple around here when we’re having anything from soups and stews to pasta and roasts.
I love serving these garlic dinner rolls with my Dutch Oven Beef Stew or Slow Cooker Chicken Stew to soak up all that gravy, or my favorite pot roast recipe ever!
They also go really well with this Red Wine Braised Beef and Apple Cider Pork Roast.
If I have leftover dinner rolls, during the week, I like to serve them with my creamy Tomato Tortellini Soup.
Bread is a staple at my Thanksgiving table, or for any holiday! Try these easy bread from scratch recipe:
Recipe FAQs
Yes. While they may not rise as high and mighty as they would with bread flour, or be as soft and fluffy, they’re still going to turn out delicious. With that said, if you can use bread flour, that would be ideal.
Yes! Form the dough into balls and arrange them in the baking pan. Cover with plastic wrap and refrigerate overnight for a slow rise. Let them sit at room temperature for about 2 hours before baking to allow for proper expansion. Then, bake according to the recipe instructions.
Yes. You may just need to knead the dough a bit longer, usually 8 to 10 minutes, or until the dough is smooth and stretchy, and springs back when poked with a finger. It should be moist and just slightly sticky.
Yes, absolutely. Use about half the amount of fresh herbs.
This recipe was originally published in 2019 and updated in November 2024 to include new photos and more information.
Tips for Success
- I’d highly recommend using bread flour for these garlic dinner rolls. This is what gives bread that beautiful texture and extra height. You can also use all-purpose flour, but they may not rise as tall and mighty.
- The milk should be within the range of 110 to 115 degrees F to allow the yeast to activate properly. Use a thermometer to test the temperature.
- Do not overwork the dough, otherwise they may turn out tough and dry. It should be ready when it’s smooth and stretchy, and springs back when poked with a finger. It should be moist and just slightly sticky.
- Allow the dough to rise in a warm environment. I use the “microwave method.” Simply, microwave a mug of water for 2-3 minutes to warm up and add humidity. Move the mug to the corner, place the dough inside, and close the door immediately to trap the warmth and humidity. This way, the dough will rise well.
I’d love to hear from you! If you loved my recipe, please consider leaving a 5-star rating and a comment down below. Sign up for my newsletter and follow along on Instagram, Facebook, or Pinterest
Garlic Dinner Rolls
Equipment
- Stand mixer with dough hook attachment
Ingredients
- 1 cup whole milk, warmed to 110-115 degrees F
- 2 ¼ teaspoons active dry yeast - (equivalent to a 0.25 ounce package)
- 2 tablespoons granulated sugar, plus 1 teaspoon
- 2 large eggs - lighty beaten
- ¼ cup unsalted butter, melted and cooled
- 1 teaspoon garlic powder
- 1 ½ teaspoons salt
- 3 ½ to 4 cups bread flour - plus more as needed, see note below
- ¾ tablespoon fresh chopped rosemary
- 2 tablespoons fresh parsley, finely chopped - fully patted dry
- 1 teaspoon dried oregano
Garlic Herb Butter for brushing
- 6 tablespoons unsalted butter, melted
- ½ tablespoon Italian seasoning
- 3 cloves garlic, minced
Instructions
Activate the yeast
- Pour warm milk (110 to 115 degrees F) into the bowl of stand mixer. Stir in 1 teaspoon of the granulated sugar and the active dry yeast, and let it sit for 10-15 minutes until frothy. This means that the yeast is good. If it does not get frothy, start over with fresh yeast.
Make the dough
- Set up the dough hook attachment in the stand mixer. With the mixer on medium speed, beat in the remaining 2 tablespoons of sugar, eggs, melted butter, garlic powder, and salt until along with the yeast mixture.
- With the mixer on medium-low speed, add in 3 cups flour, one cup at a time, scraping the sides of the bowl with a rubber spatula. Add the remaining flour in ¼ cup increments as needed until a manageable dough forms. I ended up using about 3 ½ cups of bread flour.
- Increase to high speed and knead/mix until a dough forms and pulls away from the sides of the bowl. This usually takes 3 minutes in the mixer, or 8-10 minutes by hand. The dough should be smooth and stretchy, manageable, moist, and sightly sticky.
- Then, on low speed, add the rosemary, parsley, and oregano until evenly incorporated.
- Transfer dough onto a lightly floured surface, and knead by hand for about 3-4 minutes, sprinkling more flour if too sticky still. At this point, the dough should be smooth and stretchy, and moist. It should spring back slowly when poked with a finger. Do not over-knead.
Let the dough rise
- Form dough into a ball and place on a lightly oiled bowl (I used olive oil), making sure to coat the dough with oil as well. Cover tightly with plastic wrap and let it rise in a warm environment for about 1 hour, until doubled in size. See note below “How to create a warm environment for dough to rise.”
Shape into buns and let it rise again
- After the dough has risen, punch it down to release excess air. Transfer to a clean non-floured surface. Cut the dough in half, and then cut each half into 6 equal pieces. Shape into balls, pinching the bottom with your fingers. Arrange in a lightly greased 9×13 baking pan.
- Cover the pan with plastic wrap and let it rise for another 1 to 1.5 hours in a warm environment or until doubled in size.
Bake
- Meanwhile, preheat oven to 350 degrees F.
- In a small bowl, combine the garlic herb butter ingredients, and brush all over the risen buns.
- Bake for 18-20 minutes until golden brown and tall. Once they are out of the oven, brush with more melted butter for that shiny finish. Let cool slightly and serve while still warm. Enjoy!
Notes
- Bread flour vs. all-purpose flour: Bread flour is ideal for bread to rise extra tall and also gives it a much softer texture. All-purpose flour will work too, but they won’t have the same height and softness.
- How to create a warm environment for dough to rise: Use the microwave trick! Microwave some water in a mug for 2-3 minutes to get it warm and humid inside. Push the mug to the corner, and then place the bowl with the dough inside. Close the door immediately to trap in the heat. Avoid opening until the dough has risen.
- Make-ahead: After shaping the dough into rolls, cover the pan tightly with plastic wrap and refrigerate overnight. The next day, remove the rolls from the refrigerator and let it sit on the counter at room temperature for about 2 hours, or until doubled in size. Then, proceed to bake as directed.
- Proofing yeast: Make sure the milk is warmed up to 110-115 degrees F. If the milk is too cold, the yeast will not activate. If the milk is too hot, it will kill the yeast. Use a thermometer to be sure.
- If your yeast didn’t get frothy, discard and start over with fresh non-expired yeast.
- Sugar is like food to yeast. It will help activate the yeast faster.

Kathy Herren says
So good and fluffy! Was a hit with everyone
Marie Angiolino says
Excellent
Sunita parr says
Thank you so much. The best bread rolls ever. Looks good and delicious.