
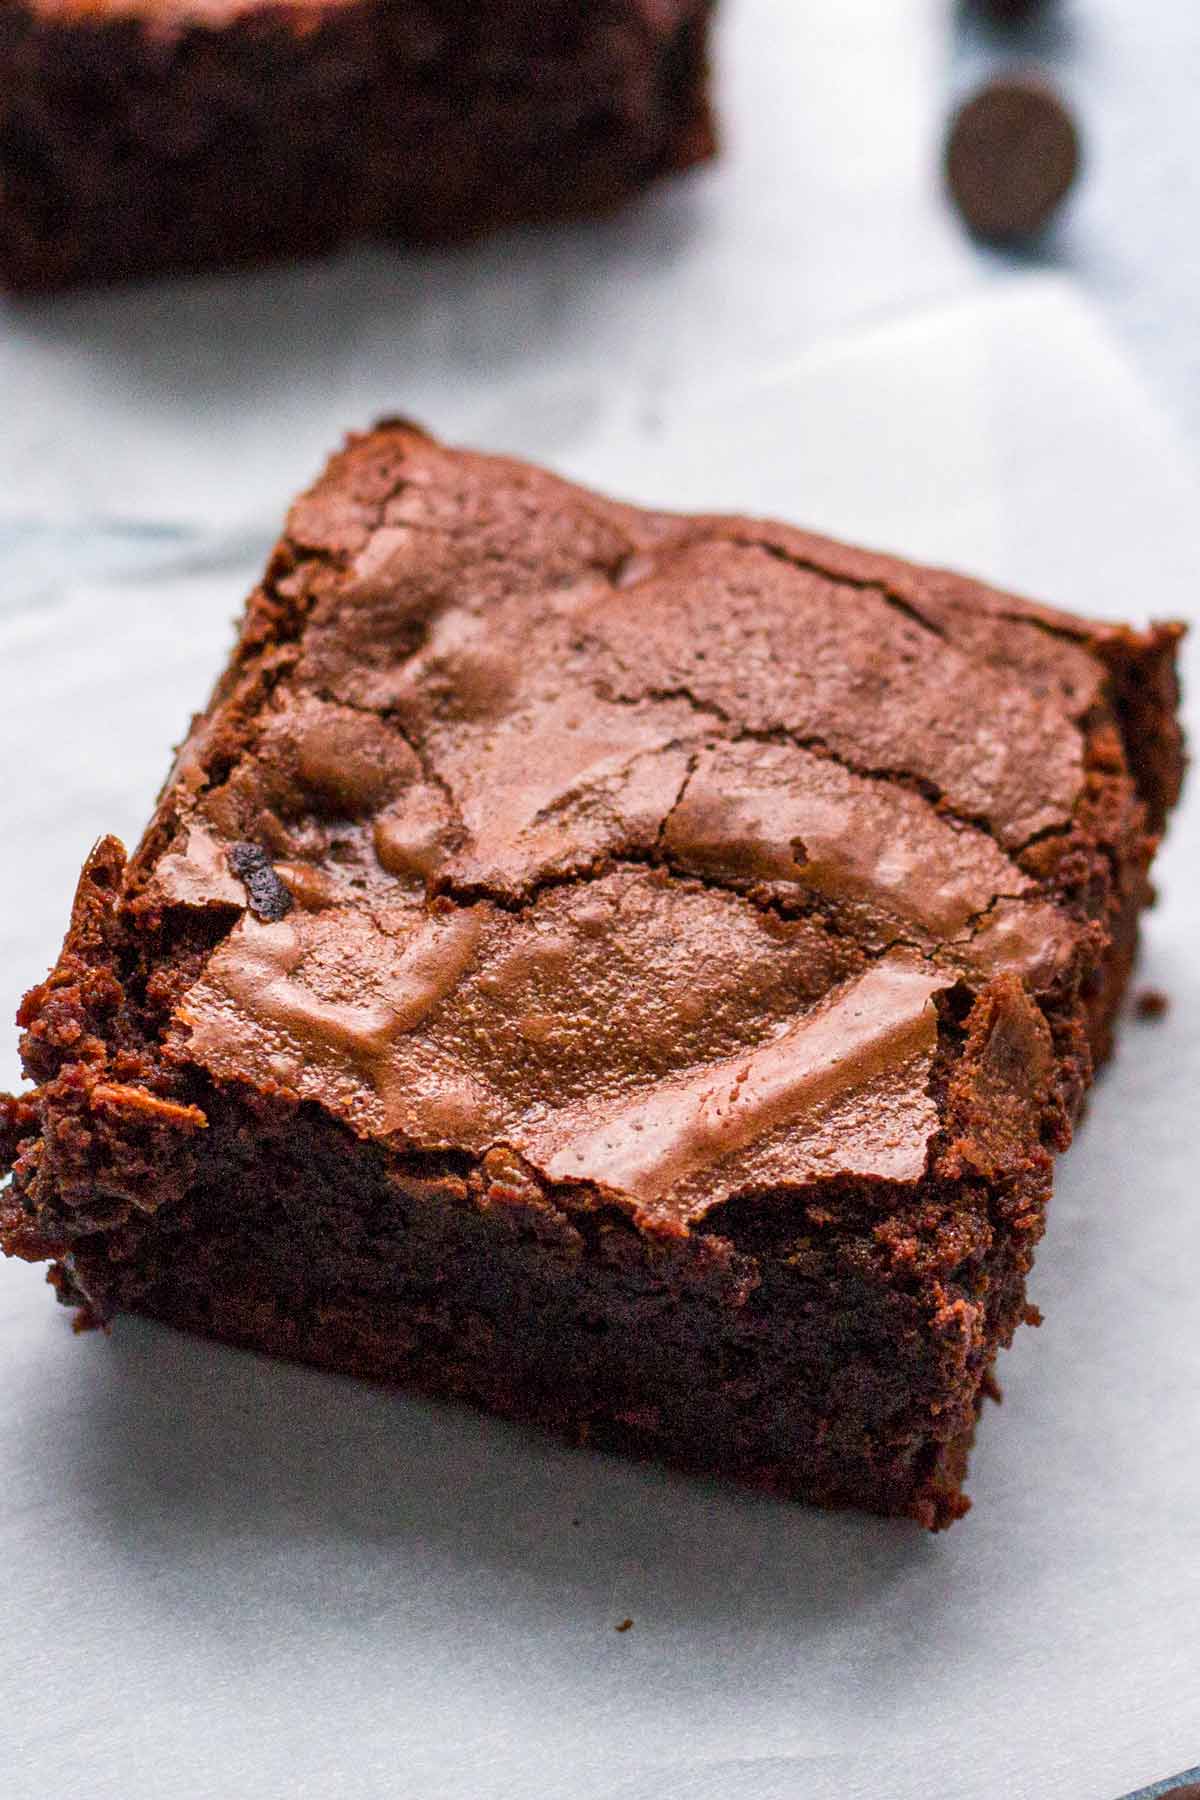
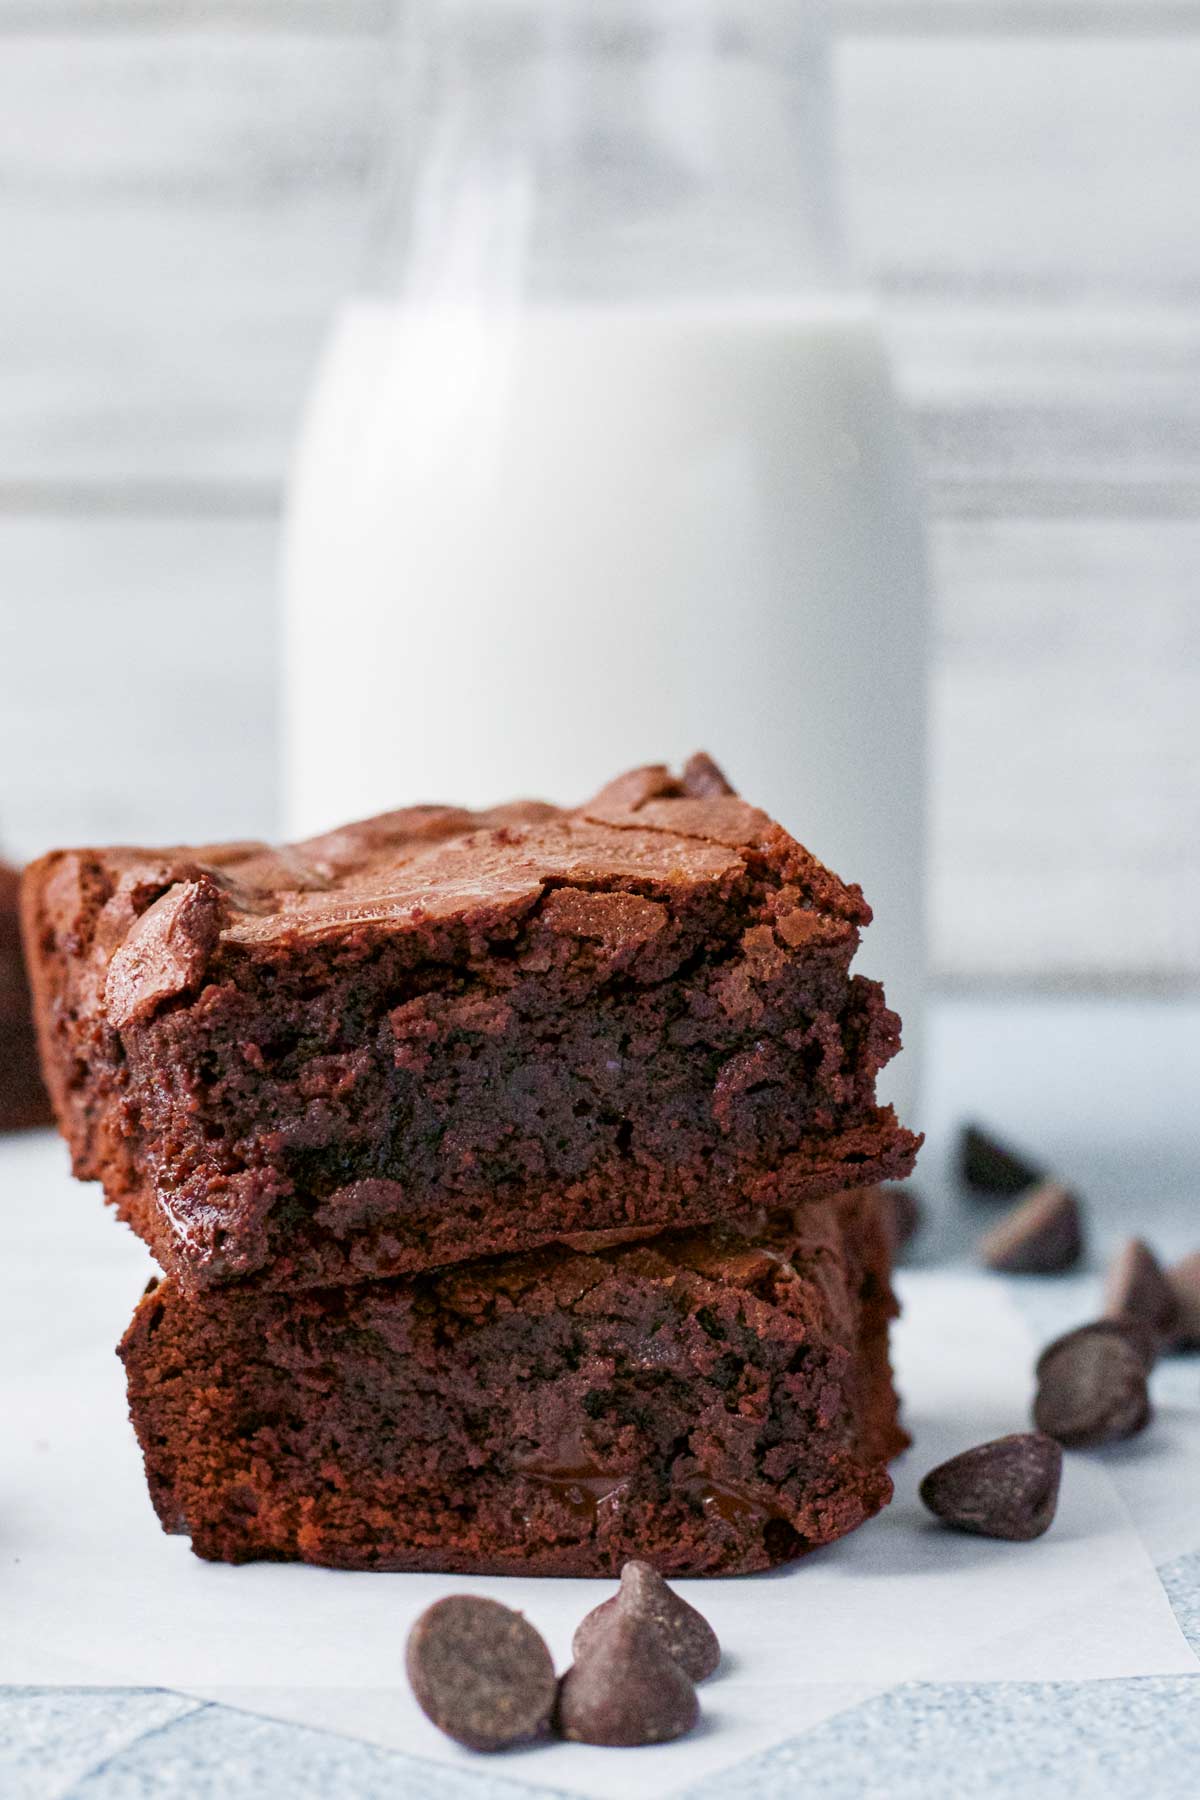
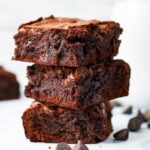
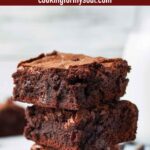
A bit fudgy in the center, a little cakey on the outside, and slightly chewy overall, these perfect brownies will become your new go-to brownie recipe!
This is a one bowl brownie recipe made with just 15 minutes of prep time, and the rest is just baking time. It’s chocolate decadence with perfect texture, and the right level of sweetness and richness.
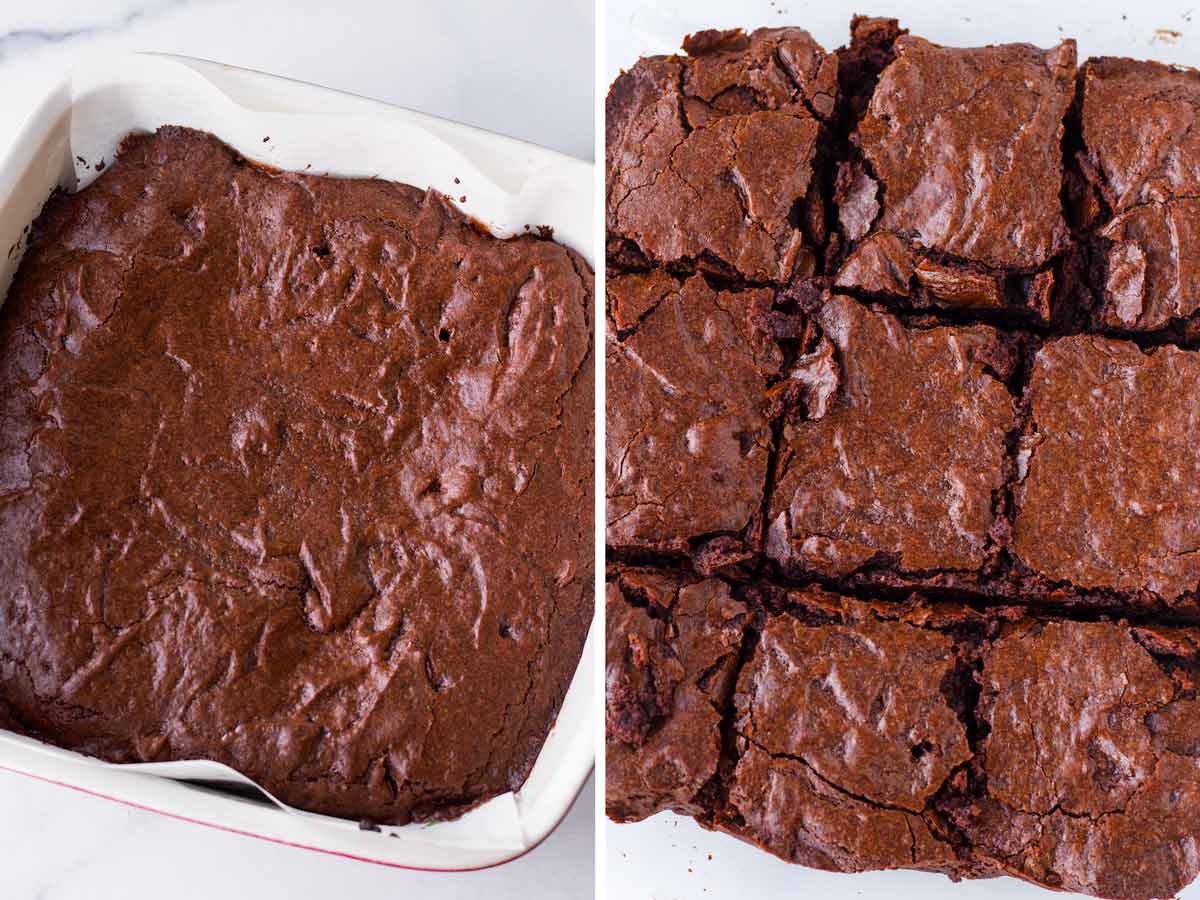
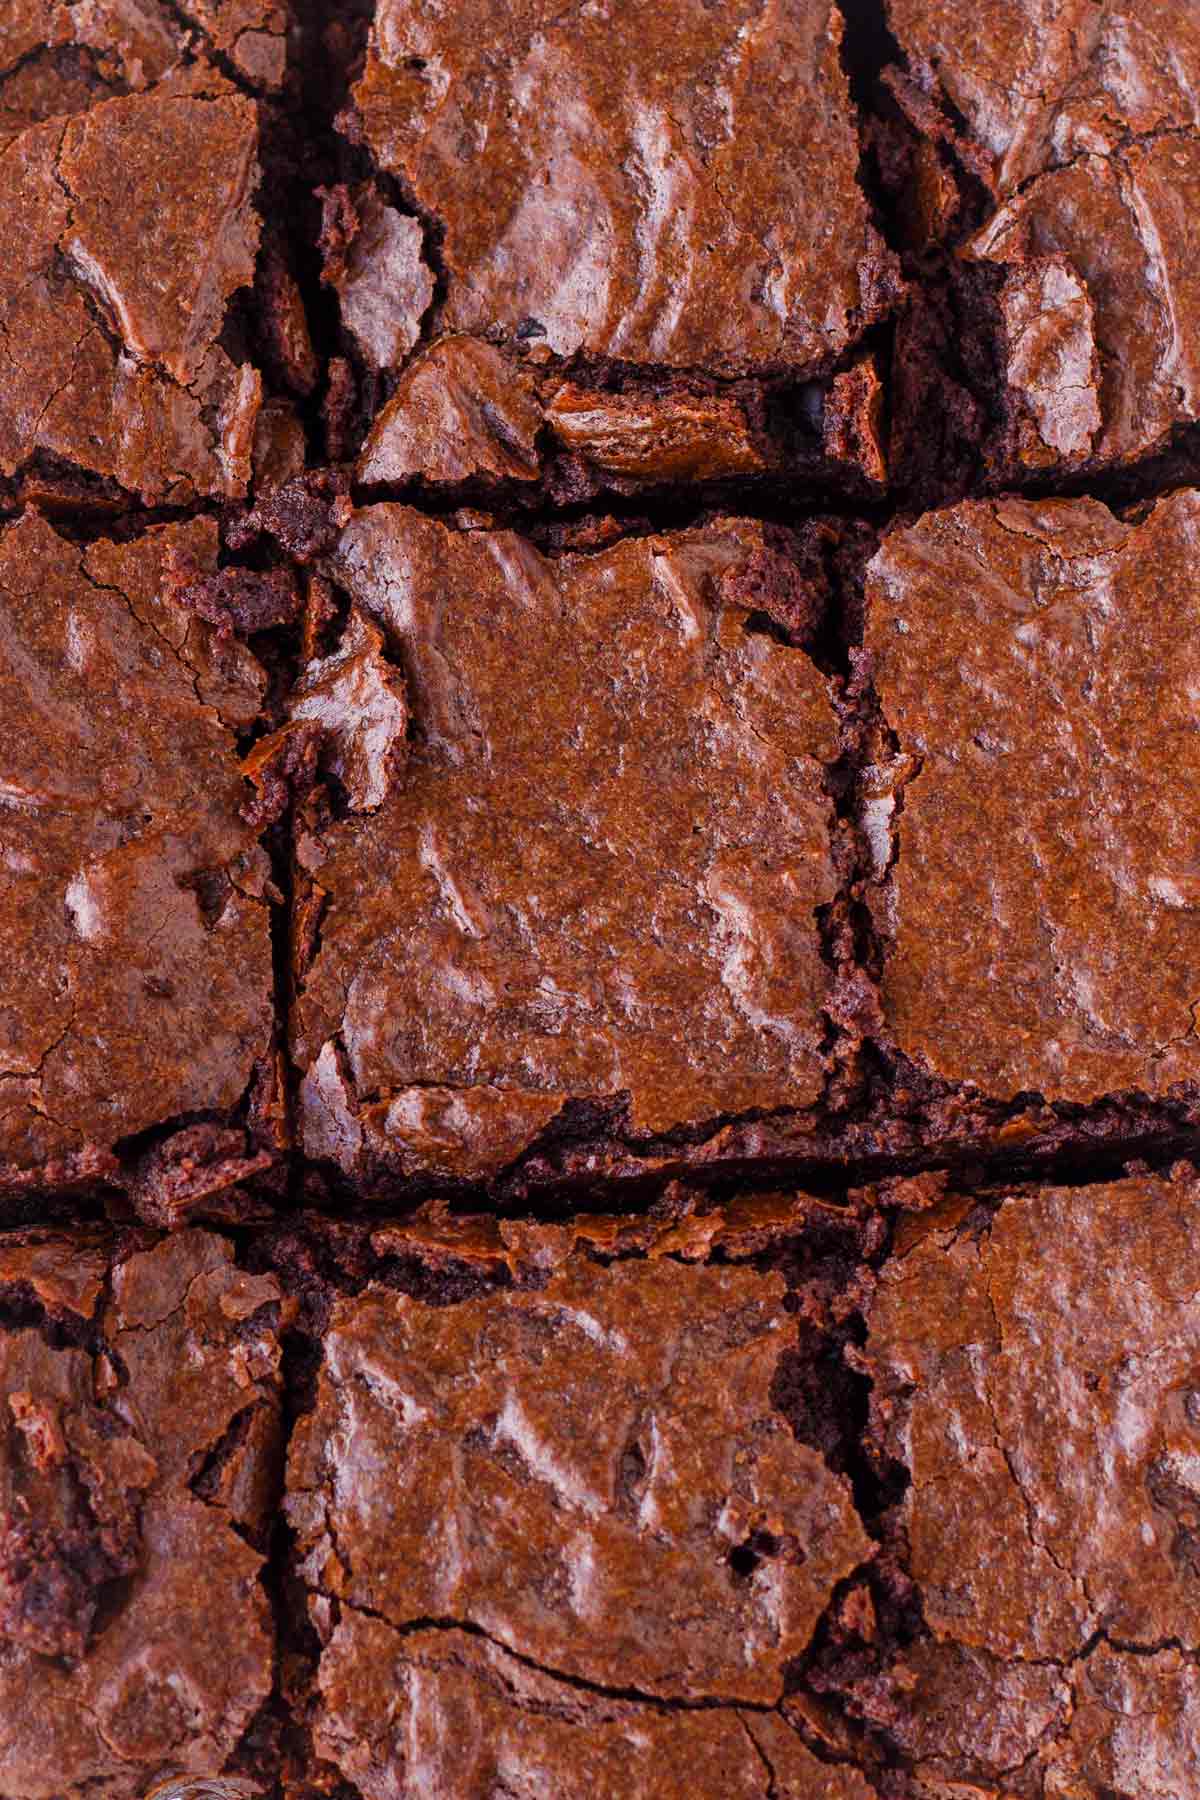
They also have that beautiful, shiny, glossy, and crackly top that everyone loves. I hope you give these a try!
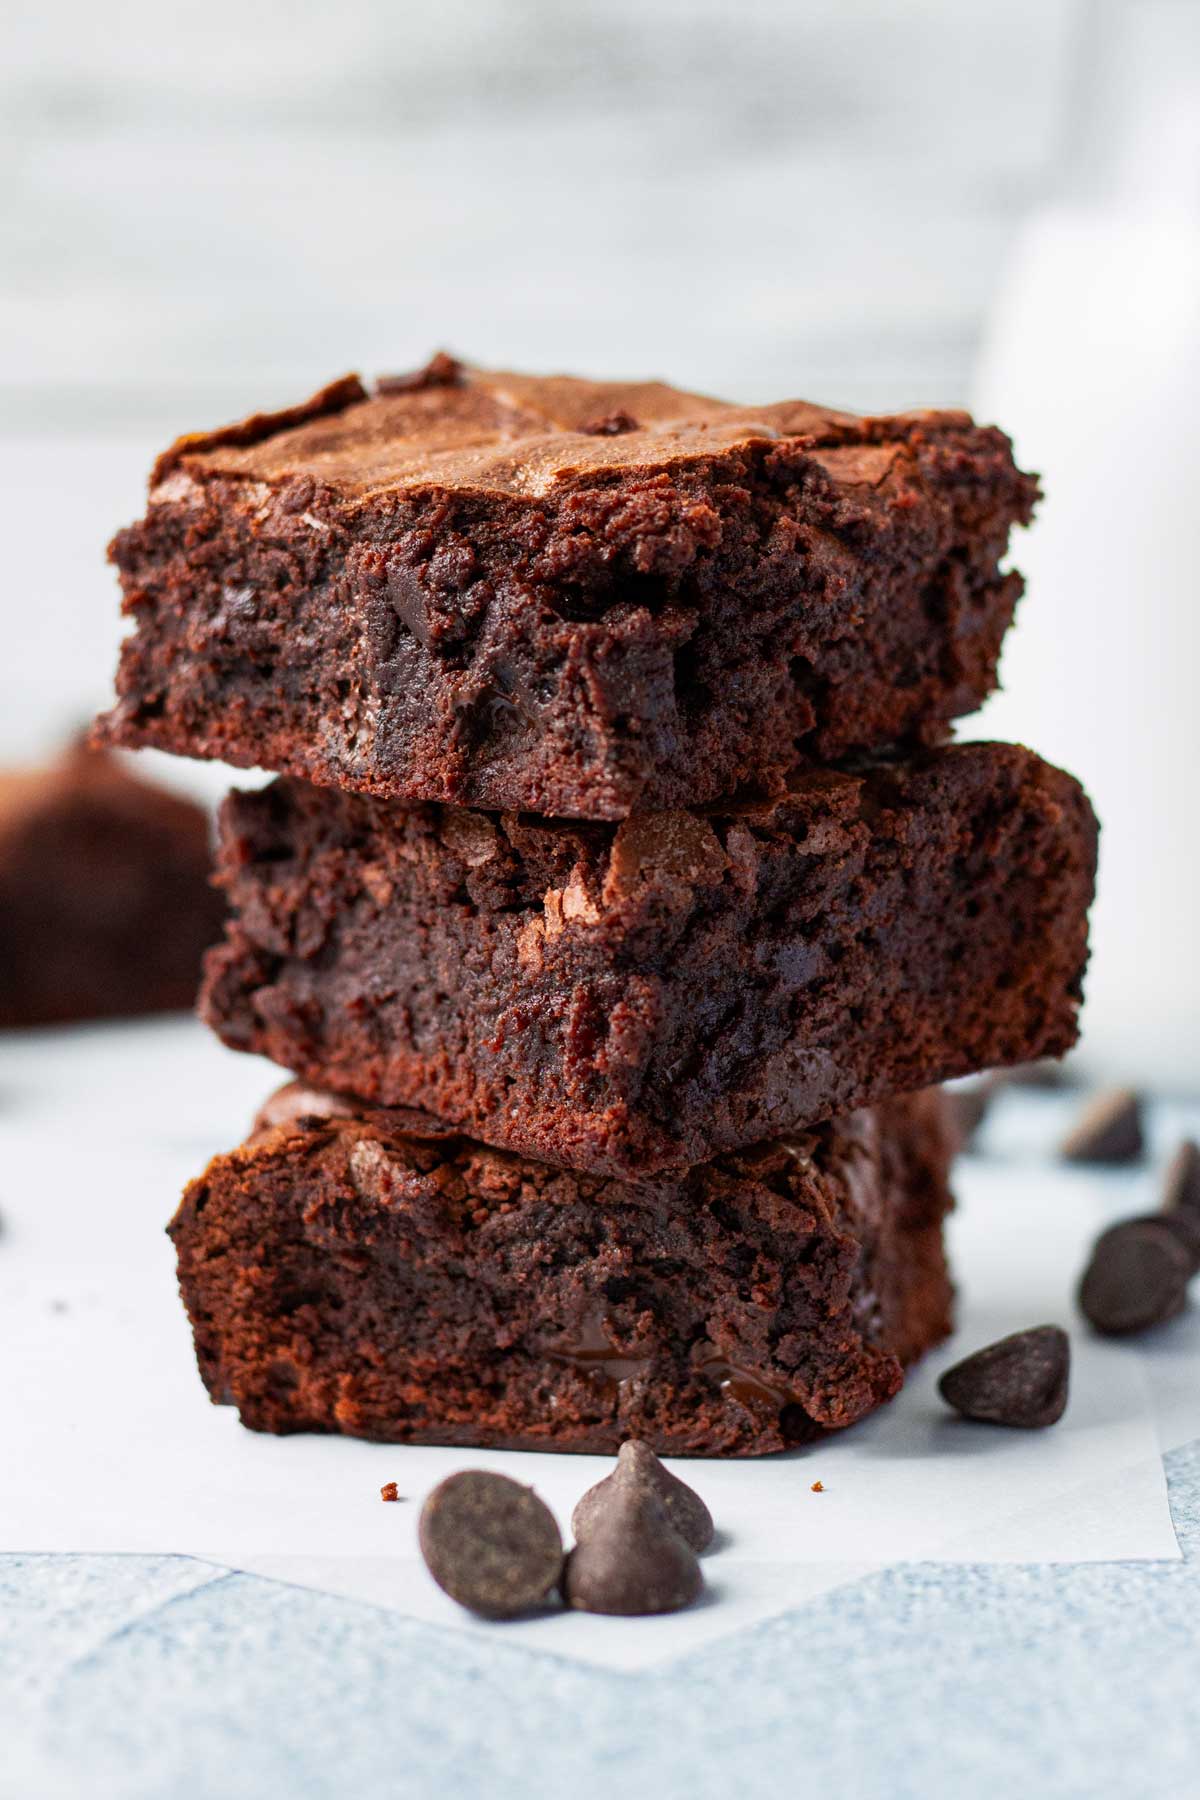
Some brownies are fudgier while others have a more cakey or chewy texture, but for those who want the perfect combination of the three, this recipe is for you!
I’ve tested so many different variations, and I have to say…THESE ARE IT! The perfect brownies. A bit fudgy in the center, a little cakey around the edges, and slightly chewy overall. Plus, they have that beautiful, shiny, crackly top that everyone loves.
These brownies are made with cocoa powder, chocolate bar, AND chocolate chips. Yes, that’s 3 kinds of chocolate! I fold in the chocolate chips for that extra melty chocolate in the center.
I like them just as much for dessert with a cold glass of milk or a scoop of vanilla ice cream. And whatever I have leftover, I use it to make super easy Brownie Sundaes!
Around the holidays, I always bake a batch or two, as well as my Nutella Stuffed Cookies and Sea Salt Chocolate Chip Cookies. And for those who can’t decide between cookies and brownies, make my Brookies!
Why I love making these perfect brownies:
- Perfect texture! Like I mentioned earlier, these are cakey, fudgy, and slightly chewy ALL IN ONE. I’m sharing all the secrets below!
- Minimal prep time. With just 15 minutes of prep time, it’s really the oven that does most of the work. Plus, it’s a one bowl recipe for minimal clean-up.
- Lots of chocolate flavor. Using 3 different kinds of chocolate makes this a chocolate lover’s dream. But they are not overly sweet or too rich either. It’s well-balanced.
- Freezer-friendly. Can be kept frozen for months for a quick and easy dessert later on.
Jump to:
Fudgy, Cakey, and Slightly Chewy
You may be wondering, how can a brownie be fudgy, cakey, and chewy…ALL IN ONE? Well, these really are. That’s why I call them “perfect brownies.”
If that’s not enough to convince you, here’s what people are saying in the recipe reviews:
- “The result was great! Crispy top with chewy, soft center, not too sweet, but definitely rich and chocolatey.”
- “The brownies sit in that perfect sweet spot between cakey and fudgy and are just heavenly”
- “These are absolutely perfect!!! Rich, perfect texture, and just delicious!”
Here’s how I achieve this brownie texture trifecta:
- It’s all about ratios. The texture depends on the ratio of flour to fat (chocolate and butter). Fudgy brownies have more fat with less flour, while cakey ones use more flour. Follow my ingredient ratios to achieve all three textures in one.
- 3 types of chocolate! These are made with cocoa powder, chocolate bar, AND chocolate chips. I fold in chocolate chips into the batter at the end to achieve that extra fudgy result in the center.
- Use an 8×8 inch square pan: An 8×8-inch square pan ensures the right level of thickness (they are quite thick, about 1 ¼ inches). This means that with about 38-40 minutes of baking time, the exterior will be a bit cakey texture with a shiny top, but still moist and fudgy texture in the center.
- The shiny, glossy, crackly brownie top is achieved by quickly dissolving granulated sugar into the warm melted chocolate.
Ingredient Notes
You only need a few simple baking staples to make the perfect brownies. Below, I included a few notes from recipe testing that I hope you find helpful. Ingredient quantities are listed in the recipe card down below, as always.
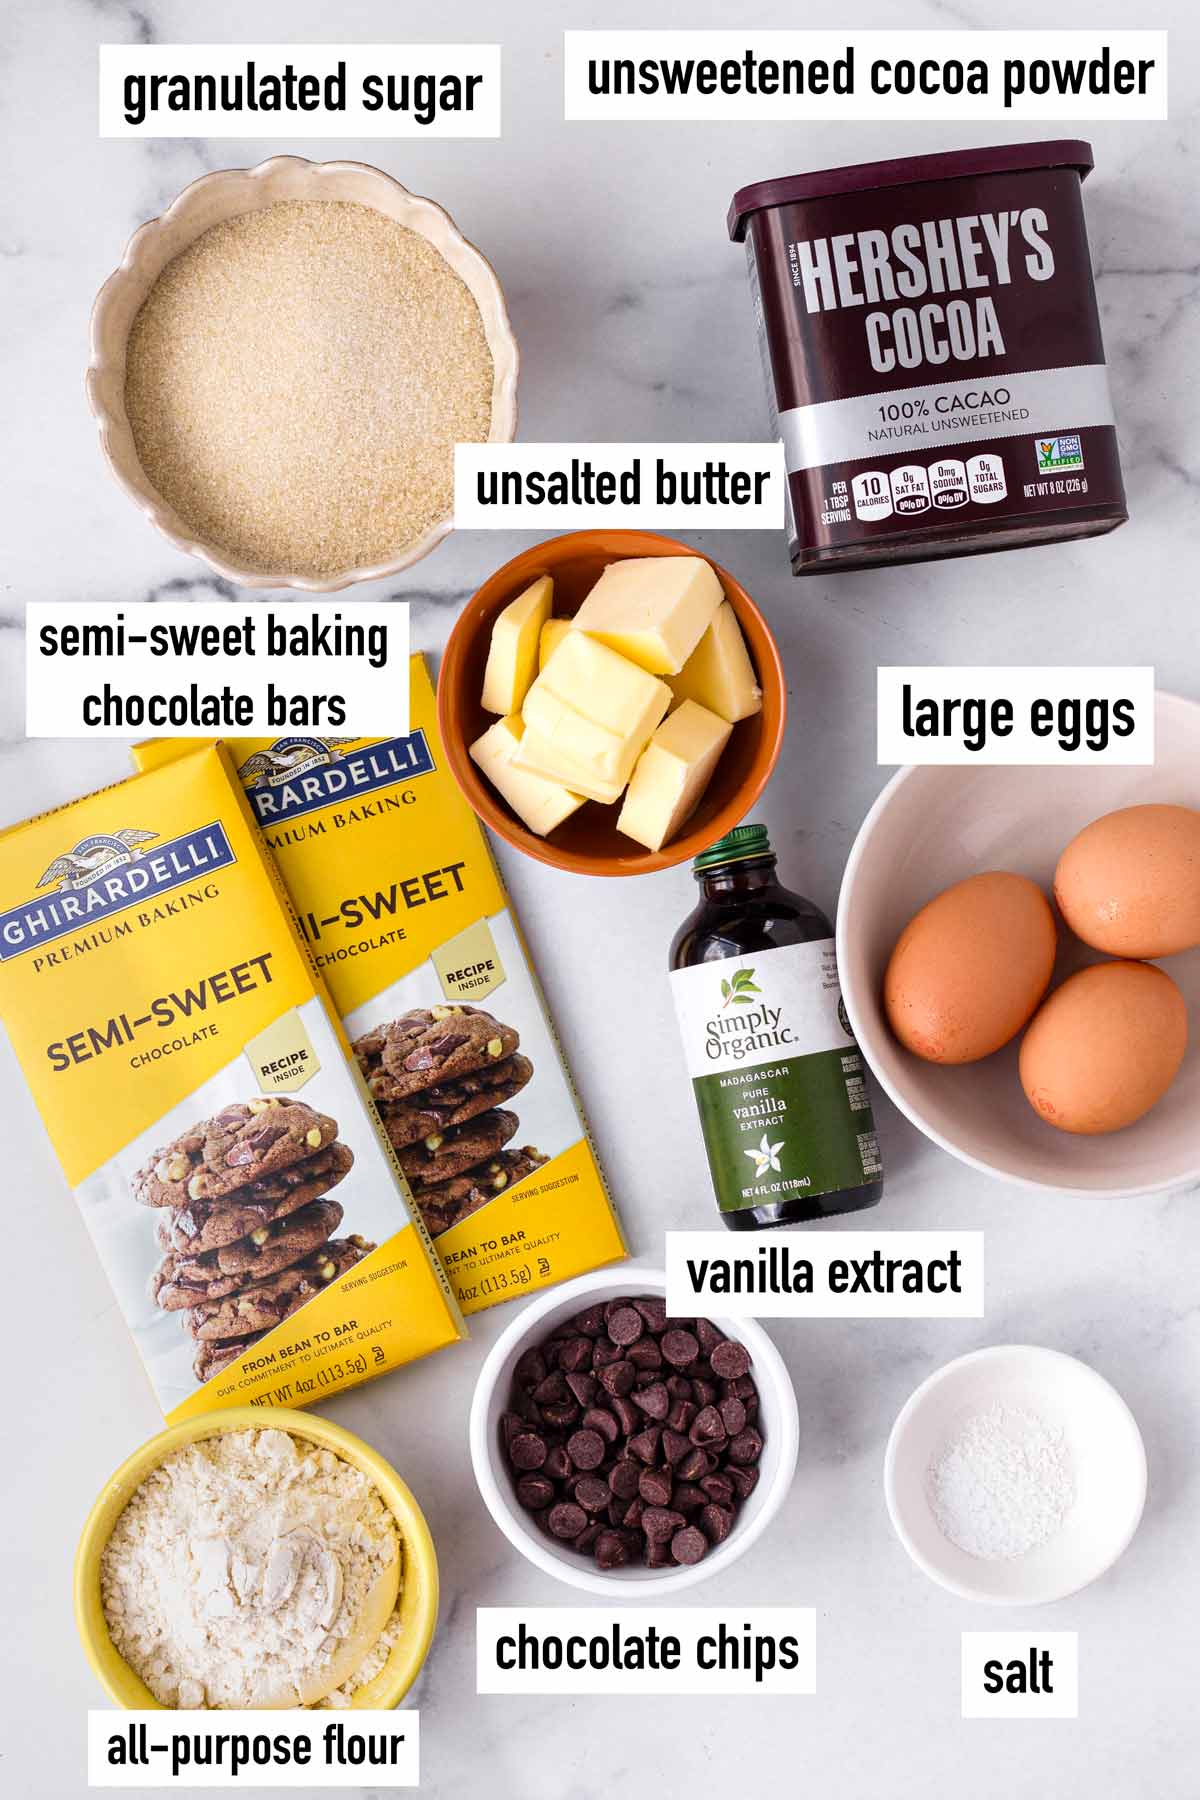
- Unsalted butter: Not all salted butter is created equal, so I like to use unsalted to be able to control the amount of salt I add separately.
- Semi-sweet baking chocolate bars: Roughly chopped. Use good quality chocolate for best results.
- Granulated sugar: Not only does it add the right amount of sweetness, it also helps to get that shiny top.
- Large eggs: Bring them to room temperature before using.
- Pure vanilla extract: Whenever possible, use pure extract. Sometimes the artificial vanilla extract can have a funny aftertaste. For the best flavor, use the pure stuff.
- Unsweetened cocoa powder: I use Hershey’s brand, and it’s never failed me. You can get that in most grocery stores in the baking aisle. Don’t use Dutch processed cocoa here – it’s different.
- All-purpose flour: Make sure to measure it accurately. We’re not using too much flour here, we only need half a cup.
- Semi-sweet chocolate chips: These get folded into the batter at the very end. They will melt while baking, and contribute to that fudgy and moist center.
- Salt: Brings out all of the flavors with baked goods.
Step-by-Step Tutorial
Prepping for this brownies recipe takes just 15 minutes, and the rest is just oven time. Let me show you how I make them!
Step 1 | Prep the baking pan
First, preheat the oven to 350 degrees F. Now, the baking pan! This part is important. Make sure you have a square 8×8 inch pan. It can be ceramic or aluminum.
Lightly grease it and line with parchment paper, leaving some hanging over all four sides. This will make it easy to lift the brownies out of the pan, and also prevent the edges from burning.
Step 2 | Melt the chocolate and butter
There are two methods for melting the chocolate and butter. Either one works, but the microwave method is easier.
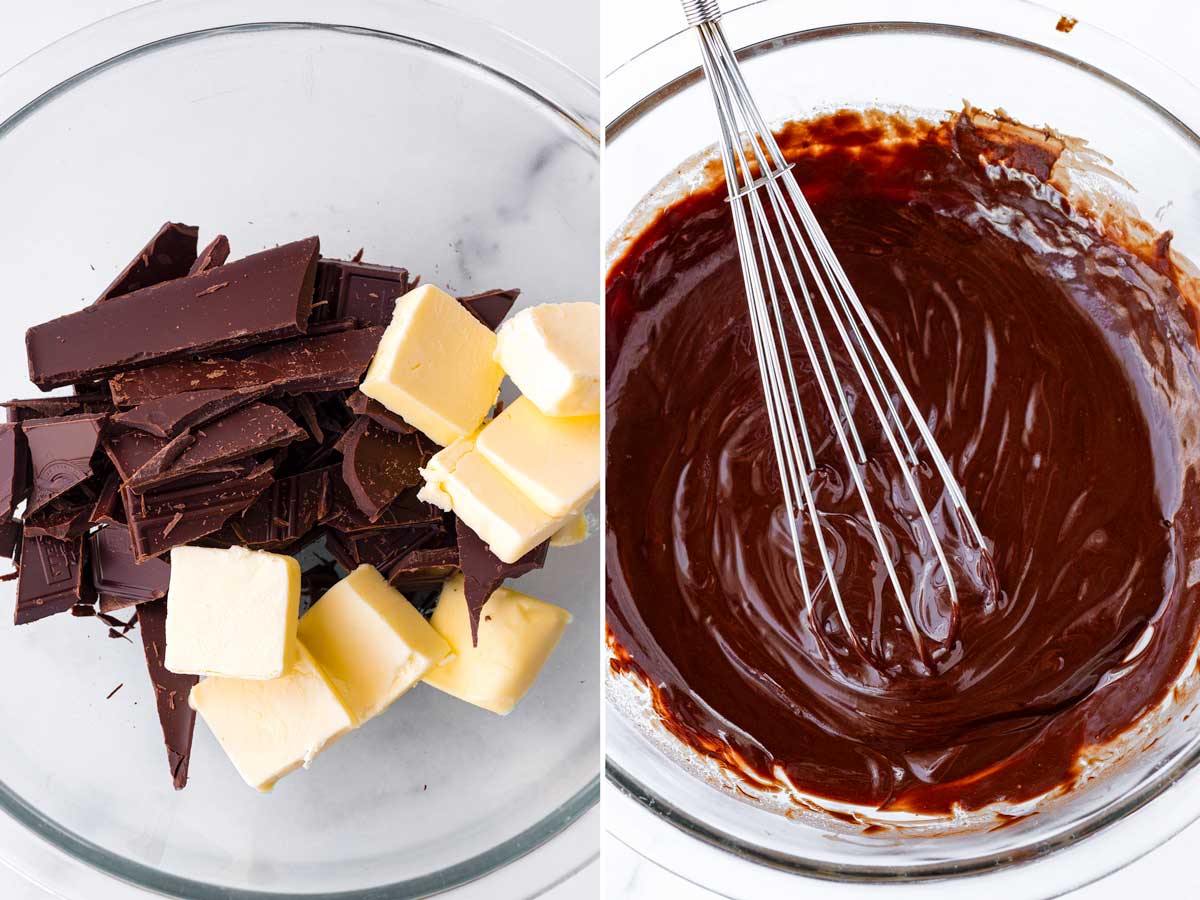
Microwave method: Add butter and chopped chocolate bar to a microwave-safe mixing bowl. Melt the chocolate in 30-second intervals, using a rubber spatula to mix in between each one. Repeat until fully melted, warm, and smooth.
Double-boiler method: Add some water (a few inches) to a medium pot and bring to a simmer. Then place a pyrex bowl on top, and melt the butter and chocolate bar chunks in the bowl. Make sure no water droplets touch the chocolate, otherwise it will seize.
Step 3 | Mix wet and dry ingredients
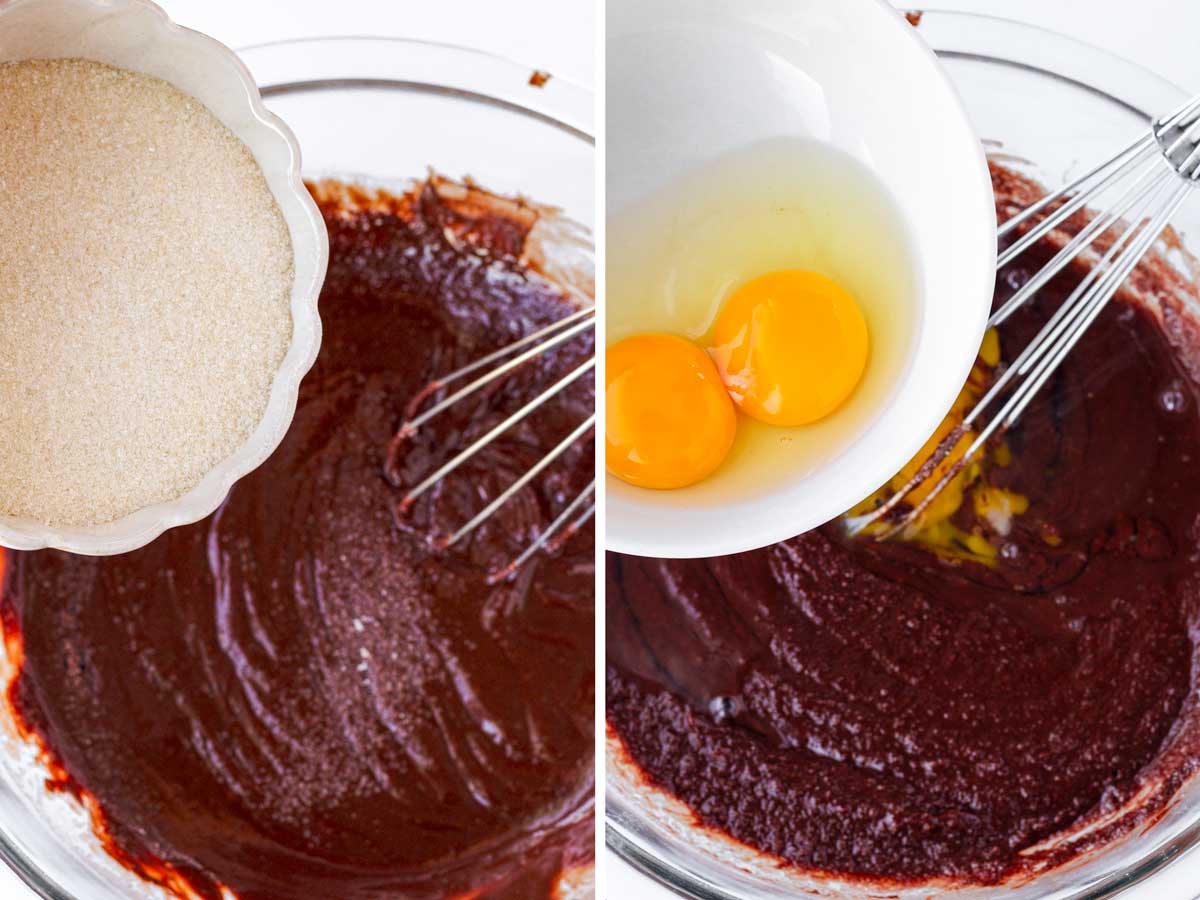
Immediately after the chocolate is melted and still warm, whisk in the granulated sugar until fully dissolved. This is what creates that shiny and crackly brownie top.
Next, whisk in the eggs, one at a time. Make sure each egg is fully incorporated before adding another one. Then, add the vanilla extract.
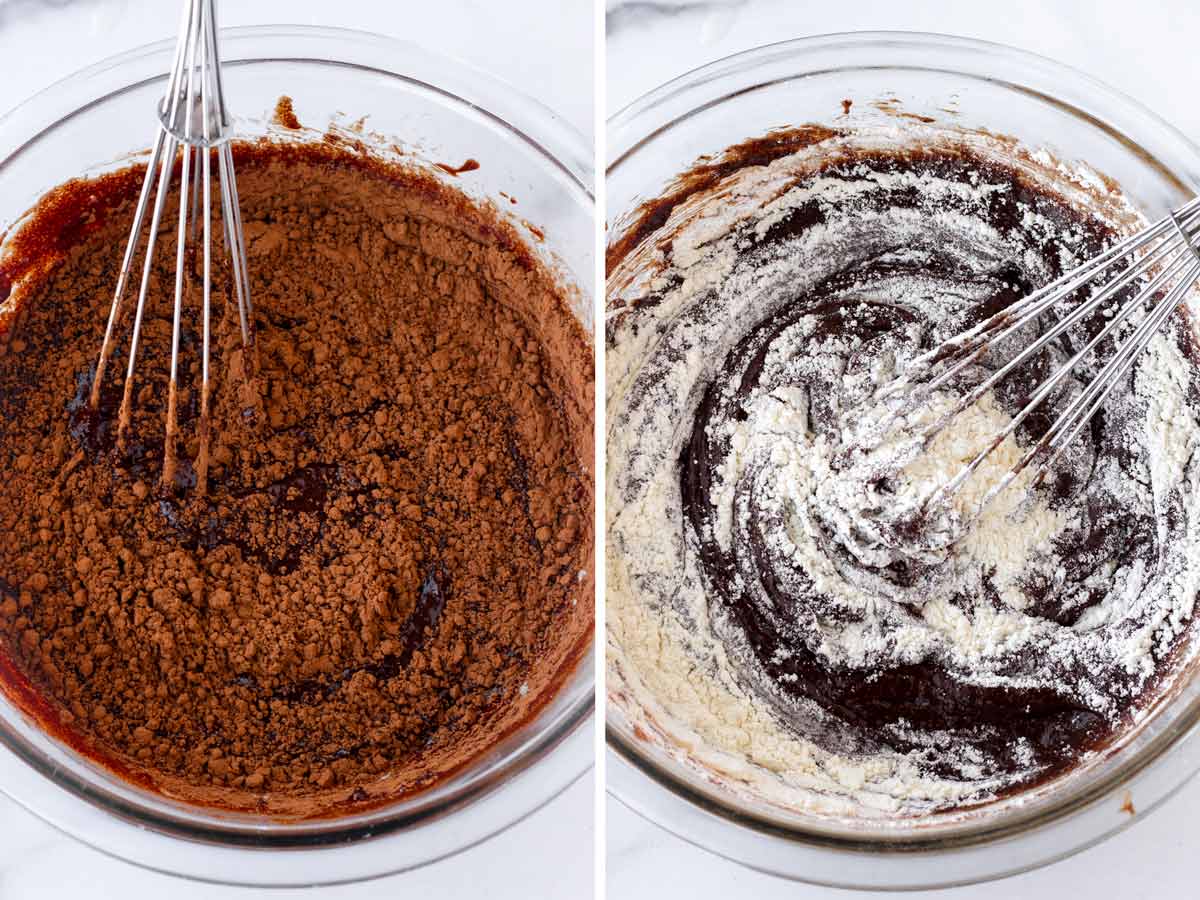
As for the dry ingredients, mix in the unsweetened cocoa powder and salt until the batter is smooth. Fold in the flour, scraping the sides of the bowl, until fully combined.
Step 4 | Fold in chocolate chips and bake
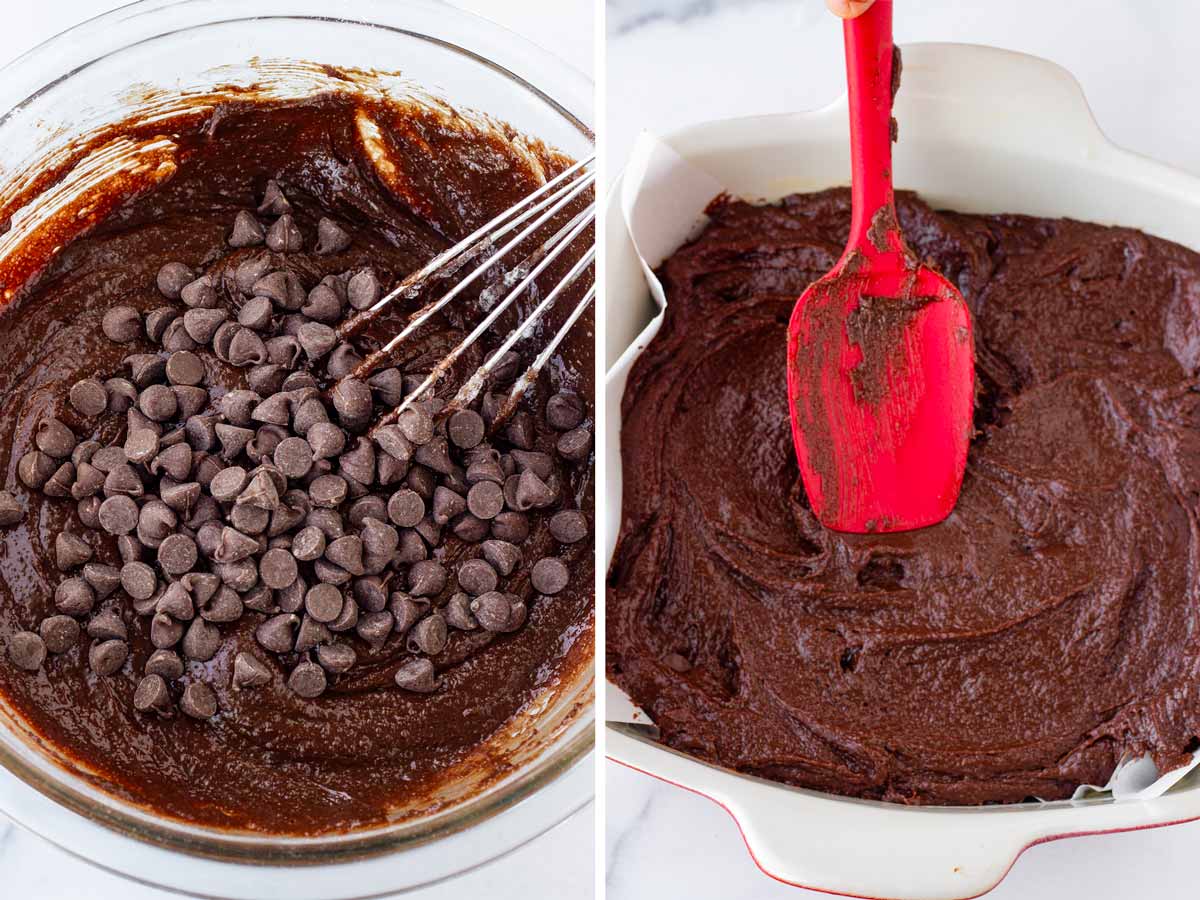
Now, the finishing touch! Stir in the chocolate chips into the batter evenly. No need to melt them first. Transfer the batter into the prepared square pan. Use a spatula to smooth out the surface.
Bake in a preheated oven for 38 to 40 minutes, until a toothpick inserted in the center comes out mostly clean. A few moist chocolate crumbs are okay, especially since they will be moist and a bit fudgy in the middle.
Step 5 | Cool and slice
Once out of the oven, use the overhanging parchment paper to lift them out of the pan. Let cool on a wire rack and then cut into squares. And just like that, the perfect brownies are ready!
Make Ahead and Freezing
These brownies can be kept at room temperature for about 5 days when stored in an airtight container. I can’t tell you what a game changer this is during the busy holidays or when I need to get ahead with baking!
Freezing: They can also be kept frozen for up to 3 months, so I say make a couple of batches, cut them up into squares, and keep these on hand for later. Perfect to satisfy those brownie cravings. Wrap in parchment paper and store in freezer-friendly bags. Thaw on the counter before serving.
More Chocolatey Dessert Ideas
Enjoy a square or two of these amazing brownies whenever, or serve with a scoop of your favorite ice cream! You can also try it with my 3-Ingredient Vanilla Milkshake or Homemade Strawberry Milk.
If you have leftovers and need a fun idea, try my Brownie Sundaes!
Looking for more chocolate dessert ideas? Try these!
Recipe FAQs
These brownies need about 38-40 minutes if using an 8×8 inch square pan. Just make sure you bake them at 350 degrees F and in the center rack of the oven. Line with parchment paper so that the edges and bottom don’t get burned.
I like using a ceramic pan because they heat up and retain heat evenly, but aluminum pans work just really well too (sometimes even better than ceramic!). Just make sure to line with parchment paper to prevent burning.
This batch makes up to 9 generous-sized squares. You could get a few more out of it (12-16), if you’re cutting them into smaller pieces. This works especially well if you’re serving them as bite-sized for a larger crowd.
Sure you can! Be sure to use a larger 9×13 inch baking pan to account for extra batter. Check at the 35-minute mark for doneness.
This post was originally published in 2018 and updated in December 2024 to include new photos and information. The original recipe remains the same.
Tips for Success
- It’s all about ratios! I tested the ingredient proportions below to achieve the right brownie texture. So, if possible, follow the measurements as listed.
- Bake in an 8×8 inch pan lined with parchment paper. This pan size creates the right level of thickness. So with 38-40 minute bake time, the exterior will be chewy, the edges a bit cakey, and the center fudgy and moist.
- Make sure no water droplets touch the chocolate when melting, otherwise the chocolate will seize.
- Immediately after the chocolate is melted and still warm, whisk in the sugar until incorporated (the batter may look a bit grainy from the sugar granules, that’s fine). This is what gets you the crackly, shiny brownie top.
- Unsweetened cocoa powder: I’ve used Hershey’s brand and it’s always turned out great. Don’t use Dutch processed chocolate – it’s different.
- For clean edges, use a sharp knife and wipe the blade clean between each slice. You can run the knife under warm water – this will keep the crumbs from sticking to it.
I’d love to hear from you! If you loved my recipe, please consider leaving a 5-star rating and a comment down below. Sign up for my newsletter and follow along on Instagram, Facebook, or Pinterest
Perfect Brownies
Equipment
Ingredients
- 8 ounces semi-sweet baking chocolate bars - roughly chopped
- 8 tablespoons unsalted butter - plus more for greasing pan
- 1 ¼ cups granulated sugar - do not use brown sugar
- 3 large eggs - at room temperature
- 1 teaspoon pure vanilla extract
- ¼ cup unsweetened cocoa powder - do not use Dutch-processed cocoa
- ½ cup all-purpose flour, plus 2 tablespoons
- ½ cup semi-sweet chocolate chips - plus more if desired
- ¼ teaspoon salt
Instructions
- Preheat oven to 350 degrees F. Lightly grease a 8×8 baking pan with butter and line with parchment paper. Make sure to leave overhang on the sides to make it easier to lift later.
- In the microwave oven, melt the chopped chocolate bars and unsalted butter in 30-second intervals, stirring with a rubber spatula each time until the mixture is melted and smooth.
- Immediately after the chocolate is melted and still warm, whisk in the granulated sugar until fully incorporated. The batter may look a bit grainy from the sugar granules, that’s fine.
- Next, whisk in the eggs, one at a time, making sure it is nicely combined before adding the next one. Then, add the vanilla extract.
- Mix in the unsweetened cocoa powder and salt until the batter is smooth.
- Next, fold in the flour, scraping the sides until fully combined. Then, stir in the chocolate chips into the batter.
- Pour the batter into the lined pan and gently smooth out the surface. Bake for 38 to 40 minutes in the center rack of your oven, until set and a toothpick inserted into the center comes out clean. A few moist and chocolatey crumbs are totally fine.
- Let cool for 5 minutes. Then, lift from the pan and let them cool on a wire rack. Cut into squares and enjoy!
Notes
- Follow the recipe measurements and use room-temperature ingredients for the best texture.
- Don’t use Dutch-processed cocoa for this recipe. Use regular unsweetened cocoa powder.
- Pan size: Bake in an 8×8-inch for ideal thickness. Expect chewy edges, a crackly top, and a fudgy center with a 38–40 minute bake time.
- Line the pan with parchment paper to prevent the edges from burning.
- Melting the chocolate: The easiest way is to use the microwave method, which is included in the recipe instructions. You can also use the double-boiler method.
- Double-boiler method: Simmer a few inches of water in a saucepan and place a Pyrex bowl on top. Melt butter and chocolate in the bowl, ensuring no water touches the chocolate to prevent seizing.
- Doubling the recipe: Use a larger 9×13 inch baking pan to account for extra batter. Check at the 35-minute mark for doneness.
- Make ahead and storage: Let them cool completely, slice, and store in an airtight container for up to 5 days.
- Freezing: Wrap in parchment paper and store in freezer-friendly bags.


Laurie says
These were awesome! If I double the recipe, should I use a 9×13 pan??
Tania says
Hi Laurie, I’m glad to hear! If you double the recipe, I’d recommend that you use two 8×8 pans. You can also use two 9×13 pans if you want them to be thinner, but bake them for 35 minutes.
Kailyn says
Also – can these be done in a 9×9 pan? Or 9×13 pan. Will they come out thinner? I’m hoping to make them 1 inch thick at the most
Tania says
Yes, you can! If using a 9×13 or similar size, they will come out thinner, about 1 inch thick. You will also need to reduce the baking time. For a 9×13, I’d say 32-35 minutes bake time or until a toothpick inserted in the middle comes out mostly clean (a few moist crumbs are fine).
Kailyn says
This were so good! If I wanted them a tad more fudgy what would you recommend? Adding powder sugar? Less flour? Milk?
Mariam says
Hello Tania! This is a great recipe, I had tried something similar earlier but the sugar wasn’t melted so I had burnt sugar patches at the base. I think melting it in the hot butter – chocolate mix will make a lot of difference..Thanks
Jayne says
Hi Tania! I just made a batch and they are super chocolatey and really fudge. Almost creamy. Love it! How would you advise on storage? Is room temp of about 30 Celsius ok or do I need to store it in the fridge? Thanks for the awesome recipe!
Tania says
Hi! I’m so sorry about the late reply! Because 30 degrees celsius is quite hot, I’d recommend storing them in the fridge if you can.
Amy says
Is there anyway i can make it less sweet cause i tried making them with less sugar. Lets just say it didn’t turn out well.
Tania says
Hi Amy! Let’s see…you could try using dark chocolate instead of semisweet chocolate. I haven’t tried making it with dark chocolate before, so I’m not sure how it would turn out – it’s just an idea. If you try it, let me know how it turns out!
Sw says
Hi can you bake it in airfryer?
Tania says
Hi! Unfortunately, I haven’t tried this method, so I can’t say for sure.
Ilincozaurus says
Gosh so let me tell you this last month i ‘ve been crving brownies A LOT! And i tried 6 different recipes cause i usually search and go to images and which one looks tastier i make it . And after long scrolling cause none of them satisfyed me. And i found this recipe . GOD is delicious is perfect (almost of course) :))))
sienna says
loved them
TS says
When you lift them of the pan after cooking, do you invert them or just lift them out with the parchment paper and then work the paper off of them?
Tania says
Let them cool down a bit first, and then lift them out with the parchment paper. If you lift them while still hot, they could break apart. The paper should come off very easily.
Ghadeer says
After looking for hours for a good non fudgy brownies, I came across this amazing recipe.. Each and every bite of this delicious brownie taste like HEAVEN! I made very slight amendments: I added only half cup of sugar to match my preference, and I added one teaspoon of powdered coffee! Ps: the longer it cools, the taster it becomes!
TS says
I’m confused why preparing pan with. Butter then inserting parchment paper?
Tania says
Hi TS! It helps to keep the parchment paper in place, but you don’t need to grease the pan if the parchment paper isn’t being stubborn.
Natasha says
Hi… Can i use a 9×13 inch pan for this recipe?
Tania says
Yes! You may need to reduce the baking time though. If using a 9×13 pan, bake for about 30-35 minutes or whenever a toothpick inserted in the middle comes out clean (a few moist crumbles are fine, and make sure not to stick it in a melted chocolate chip).
Mary Russell here says
Totally perfect. I like the extra chocolate boost. I also added a cup of chopped nuts. I am the only one here who likes nut so I ate the whole pan of brownies. A week of pure delight.
Tania says
Hi Mary, so glad to hear you liked it. Thank you for making it! And totally agree with you, I love adding chopped walnuts.
Amber says
Hi can i use those ready-eat semi-sweet chocolate bar instead of cooking chocolate bar?
Tania says
Hi Amber – great question! I haven’t tried making it with a ready-to-eat semi sweet chocolate bars, so I can’t say for sure. However, I think it should be fine as long as it’s semi-sweet chocolate (e.g. not flavored, not milk chocolate bar, etc.) Let me know how it goes and maybe I can try it myself next time!