
These Sea Salt Chocolate Chip Cookies are insanely delicious! I’ve been baking these cookies for years and they never disappoint.
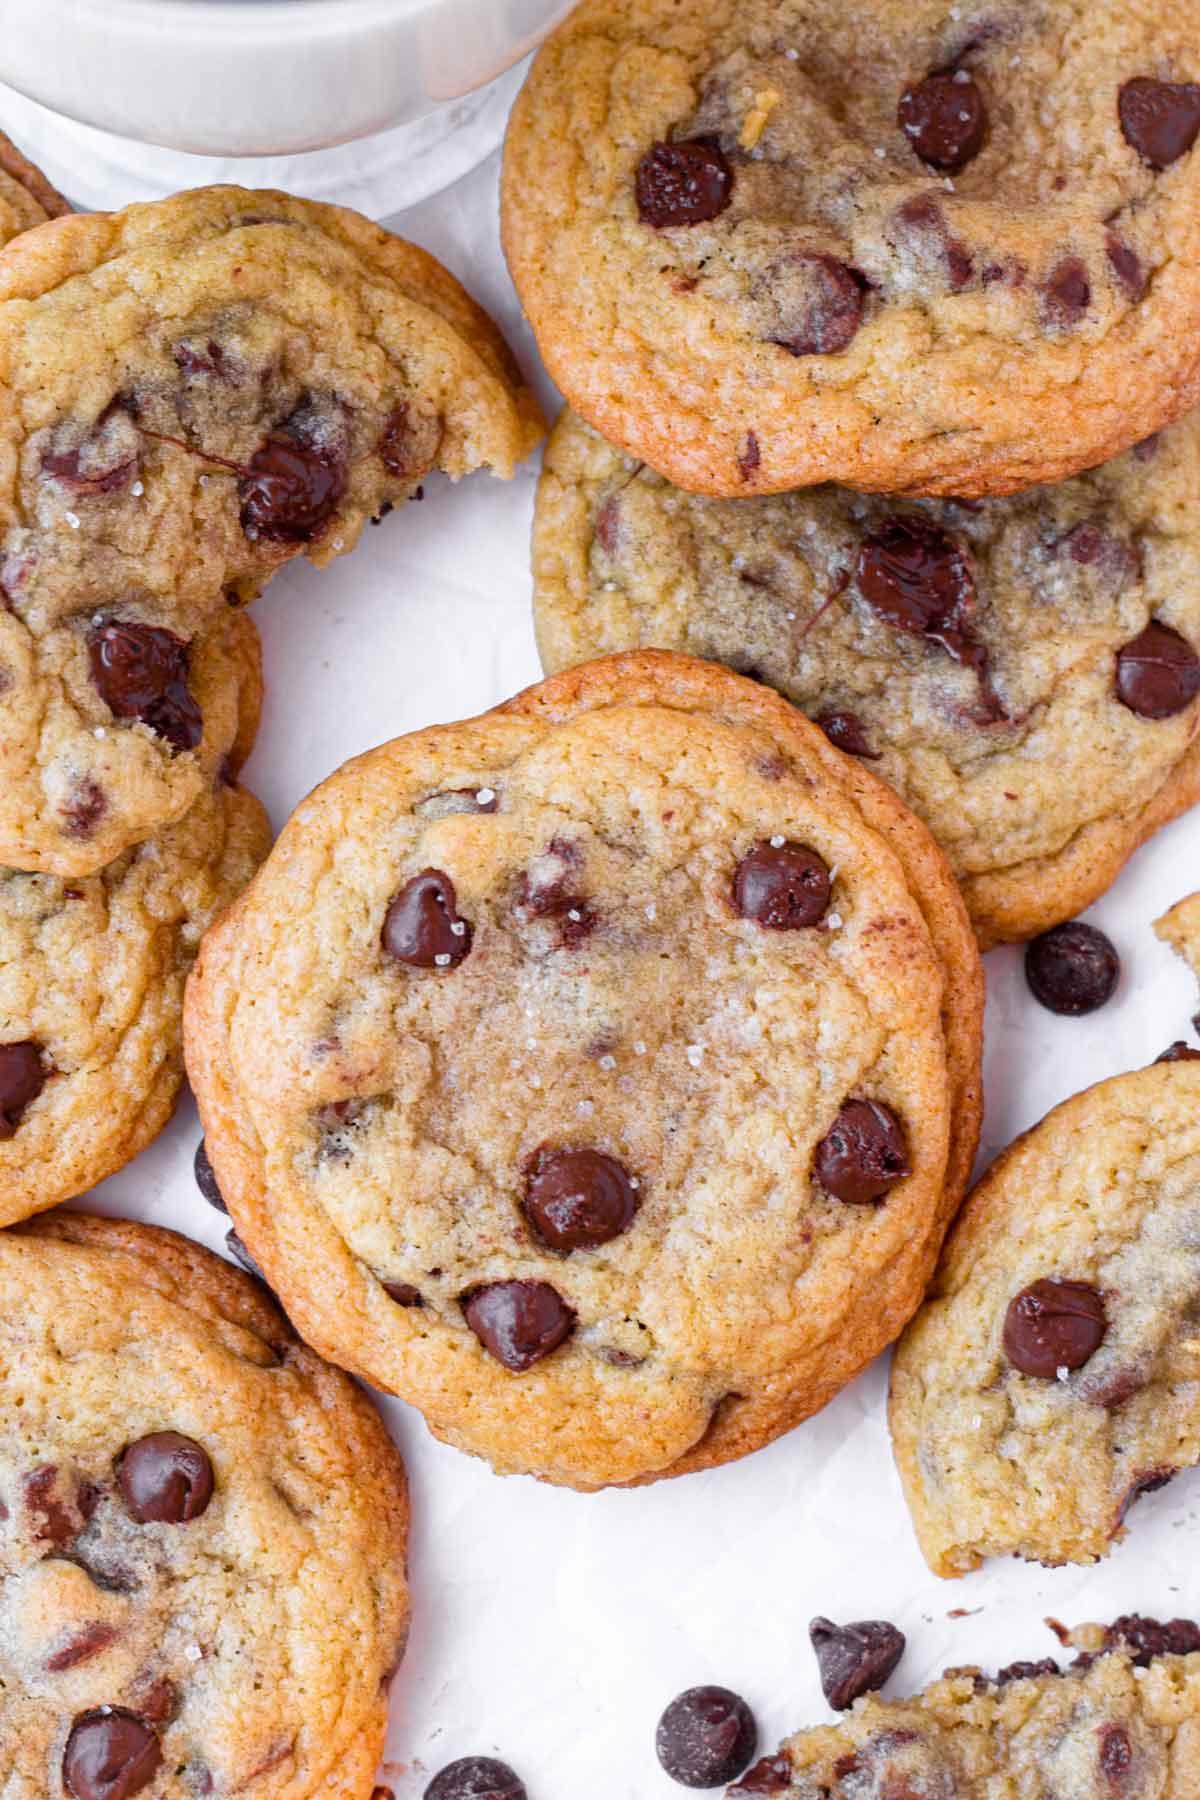
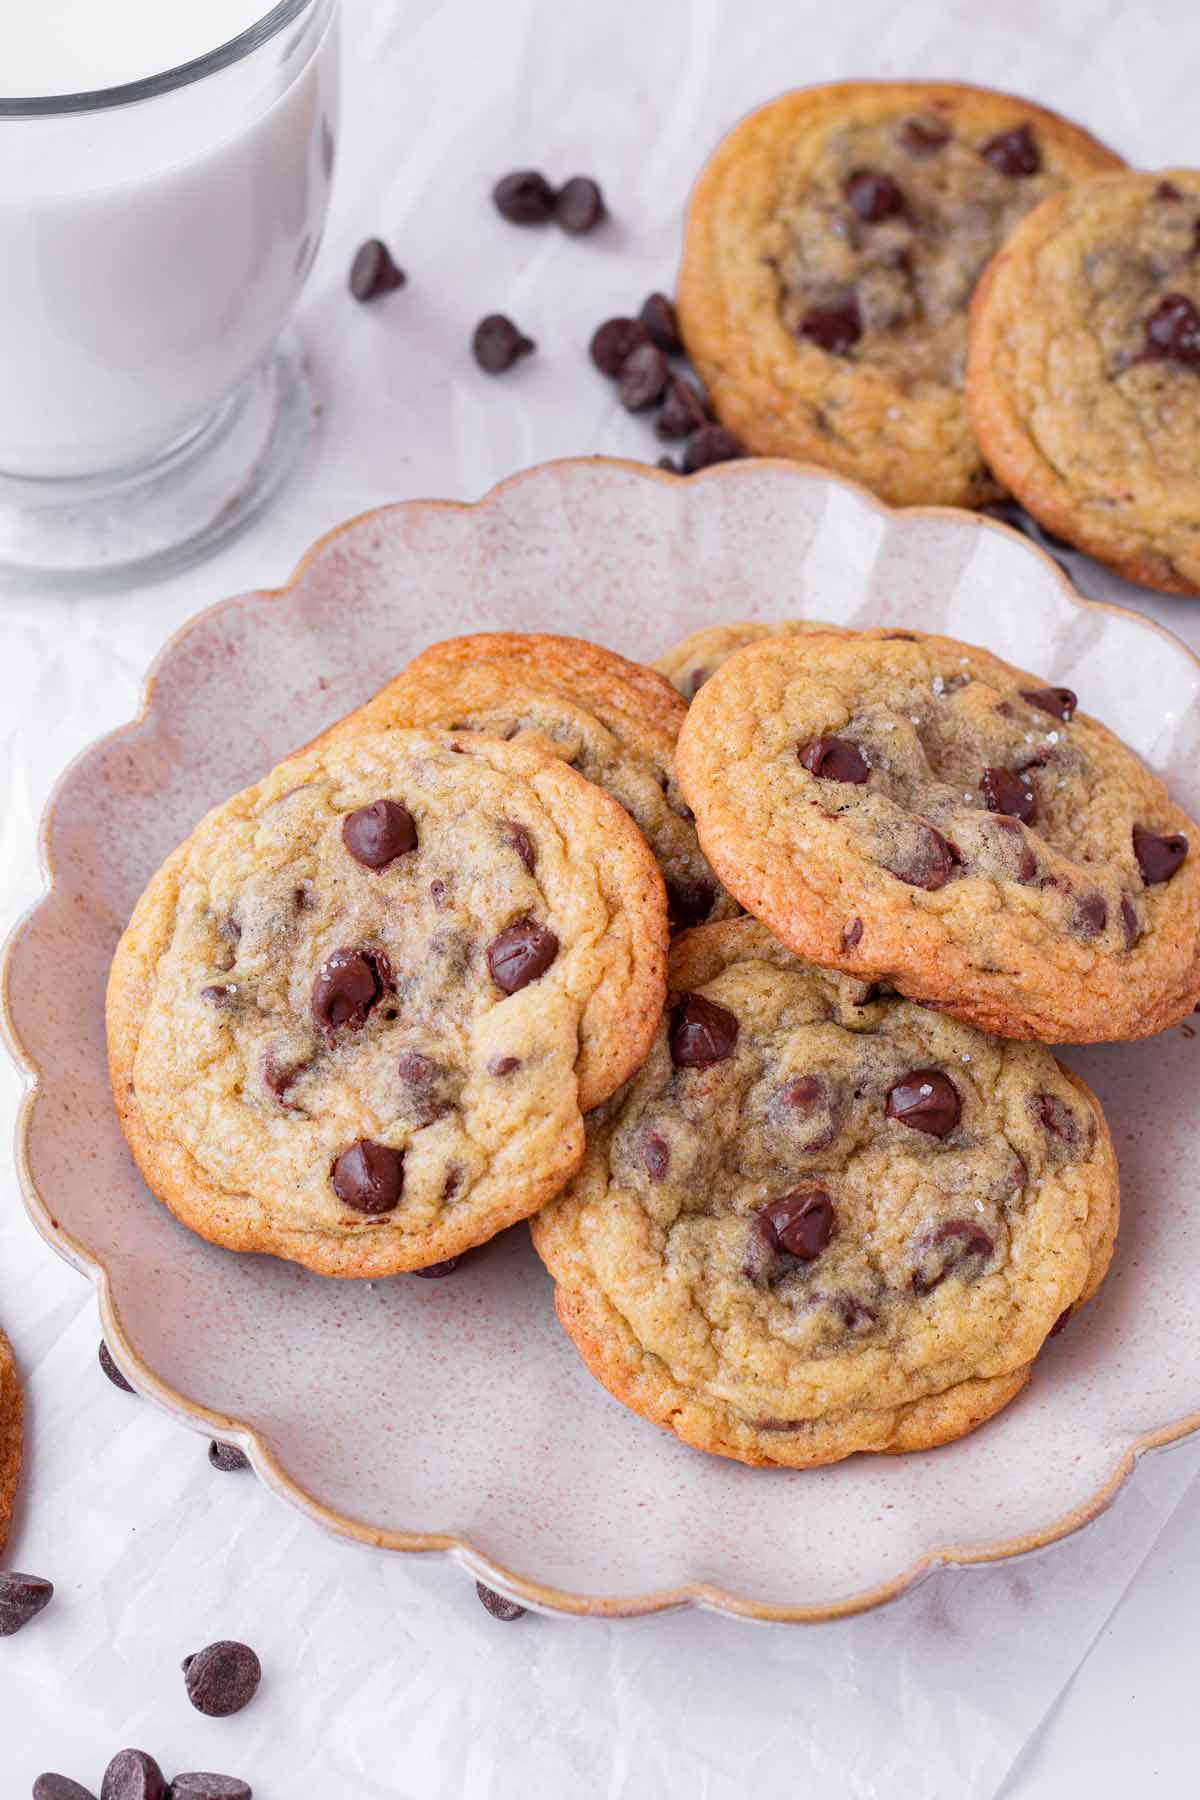
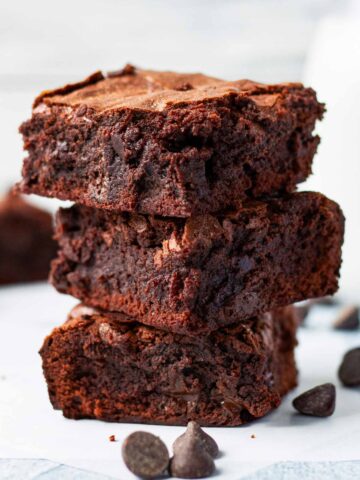
They are soft and chewy with golden brown and slightly crisp edges. Loaded with decadent chocolate and finished with a sprinkle of sea salt.
These cookies are make-ahead and freezer friendly, so make a big batch and enjoy them whenever you have a craving. Hands down my go-to everyday chocolate chip cookies!
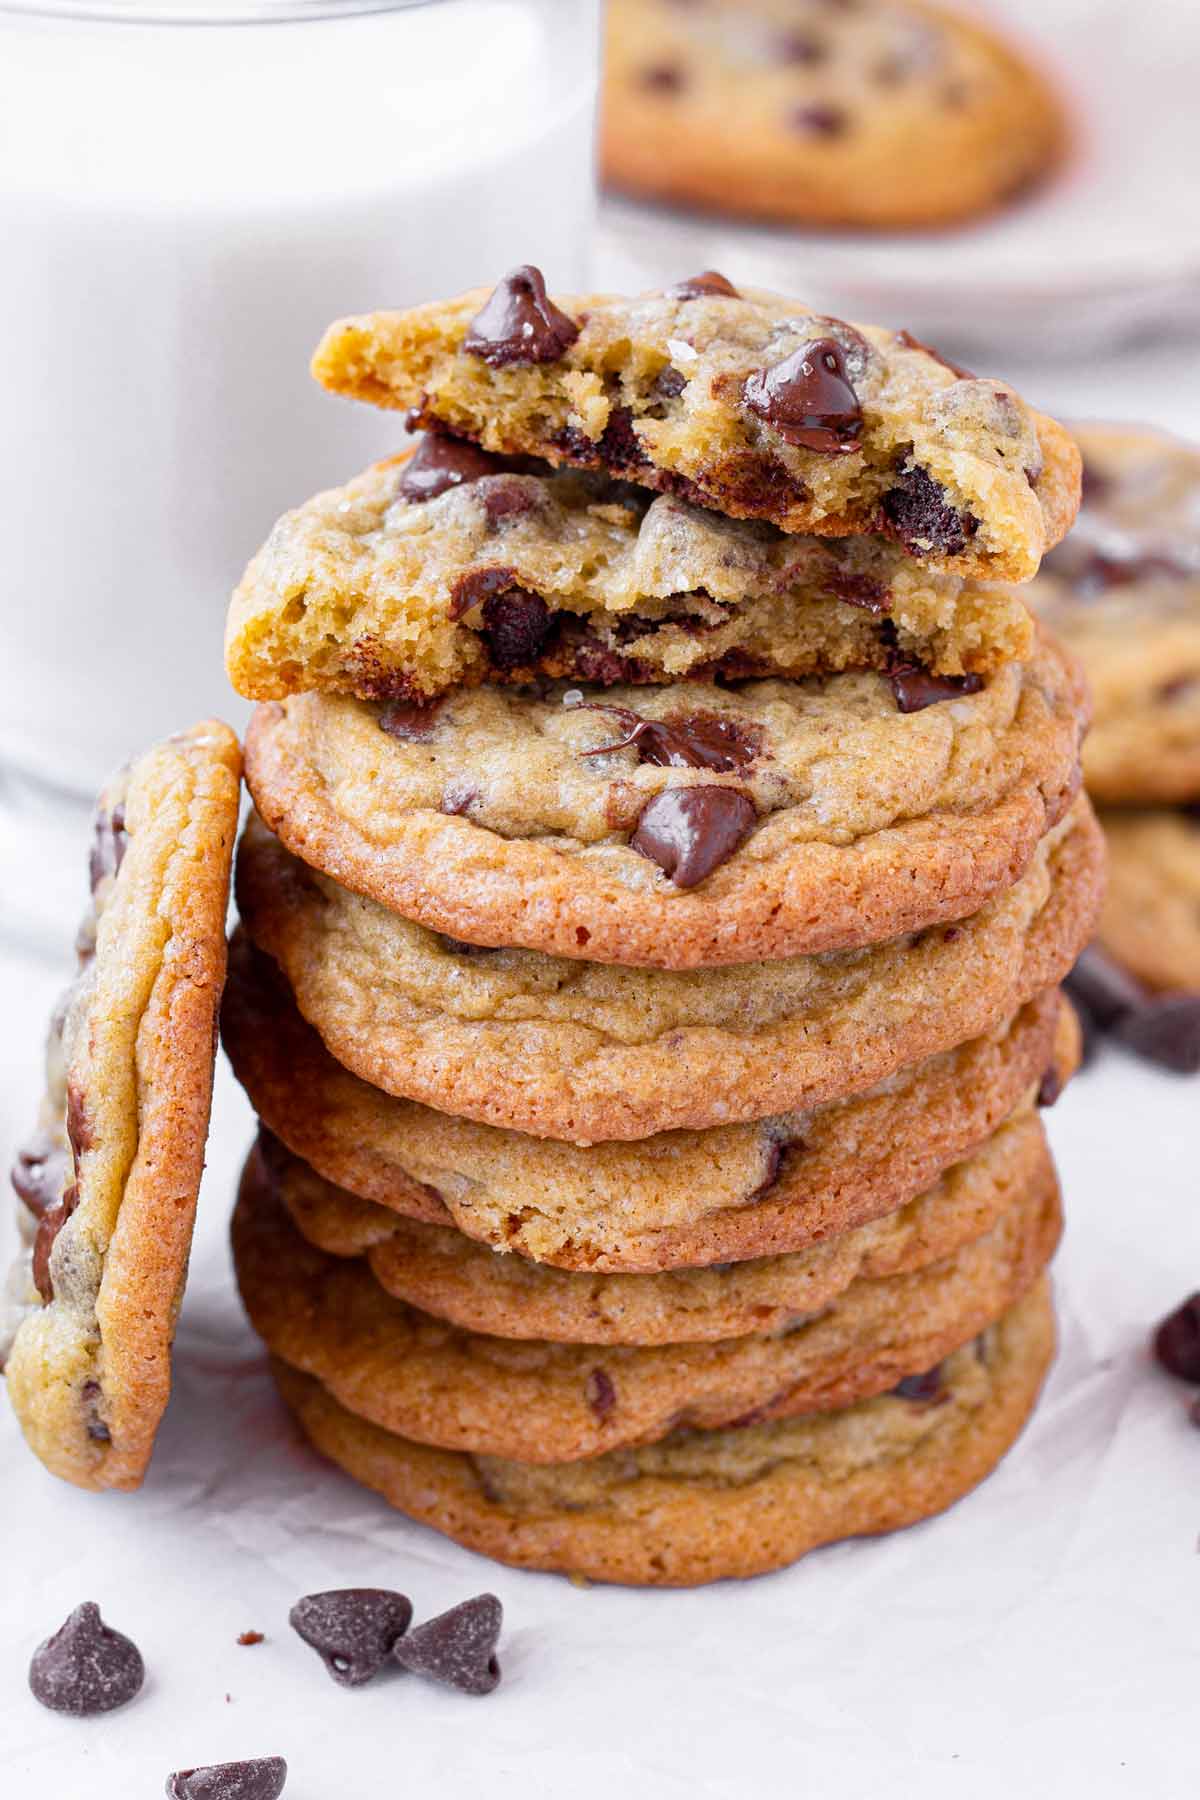
Words can’t fully express how much I love these sea salt chocolate chip cookies. They are soft and a bit chewy in the center, with beautiful golden brown and crisp edges. I love it when they are still warm, with all that melty chocolate!
It’s still early in December, and I’ve already baked multiple batches of these insanely delicious cookies, along with my oatmeal raisin cookies and pistachio shortbread cookies. They are THAT good! So perfect for holiday parties.
Today I’m sharing ALL my tips and tricks to make the best salted chocolate chip cookies ever. I promise, these will be gone in a matter of seconds!
Why we LOVE these sea salt chocolate chip cookies:
- Perfect texture: These cookies have it all! Soft, chewy, and just slightly crisp all in one. They are rich and so delightful.
- Extra chocolatey: We don’t skimp on the chocolate here!
- Easy to make: It’s a pretty simple and straightforward process. Nothing too complicated or fancy here.
- Make-ahead and freezer friendly
If you’re like me and love baking with chocolate chips, try this Chocolate Chip Pumpkin Bread and Skillet Chocolate Chip Cookie. Or bake these brookies and brownies, which have chocolate chips hidden inside!
Looking for easy no-bake holiday treats? Chocolate Covered Pretzel Rods, Christmas Truffles, or Pistachio Almond Chocolate Bark.
Jump to:
Tips for Baking the Perfect Chocolate Cookies
Before we go into the specifics of the recipe, I wanted to start by sharing a compilation of cookie wisdom I’ve gathered over the last few years. Follow these guidelines and you’ll be on your way to make the BEST sea salt chocolate chip cookies ever!
- Ratios matter. Texture depends on the ratio between the flour, butter, granulated sugar, and brown sugar. Try not to adjust the quantities listed for these ingredients.
- Refrigerating the dough is KEY! Chilled dough is essential for texture and shape. More on this below.
- Use softened butter: The butter needs to be soft enough so all the ingredients can be incorporated easily.
- Use ingredients at room temperature: This will help the ingredients combine a lot more easily and evenly mixed dough.
- Measure the flour properly: Spooned into a measuring cup and leveled. Too much or too little flour can affect texture.
- Invest in a good cookie scoop so you can make even-sized cookies. For 3 inch round cookies, I use a medium 1.5 tablespoon capacity cookie scoop.
Why Chill The Dough Before Baking
When it comes to cookies, refrigerating the dough prior to baking is crucial to making beautiful, thick, and round cookies. Unrefrigerated cookie dough will result in flat and shapeless cookies.
Here’s why:
- It slows down how fast the dough melts and spreads in the oven because the fat component (butter) is more solidified and colder to start with.
- During the chilling process, the sugar absorbs extra moisture, which helps the cookies spread less.
- As a bonus, the longer the dough “rests,” the more delicious the cookies. During this time, the flavors have a chance to develop fully.
Chill the dough for at least 2 hours or up to 3 days. You can also freeze it for up to 3 months.
Ingredient Notes
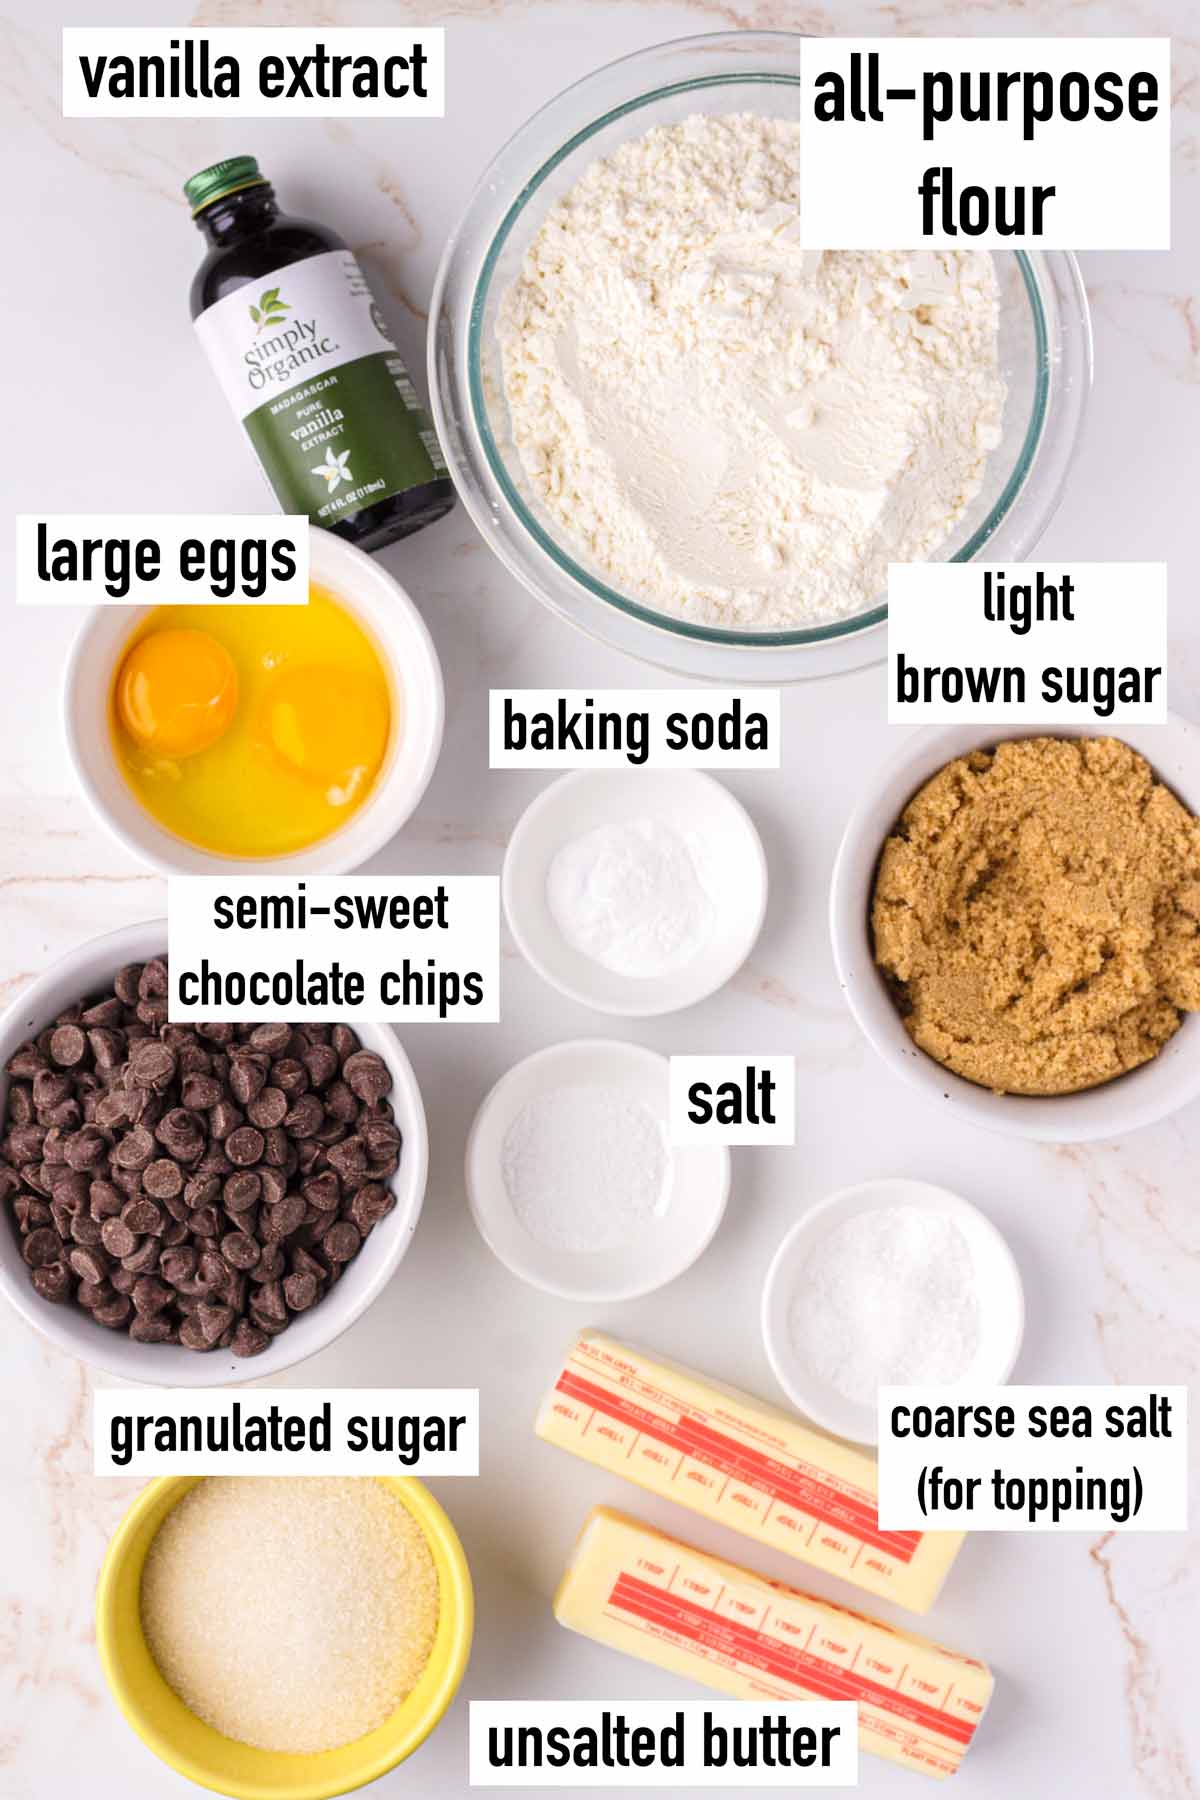
Making sea salt chocolate chip cookies requires basic baking ingredients that you already have in your pantry. Below are a few helpful notes on the ingredients I used. The full ingredient quantity list can be found in the recipe card down below, per usual.
- Flour: I used all-purpose flour for this recipe.
- Baking soda: The leavener used here to give the cookies a light texture and structure.
- Salt: I like to use Kosher salt for baking.
- Unsalted butter: Softened at room temperature.
- Brown sugar: Aside from sweetening the cookies, it helps with that soft and chewy texture.
- Granulated sugar: We don’t use as much granulated sugar as brown sugar, but it’s still necessary for texture. It will help the cookies spread properly and give it structure.
- Vanilla extract: Adds and accentuates flavors.
- Large eggs: At room temperature.
- Semi-sweet chocolate chips: You can also use chocolate chunks.
- Coarse or flaky sea salt for sprinkling at the end.
Step-by-Step Instructions
Here’s an overview on how to make the perfect sea salt chocolate chip cookies at home! I usually make the dough the day before or freeze it for later.
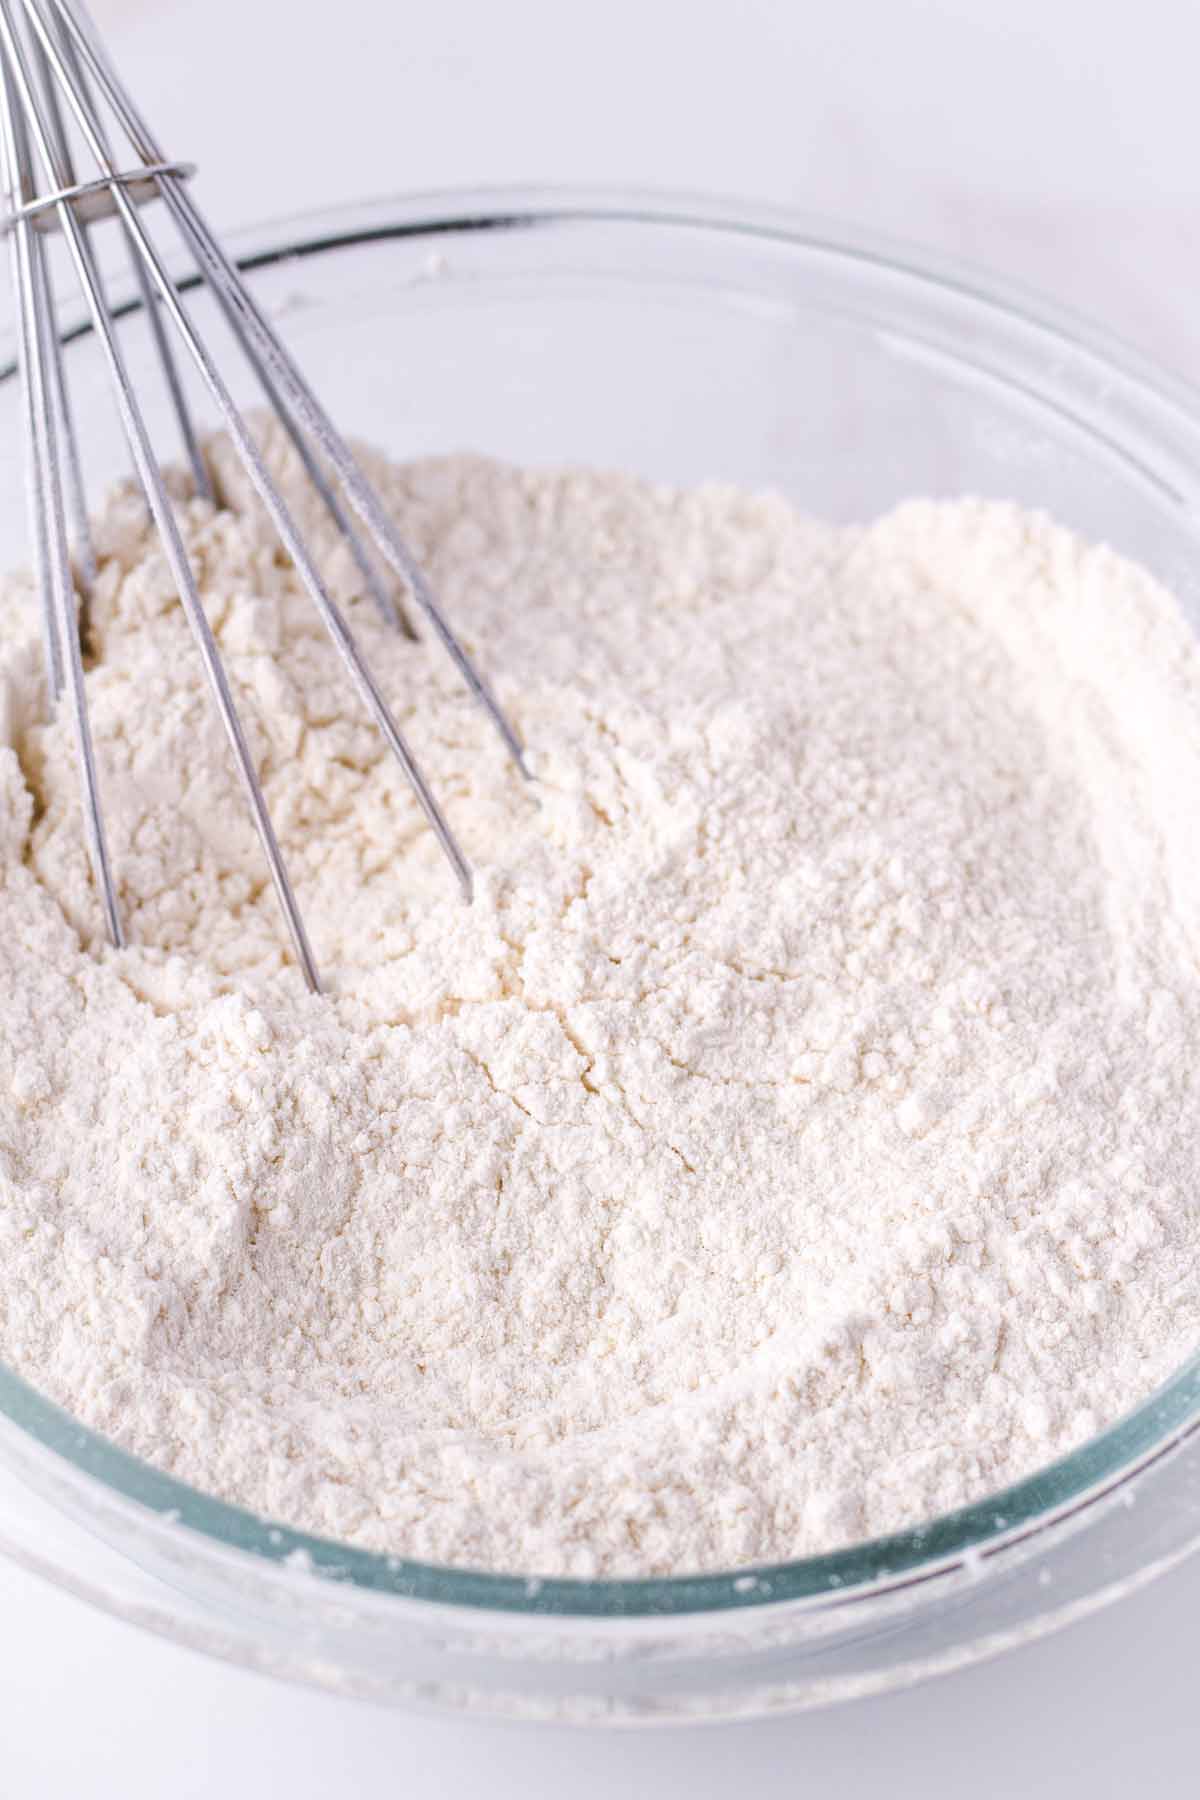
Step 1 | Whisk dry ingredients
In a bowl, whisk the flour, baking soda, and salt until evenly combined. Set aside.
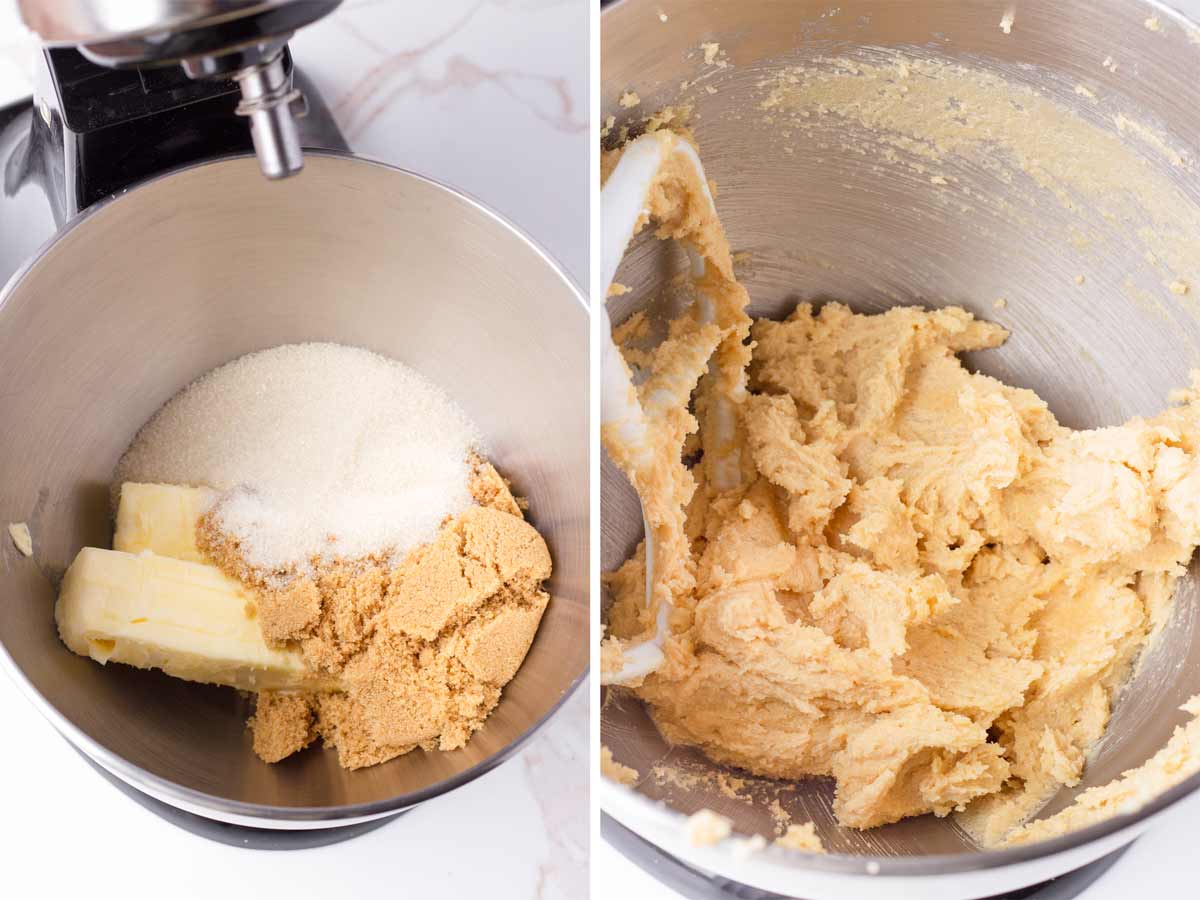
Step 2 | Cream butter and sugar
In a stand mixer with the paddle attachment or using a handheld mixer, beat the granulated sugar, brown sugar, and softened butter over medium-high speed until light and fluffy, about 2 to 3 minutes. Scrape the sides of the bowl as needed. Do NOT over-beat, as this could introduce too much air and cause the cookies to collapse in the oven.
Softened butter: When you press it with a finger, it should give easily but still hold its shape very well. It should not be too hard or runny at all. If you forgot to take the butter out to soften, microwave, 5 to 10 seconds, until softened. It should NOT be melted at all.
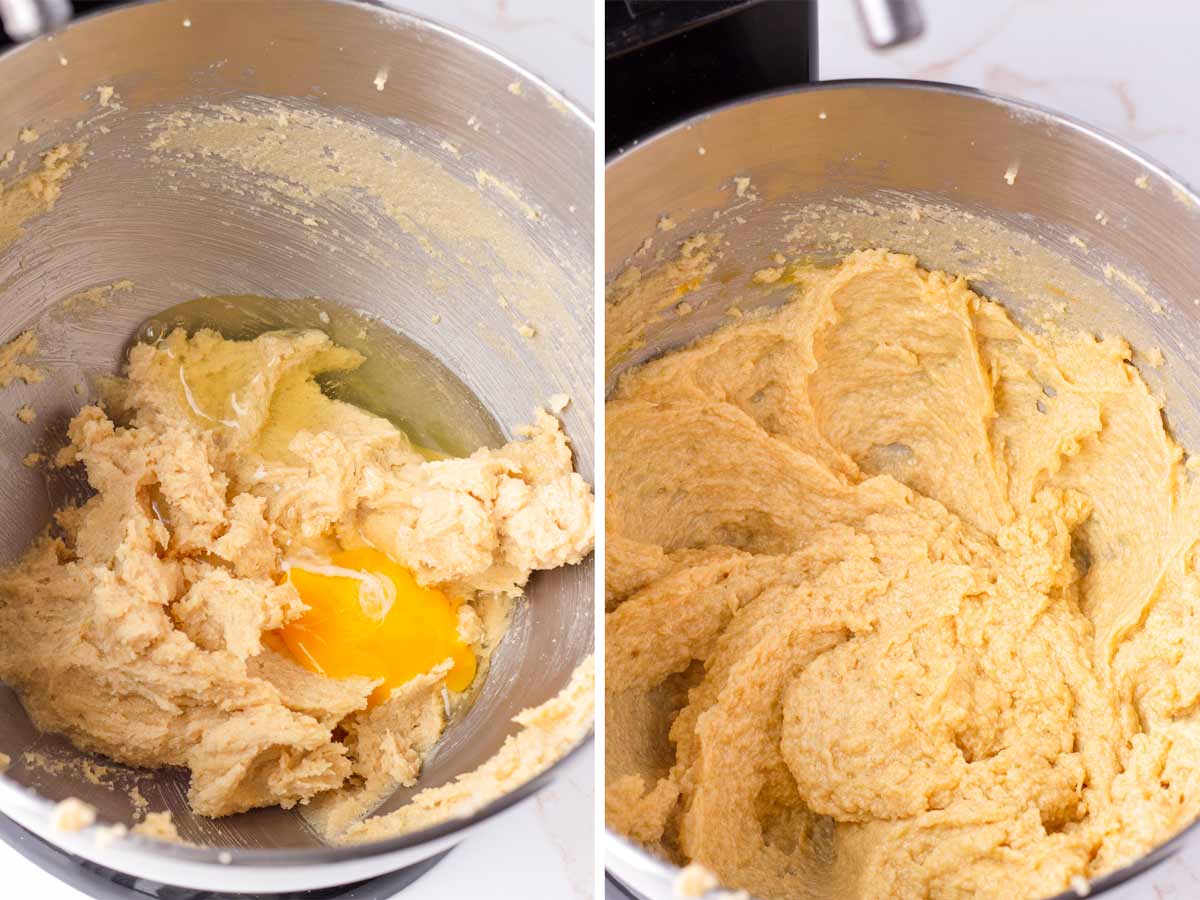
Step 3 | Add in eggs and vanilla
To the creamed sugar and butter, mix in the eggs (one at a time) and vanilla extract until evenly combined.
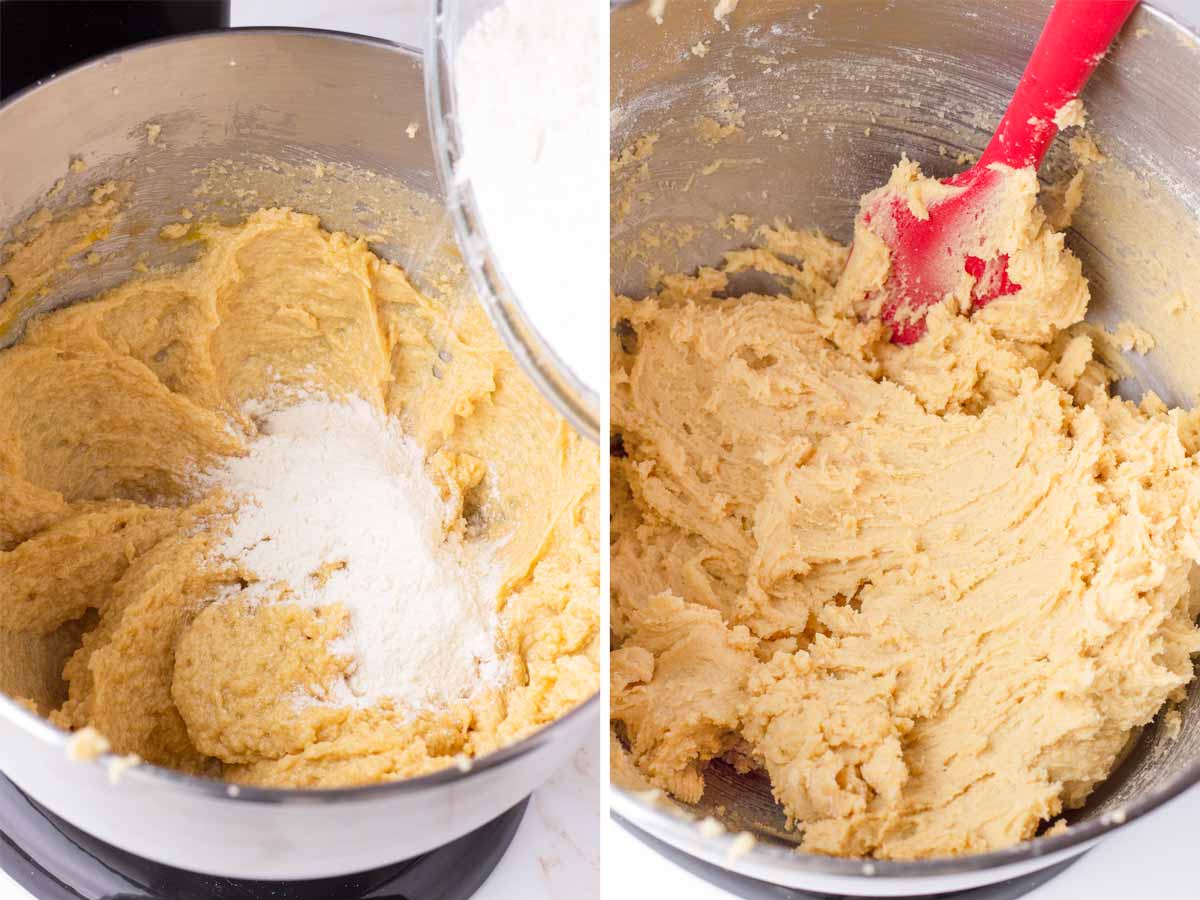
Step 4 | Mix in the dry ingredients
Gradually add the dry ingredients and mix over medium-low speed. The dough should be thick, sticky, and moist.
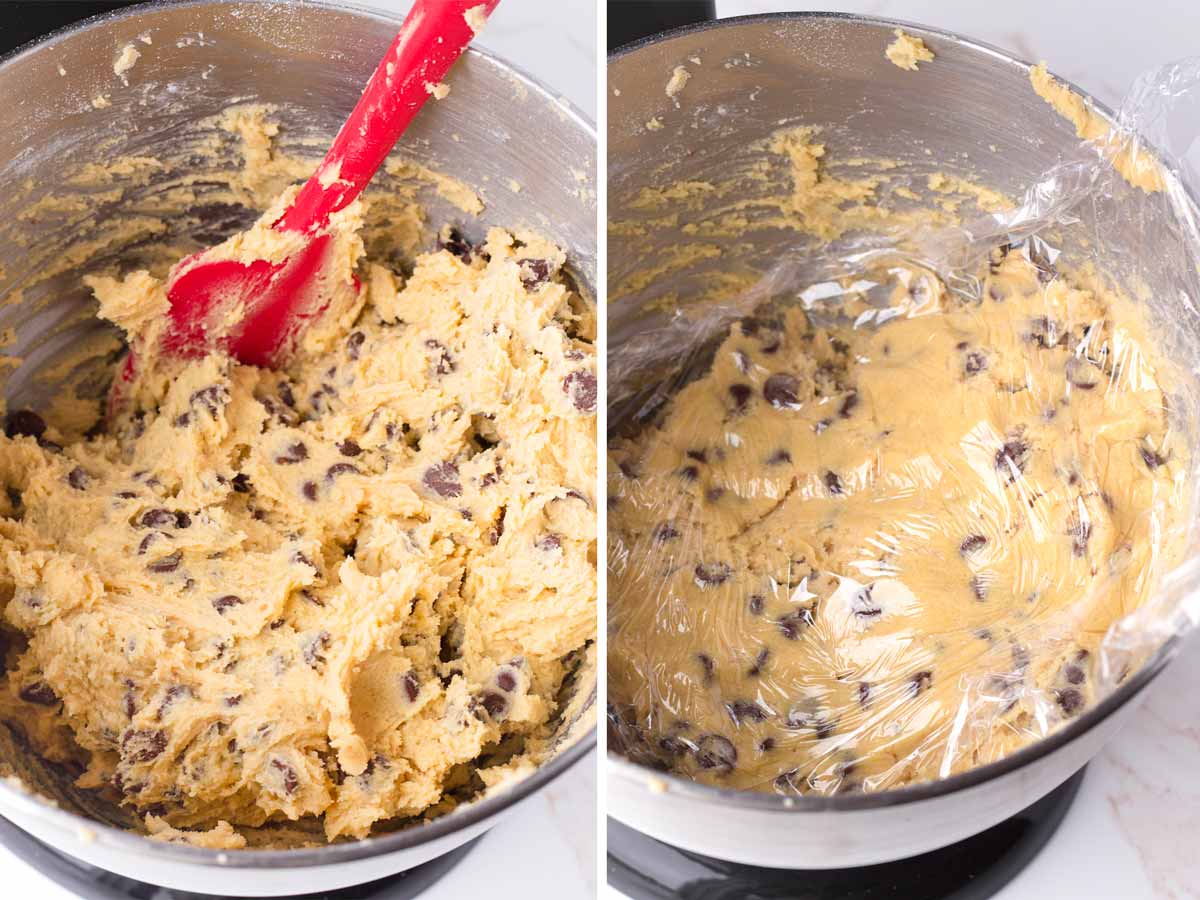
Step 5 | Fold in the chocolate chips and refrigerate
Fold in the chocolate chips over low speed or using a rubber spatula until evenly combined. Cover the dough with plastic wrap, making sure that the plastic is touching the dough so the surface doesn’t dry out. Refrigerate for at least 2 hours or up to 3 days.
Step 6 | Scoop dough and bake
Preheat oven to 350 degrees F. After the dough has chilled, take it out of the fridge and let it sit on the counter for about 15 minutes so it’s not so hard.
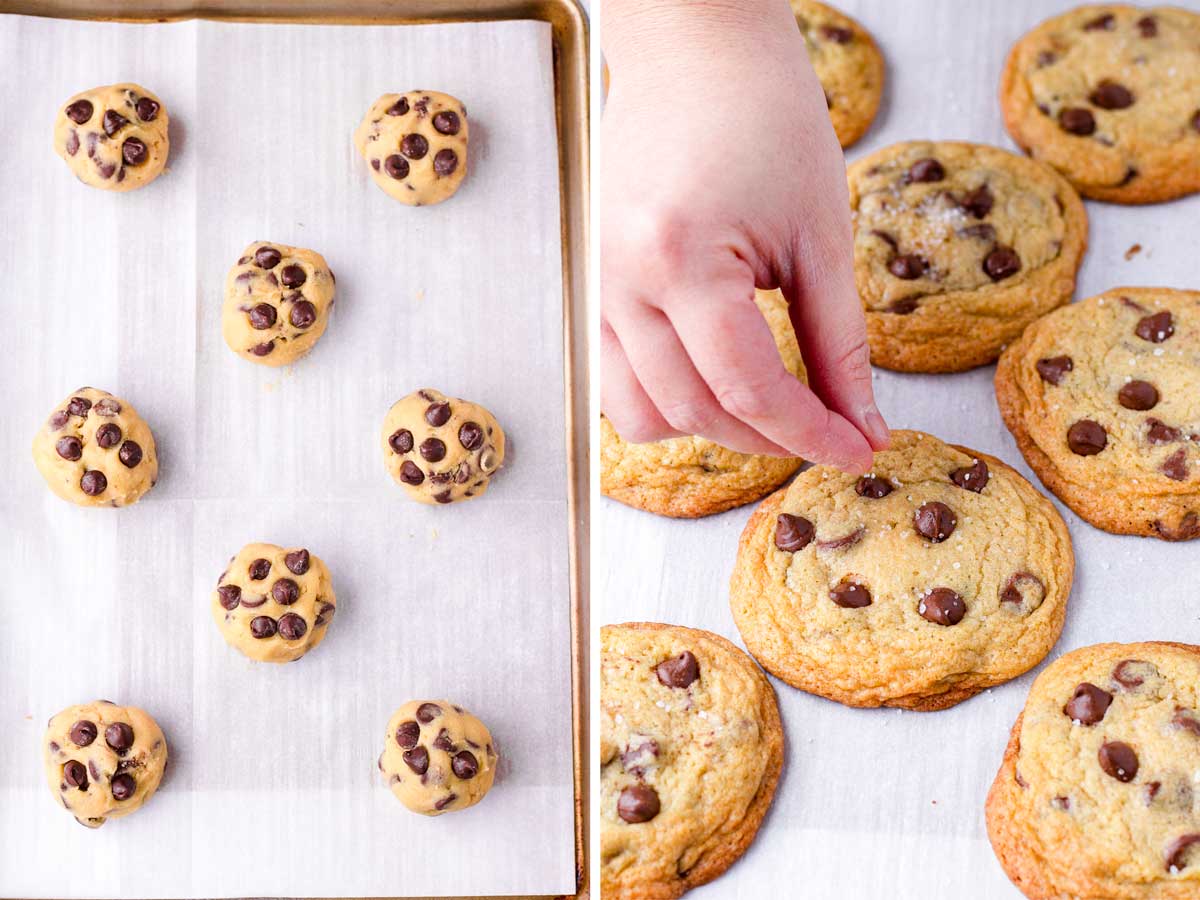
Using a medium cookie scoop (1.5 tablespoons capacity), scoop out the dough and shape into balls. Arrange about 3 inches apart in a sheet pan lined with parchment paper. Press a few extra chocolate chips into the dough. Bake for 10 to 11 minutes in the middle rack, until the edges are slightly golden brown.
Use parchment paper: Without it, the bottoms will turn brown too quickly and burn. I’d also recommend using light-colored aluminum sheet pans too, as dark colored pans tend to transmit more heat.
Prefer Extra Thick Cookies?
If you like your sea salt chocolate chip cookies to be extra thick, there are 2 things you can do.
First, make tall mounds, almost oval-shaped, rather than round cookie dough balls. Then, freeze the cookie dough mounds (on the sheet pan) for 10 to 15 minutes before baking.
How to Make Perfectly Round Cookies
If you want to make (almost) perfectly round sea salt chocolate chip cookies, here’s a cool trick:
While the cookies are still hot, run a round cookie cutter around each cookie in a swirling motion to reshape and mold the edges as needed. Use a cookie cutter that’s slightly bigger than the cookie.
Make Ahead and Freezing
There are several ways you can make these cookies in advance:
- Make the dough as directed and refrigerate for up to 3 days. When ready to bake, let it sit at room temperature for 15 minutes so it’s easier to scoop.
- Baked sea salt chocolate chip cookies will stay fresh for about 5 days when stored in an airtight container at room temperature.
- Freeze the dough in a resealable freezer-friendly bag for up to 3 months. Thaw in the fridge.
- Shape the cookie dough balls and arrange on a sheet pan. Freeze until they are hard (so they don’t stick together) and then transfer to a resealable freezer-friendly bag. You can bake from frozen, just add an extra 2 or 3 minutes to the baking time. I love doing this because I can basically bake a single cookie whenever I have a craving.
Recipe FAQs
When you press it with a finger, it should give easily but still hold its shape very well. It should not be too hard or runny. If you forgot to take the butter out to soften, microwave, 5 to 10 seconds until softened. It should NOT be melted at all.
Yes. Without parchment paper, the cookie bottoms could brown too quickly and burn. I’d also recommend using light-colored sheet pans as they transmit less heat than dark pans. Do not grease the pans.
Right after they come out of the oven so it sticks to the cookie.
Yes! Add an extra 2-3 minutes to the baking time until the edges are slightly golden brown.
Yes, absolutely! Halve it, double it, triple it, etc.

This recipe was published in 2019 and updated in December 2022 to include new photos and information, plus a few recipe modifications.
Tips for Success
- Chilling the dough is super important. Unchilled dough will result in flat and shapeless cookies.
- Don’t overbeat the butter and sugar. This can incorporate too much air into the dough, and so when the cookies bake they may deflate.
- If you’re rotating sheet pans between batches, I’d recommend running the pan through cold water and drying it off with a mat. This way, it will be cold and ready for the next batch of cookies.
- Don’t overbake. The cookies will look a bit undone in the center. Look for slightly golden brown edges and barely browned spots in the middle. They will continue cooking a bit when cooling.
- Use parchment paper or a silicone baking mat, otherwise the cookie bottoms may brown too fast and burn.
- If possible, use light-colored aluminum sheet pans, as dark pans transmit more heat and can sometimes cause the cookie bottoms to overbake.
I’d love to hear from you! If you loved my recipe, please consider leaving a 5-star rating and a comment down below. Sign up for my newsletter and follow along on Instagram, Facebook, or Pinterest
Sea Salt Chocolate Chip Cookies
Equipment
- Handheld electric mixer if not using hand mixer
Ingredients
- 2 ½ cups all-purpose flour
- 1 teaspoon baking soda
- ½ teaspoon salt - preferably Kosher salt
- 1 cup unsalted butter, SOFTENED at room temperature - equiv to 2 standard sticks
- ½ cup granulated sugar
- 1 cup light brown sugar, packed
- 2 large eggs - at room temperature
- 1 ½ teaspoons vanilla extract
- 2 ½ cups semi-sweet chocolate chips, plus more for topping
- Coarse or flaky sea salt for sprinkling
Instructions
- Dry ingredients: In a bowl, whisk the flour, baking soda, and ½ teaspoon salt until evenly combined. Set aside.
- In a stand mixer with the paddle attachment or using a handheld mixer, beat the softened butter, granulated sugar, and brown sugar on medium-high speed until light and fluffy, about 2 to 3 minutes, scraping the sides of the bowl as needed. Tip: Don’t overbeat, as this could introduce excess air and cause the cookies to deflate in the oven.
- Reduce speed to medium. To the butter and sugar mixture, mix in the eggs, one at a time. Add the vanilla extract and mix until evenly combined.
- Gradually, add the dry ingredients mixture and mix until combined and no pockets of flour remain. Then, stir in the chocolate chips until just combined. Do not overmix. The dough should be sticky and moist.
- Cover the dough with plastic wrap, making sure that the plastic is touching the dough. Refrigerate for at least 2 hours or up to 3 days. Note: The dough has to refrigerate. Unchilled dough can cause flat and shapeless cookies.
- Preheat oven to 350 degrees F. Remove dough from the fridge and let it sit for 15 minutes on the counter so it’s not so hard and easier to scoop.
- Meanwhile, line your sheet pans with parchment paper. Tip: Without parchment paper, the cookies bottoms will turn brown too quickly and overbake. I’d also recommend using light-colored aluminum sheet pans.
- Using a medium cookie scoop (1.5 tablespoon capacity), scoop out the dough and shape into balls. Arrange 3 inches apart on the sheet pan. Press a few extra chocolate chips into the cookie dough balls so they look prettier.
- Bake for 11-12 minutes in the middle rack or until the edges are slightly golden brown (also look for a few brown spots in the middle). Bake in multiple batches. They may look a bit underdone but will continue to cook and set with the residual heat.
- As soon as they come out of the oven, sprinkle with some sea salt on top. Let cool for about 5 minutes and then transfer to a wire cooling rack to cool completely. Enjoy!
Notes
- It’s super important to chill the dough for at least 2 hours. Unchilled dough will result in flat and shapeless cookies.
- Softened butter: When you press it with a finger, it should give easily but still hold its shape very well. It should not be too hard or runny. If you forgot to soften it, put it in the microwave for 5 seconds at a time, until just softened. It should NOT be melted at all.
- Use parchment paper or a silicone baking mat, otherwise the cookie bottoms may brown too fast and burn. Do NOT grease the pan. I’d also recommend light-colored aluminum sheet pans, as dark pans transmit more heat.
- How to get perfectly round cookies: While the cookies are still hot, run a round cookie cutter around each cookie in a swirling motion to reshape and mold the edges as needed. Use a cookie cutter that’s slightly bigger than the cookie.
- Storage: Store in an airtight container at room temperature for up to 5 days.
- Make-ahead: The dough can be made and refrigerated up to 3 days in advance. Prior to using, let it sit at room temperature for 15 minutes so it’s easier to scoop.
- Freezing: Freeze the dough for up to 3 months and thaw in the fridge prior to using. You can also freeze shaped cookie dough balls and bake from frozen (add an extra 2-3 minutes into the baking time).
- Do not adjust the ratios between brown sugar and granulated sugar, as this can affect texture.
- Chocolate chips: chocolate chunks.


Stacy says
Thank you so much for sharing this recipe!! Baker I am NOT, but I am a decent recipe follower. Your notes were SUPER helpful as well. They came out pretty darn good my first try, and they were a hit with my neighbors.
Hands down the best cookies EVER. It’s all about the mix in texture between the crispy edges and the soft and chewy inside….